
This tutorial proposes a dual-region disaster recovery and business continuity strategy using Dataproc Metastore. The tutorial employs dual-region buckets for storing both Hive datasets and Hive metadata exports.
Dataproc Metastore is a fully-managed, highly-available, auto-scaled, auto-healing, OSS-native metastore service that greatly simplifies technical metadata management. Our managed service is based on Apache Hive Metastore and serves as a critical component towards enterprise data lakes.
This tutorial is designed for Google Cloud customers who require high availability for their Hive data and metadata. It uses Cloud Storage for storage, Dataproc for computing, and Dataproc Metastore (DPMS), a fully managed Hive Metastore service on Google Cloud. The tutorial also features two different ways of orchestrating failovers: one uses Cloud Run and Cloud Scheduler, the other uses Cloud Composer.
The dual-region approach used in the tutorial has advantages and disadvantages:
Advantages
- Dual-region buckets are geo-redundant.
- Dual-region buckets have a 99.95% availability SLA, compared to the 99.9% availability of single-region buckets.
- Dual-region buckets have optimized performance in two regions, whereas single-region buckets don't perform as well when working with resources in other regions.
Disadvantages
- Dual-region bucket writes are not immediately replicated to both regions.
- Dual-region buckets have higher storage costs than single-region buckets.
Reference architecture
The following architectural diagrams show the components that you use in this tutorial. In both diagrams, the large red X indicates the failure of the primary region:
 Figure 1: Using Cloud Run and Cloud Scheduler
 Figure 2: Using Cloud Composer
The solution's components and their relationships are:
- Two Cloud Storage dual-region buckets: You create one bucket for the Hive data, and one bucket for the periodic backups of Hive metadata. Create both dual-region buckets such that they use the same regions as the Hadoop clusters that access the data.
- A Hive metastore using DPMS: You create this Hive metastore in your primary region (region A). The metastore configuration points to your Hive data bucket. A Hadoop cluster using Dataproc must be in the same region as the DPMS instance to which it is attached.
- A second DPMS instance: You create a second DPMS instance in your
standby region (region B) to prepare for a region-wide failure. You then
import the most recent
hive.sqlexport file from your export bucket into your standby DPMS. You also create a Dataproc cluster in your standby region and attach it to your standby DPMS instance. Lastly, in a disaster recovery scenario, you redirect your client applications from your Dataproc cluster in region A to your Dataproc cluster in region B. A Cloud Run deployment: You create a Cloud Run deployment in region A that periodically exports the DPMS metadata into a metadata backup bucket using Cloud Scheduler (as shown in Figure 1). The export takes the form of a SQL file that contains a full dump of the DPMS metadata.
If you already have a Cloud Composer environment, you can orchestrate your DPMS metadata exports and imports by running an Airflow DAG on that environment (as shown in Figure 2). This use of an Airflow DAG would be in place of the Cloud Run method mentioned earlier.
Objectives
- Set up dual-regional storage for Hive data and Hive Metastore backups.
- Deploy a Dataproc Metastore and a Dataproc cluster in regions A and B.
- Fail the deployment over to region B.
- Fail the deployment back to region A.
- Create automated Hive metastore backups.
- Orchestrate metadata exports and imports through Cloud Run.
- Orchestrate metadata exports and imports through Cloud Composer.
Costs
In this document, you use the following billable components of Google Cloud:
To generate a cost estimate based on your projected usage,
use the pricing calculator.
Before you begin
- Sign in to your Google Cloud account. If you're new to Google Cloud, create an account to evaluate how our products perform in real-world scenarios. New customers also get $300 in free credits to run, test, and deploy workloads.
-
In the Google Cloud console, on the project selector page, select or create a Google Cloud project.
-
Make sure that billing is enabled for your Google Cloud project.
-
Enable the Dataproc, and Dataproc Metastore APIs.
-
Create a service account:
-
In the Google Cloud console, go to the Create service account page.
Go to Create service account - Select your project.
-
In the Service account name field, enter a name. The Google Cloud console fills in the Service account ID field based on this name.
In the Service account description field, enter a description. For example,
Service account for quickstart. - Click Create and continue.
-
Grant the Project > Owner role to the service account.
To grant the role, find the Select a role list, then select Project > Owner.
- Click Continue.
-
Click Done to finish creating the service account.
Do not close your browser window. You will use it in the next step.
-
-
Create a service account key:
- In the Google Cloud console, click the email address for the service account that you created.
- Click Keys.
- Click Add key, and then click Create new key.
- Click Create. A JSON key file is downloaded to your computer.
- Click Close.
-
In the Google Cloud console, on the project selector page, select or create a Google Cloud project.
-
Make sure that billing is enabled for your Google Cloud project.
-
Enable the Dataproc, and Dataproc Metastore APIs.
-
Create a service account:
-
In the Google Cloud console, go to the Create service account page.
Go to Create service account - Select your project.
-
In the Service account name field, enter a name. The Google Cloud console fills in the Service account ID field based on this name.
In the Service account description field, enter a description. For example,
Service account for quickstart. - Click Create and continue.
-
Grant the Project > Owner role to the service account.
To grant the role, find the Select a role list, then select Project > Owner.
- Click Continue.
-
Click Done to finish creating the service account.
Do not close your browser window. You will use it in the next step.
-
-
Create a service account key:
- In the Google Cloud console, click the email address for the service account that you created.
- Click Keys.
- Click Add key, and then click Create new key.
- Click Create. A JSON key file is downloaded to your computer.
- Click Close.
Initialize the environment
- In Cloud Shell, start a Cloud Shell instance.
Clone the tutorial's GitHub repository:
git clone https://github.com/GoogleCloudPlatform/metastore-disaster-recovery.gitEnable the following Google Cloud APIs:
gcloud services enable dataproc.googleapis.com metastore.googleapis.comSet some environment variables:
export PROJECT=$(gcloud info --format='value(config.project)')
export WAREHOUSE_BUCKET=${PROJECT}-warehouse
export BACKUP_BUCKET=${PROJECT}-dpms-backups
export DPMS_PRIMARY_REGION=us-central1
export DPMS_STANDBY_REGION=us-east1
export DPMS_PRIMARY_INSTANCE=dpms1
export DPMS_STANDBY_INSTANCE=dpms2
export HADOOP_PRIMARY=dataproc-cluster1
export HADOOP_STANDBY=dataproc-cluster2
Creating storage for Hive data and Hive Metastore backups
In this section, you create Cloud Storage buckets to host the Hive data and Hive Metastore backups.
Create Hive data storage
In Cloud Shell, create a dual-regional bucket to host the Hive data:
gsutil mb -c standard -l us-east1+us-central1 gs://${WAREHOUSE_BUCKET}Copy some sample data to the Hive data bucket:
gsutil -m cp -r gs://retail_csv gs://${WAREHOUSE_BUCKET}/retail
Create storage for metadata backups
In Cloud Shell, create a dual-region bucket to host the DPMS metadata backups:
gsutil mb -c standard -l us-east1+us-central1 us gs://${BACKUP_BUCKET}
Deploying compute resources in the primary region
In this section, you deploy all the compute resources in the primary region, including the DPMS instance and the Dataproc cluster. You also populate the Dataproc Metastore with sample metadata.
Create the DPMS instance
In Cloud Shell, create the DPMS instance:
gcloud metastore services create ${DPMS_PRIMARY_INSTANCE} \
    --location=${DPMS_PRIMARY_REGION} \
    --hive-metastore-version=3.1.2
This command can take several minutes to complete.
Set the Hive data bucket as the default warehouse directory:
gcloud metastore services update ${DPMS_PRIMARY_INSTANCE} \
    --location=${DPMS_PRIMARY_REGION} \
    --update-hive-metastore-configs="hive.metastore.warehouse.dir=gs://${PROJECT}-  warehouse"
This command can take several minutes to complete.
Create a Dataproc cluster
In Cloud Shell, create a Dataproc cluster and attach it to the DPMS instance:
gcloud dataproc clusters create ${HADOOP_PRIMARY} \
    --dataproc-metastore=projects/${PROJECT}/locations/${DPMS_PRIMARY_REGION}/services/${DPMS_PRIMARY_INSTANCE} \
    --region=${DPMS_PRIMARY_REGION} \
    --image-version=2.0
Specify the cluster image as version 2.0, which is the latest version available as of June 2021. It's also the first version that supports DPMS.
Populate the metastore
In Cloud Shell, update the sample
retail.hqlprovided in this tutorial's repository with the name of the Hive data bucket:sed -i -- 's/${WAREHOUSE_BUCKET}/'"$WAREHOUSE_BUCKET"'/g' retail.hqlRun the queries contained in the
retail.hqlfile to create the table definitions in the metastore:gcloud dataproc jobs submit hive \ --cluster=${HADOOP_PRIMARY} \ --region=${DPMS_PRIMARY_REGION} \ --file=retail.hqlVerify that the table definitions were correctly created:
gcloud dataproc jobs submit hive \
    --cluster=${HADOOP_PRIMARY} \
    --region=${DPMS_PRIMARY_REGION} \
    --execute="
    desc departments;
    desc categories;
    desc products;
    desc order_items;
    desc orders;
    desc customers;

    select count(*) as num_departments from departments;
    select count(*) as num_categories from categories;
    select count(*) as num_products from products;
    select count(*) as num_order_items from order_items;
    select count(*) as num_orders from orders;
    select count(*) as num_customers from customers;
  "
The output resembles the following:
+------------------+------------+----------+
|     col_name     | data_type  | comment  |
+------------------+------------+----------+
| department_id    | int        |          |
| department_name  | string     |          |
+------------------+------------+----------+
The output also contains the number of elements in each table—for example:
+----------------+
| num_customers  |
+----------------+
| 12435          |
+----------------+
Failing over to the standby region
This section provides the steps to failover from the primary region (region A) to the standby region (region B).
In Cloud Shell, export the primary DPMS instance's metadata to the backups bucket:
gcloud metastore services export gcs ${DPMS_PRIMARY_INSTANCE}  \
    --location=${DPMS_PRIMARY_REGION} \
    --destination-folder=gs://${BACKUP_BUCKET}
The output resembles the following:
metadataManagementActivity:
metadataExports:
‐ databaseDumpType: MYSQL
    destinationGcsUri: gs://qa01-300915-dpms-backups/hive-export-2021-05-04T22:21:53.288Z
    endTime: '2021-05-04T22:23:35.982214Z'
    startTime: '2021-05-04T22:21:53.308534Z'
    state: SUCCEEDED
Note the value in the
destinationGcsUriattribute. This attribute stores the backup that you created.Create a new DPMS instance in the standby region:
gcloud metastore services create ${DPMS_STANDBY_INSTANCE} \
    --location=${DPMS_STANDBY_REGION} \
    --hive-metastore-version=3.1.2
Set the Hive data bucket as the default warehouse directory:
gcloud metastore services update ${DPMS_STANDBY_INSTANCE} \
    --location=${DPMS_STANDBY_REGION} \
    --update-hive-metastore-configs="hive.metastore.warehouse.dir=gs://${PROJECT}-warehouse"
Retrieve the path of the latest metadata backup:
IMPORT_DIR=`gsutil ls gs://${BACKUP_BUCKET} | sort -k 1 | tail -1`
IMPORT_SQL="${IMPORT_DIR}hive.sql"
echo ${IMPORT_SQL}
Import the backed-up metadata into the new Dataproc Metastore instance:
gcloud metastore services import gcs ${DPMS_STANDBY_INSTANCE} \
    --location=${DPMS_STANDBY_REGION} \
    --dump-type=mysql \
    --database-dump=${IMPORT_SQL} \
    --import-id=import-$(date +"%Y-%m-%d-%H-%M-%S")
Create a Dataproc cluster in the standby region (region B):
gcloud dataproc clusters create ${HADOOP_STANDBY} \
    --dataproc-metastore=projects/${PROJECT}/locations/${DPMS_STANDBY_REGION}/services/${DPMS_STANDBY_INSTANCE} \
    --region=${DPMS_STANDBY_REGION} \
    --image-version=2.0
Verify that the metadata was correctly imported:
gcloud dataproc jobs submit hive \
    --cluster ${HADOOP_STANDBY} \
    --region ${DPMS_STANDBY_REGION} \
    --execute "select count(*) as num_orders from orders;"
The
num_ordersoutput is most important to the tutorial. It resembles the following:+-------------+ | num_orders | +-------------+ | 68883 | +-------------+The primary Dataproc Metastore has become the new standby metastore, and the standby Dataproc Metastore has become the new primary metastore.
Update the environment variables based on these new roles:
export DPMS_PRIMARY_REGION=us-east1
export DPMS_STANDBY_REGION=us-central1]
export DPMS_PRIMARY_INSTANCE=dpms2
export DPMS_STANDBY_INSTANCE=dpms1
export HADOOP_PRIMARY=dataproc-cluster2
export HADOOP_STANDBY=dataproc-cluster1
Verify that you can write to the new primary Dataproc Metastore in region B:
gcloud dataproc jobs submit hive \
    --cluster ${DPMS_PRIMARY_INSTANCE} \
    --region ${DPMS_PRIMARY_REGION} \
    --execute "create view completed_orders as select * from orders where order_status = 'COMPLETE';"

gcloud dataproc jobs submit hive \
    --cluster ${HADOOP_PRIMARY} \
    --region ${DPMS_PRIMARY_REGION} \
    --execute "select * from completed_orders limit 5;"
The output contains the following:
+----------------------------+------------------------------+-------------------------------------+--------------------------------+
| completed_orders.order_id  | completed_orders.order_date  | completed_orders.order_customer_id  | completed_orders.order_status  |
+----------------------------+------------------------------+-------------------------------------+--------------------------------+
| 3                          | 2013-07-25 00:00:00.0        | 12111                               | COMPLETE                       |
| 5                          | 2013-07-25 00:00:00.0        | 11318                               | COMPLETE                       |
| 6                          | 2013-07-25 00:00:00.0        | 7130                                | COMPLETE                       |
| 7                          | 2013-07-25 00:00:00.0        | 4530                                | COMPLETE                       |
| 15                         | 2013-07-25 00:00:00.0        | 2568                                | COMPLETE                       |
+----------------------------+------------------------------+-------------------------------------+--------------------------------+
The failover is now complete. You should now redirect your client applications to the new primary Dataproc cluster in region B by updating your Hadoop client configuration files.
Failing back to the original region
This section provides the steps to fail back to the original region (region A).
In Cloud Shell, export the metadata from the DPMS instance:
gcloud metastore services export gcs ${DPMS_PRIMARY_INSTANCE} \
    --location=${DPMS_PRIMARY_REGION} \
    --destination-folder=gs://${BACKUP_BUCKET}
Retrieve the path of the latest metadata backup:
IMPORT_DIR=`gsutil ls gs://${BACKUP_BUCKET} | sort -k 1 | tail -1`
IMPORT_SQL="${IMPORT_DIR}hive.sql"
echo ${IMPORT_SQL}
Import the metadata into the standby DPMS instance in the original region (region A):
gcloud metastore services import gcs ${DPMS_STANDBY_INSTANCE} \
    --location=${DPMS_STANDBY_REGION} \
    --dump-type=mysql \
    --database-dump=${IMPORT_SQL} \
    --import-id=import-$(date +"%Y-%m-%d-%H-%M-%S")
Verify that the metadata was correctly imported:
gcloud dataproc jobs submit hive \
    --cluster ${HADOOP_STANDBY} \
    --region ${DPMS_STANDBY_REGION} \
    --execute "select * from completed_orders limit 5;"
The output includes the following:
+----------------------------+------------------------------+-------------------------------------+--------------------------------+
| completed_orders.order_id  | completed_orders.order_date  | completed_orders.order_customer_id  | completed_orders.order_status  |
+----------------------------+------------------------------+-------------------------------------+--------------------------------+
| 3                          | 2013-07-25 00:00:00.0        | 12111                               | COMPLETE                       |
| 5                          | 2013-07-25 00:00:00.0        | 11318                               | COMPLETE                       |
| 6                          | 2013-07-25 00:00:00.0        | 7130                                | COMPLETE                       |
| 7                          | 2013-07-25 00:00:00.0        | 4530                                | COMPLETE                       |
| 15                         | 2013-07-25 00:00:00.0        | 2568                                | COMPLETE                       |
+----------------------------+------------------------------+-------------------------------------+--------------------------------+
The primary Dataproc Metastore and standby Dataproc Metastore have swapped roles again.
Update the environment variables to these new roles:
export DPMS_PRIMARY_REGION=us-central1
export DPMS_STANDBY_REGION=us-east1
export DPMS_PRIMARY_INSTANCE=dpms1
export DPMS_STANDBY_INSTANCE=dpms12
export HADOOP_PRIMARY=dataproc-cluster1
export HADOOP_STANDBY=dataproc-cluster2
The failback is now complete. You should now redirect your client applications to the new primary Dataproc cluster in region A by updating your Hadoop client configuration files.
Creating automated metadata backups
This section outlines two different methods of automating your metadata backup exports and imports. The first method, Option 1: Cloud Run and Cloud Scheduler, uses Cloud Run and Cloud Scheduler. The second method, Option 2: Cloud Composer, uses Cloud Composer. In both examples, an export job creates a backup of the metadata from the primary DPMS in region A. An import job populates the standby DPMS in region B from the backup.
If you already have an existing Cloud Composer cluster, you should consider Option 2: Cloud Composer (assuming that your cluster has enough compute capacity). Otherwise, go with Option 1: Cloud Run and Cloud Scheduler. This option uses a pay-as-you-go pricing model and is more economical than Cloud Composer, which requires the use of persistent compute resources.
Option 1: Cloud Run and Cloud Scheduler
This section shows how to use Cloud Run and Cloud Scheduler to automate the exports of imports of DPMS metadata.
Cloud Run services
This section shows how to build two Cloud Run services to execute the metadata export and import jobs.
In Cloud Shell, enable the Cloud Run, Cloud Scheduler, Cloud Build, and App Engine APIs:
gcloud services enable run.googleapis.com cloudscheduler.googleapis.com cloudbuild.googleapis.com appengine.googleapis.comYou enable the App Engine API because the Cloud Scheduler service requires App Engine.
Build the Docker image with the provided Dockerfile:
cd metastore-disaster-recovery
gcloud builds submit --tag gcr.io/$PROJECT/dpms_dr
Deploy your container image to a Cloud Run service in the primary region (region A). This deployment is responsible for creating the metadata backups from the primary metastore:
gcloud run deploy dpms-export \
    --image gcr.io/${PROJECT}/dpms_dr \
    --region ${DPMS_PRIMARY_REGION} \
    --platform managed \
    --update-env-vars DPMS_STANDBY_REGION=${DPMS_STANDBY_REGION},BACKUP_BUCKET=${BACKUP_BUCKET},DPMS_STANDBY_INSTANCE=${DPMS_STANDBY_INSTANCE},DPMS_PRIMARY_INSTANCE=${DPMS_PRIMARY_INSTANCE},DPMS_PRIMARY_REGION=${DPMS_PRIMARY_REGION} \
    --allow-unauthenticated \
    --timeout=10m
By default, a Cloud Run service request times out after 5 minutes. To help ensure that all requests have enough time to successfully complete, the previous code sample extends the timeout value to at least 10 minutes.
Retrieve the deploy URL for the Cloud Run service:
EXPORT_RUN_URL=$(gcloud run services describe dpms-export --platform
managed --region ${DPMS_PRIMARY_REGION} --format `
"value(status.address.url)")
echo ${EXPORT_RUN_URL}
Create a second Cloud Run service in the standby region (region B). This service is responsible for importing the metadata backups from
BACKUP_BUCKETinto the standby metastore:gcloud run deploy dpms-import \ --image gcr.io/${PROJECT}/dpms_dr \ --region ${DPMS_STANDBY_REGION} \ --platform managed \ --update-env-vars DPMS_STANDBY_REGION=${DPMS_STANDBY_REGION},BACKUP_BUCKET=${BACKUP_BUCKET},DPMS_STANDBY_INSTANCE=${DPMS_STANDBY_INSTANCE} \ --allow-unauthenticated \ --timeout=10mRetrieve the deploy URL for the second Cloud Run service:
  IMPORT_RUN_URL=$(gcloud run services describe dpms-import --platform
  managed --region ${REGION_B} --format "value(status.address.url)")
  echo ${IMPORT_RUN_URL}
Jobs scheduling
This section shows how to use Cloud Scheduler to trigger the two Cloud Run services.
In Cloud Shell, create an App Engine application, which Cloud Scheduler requires:
gcloud app create --region=${REGION_A}Create a Cloud Scheduler job to schedule the metadata exports from the primary metastore:
gcloud scheduler jobs create http dpms-export \
    --schedule "*/15 * * * *" \
    --http-method=post \
    --uri=${EXPORT_RUN_URL}/export\
The Cloud Scheduler job makes an http request to the
Cloud Run service every 15 minutes. The
Cloud Run service runs a containerized
Flask
application with both an export and an import function. When the export
function is triggered, it exports the metadata to Cloud Storage
using the gcloud metastore services export command.
In general, if your Hadoop jobs frequently write to the Hive Metastore, we recommend that you back up your metastore often. A good backup schedule would be in the range of every 15 minutes to 60 minutes.
Trigger a test run of the Cloud Run service:
gcloud scheduler jobs run dpms-exportVerify that Cloud Scheduler correctly triggered the DPMS export operation:
gcloud metastore operations list --location ${REGION_A}The output resembles the following:
OPERATION_NAME                                           LOCATION     TYPE             TARGET                             DONE  CREATE_TIME          DURATION
 ...
operation-a520936204508-5v23bx4y23f60-920f0a0f-9c2b56b5  us-central1  update  dpms1                       True  2021-05-13T20:05:04  2M23S
If the value for
DONEisFalse, the export is still in progress. To confirm that the operation is complete, re-run thegcloud metastore operations list --location ${REGION_A}command until the value becomesTrue.Learn more about
gcloud metastore operationscommands in the reference documentation.(Optional) Create a Cloud Scheduler job to schedule the imports into the standby metastore:
gcloud scheduler jobs create http dpms-import \
    --schedule "*/15 * * * *" \
    --http-method=post \
    --uri=${IMPORT_RUN_URL}/import
This step depends on your recovery time objective (RTO) requirements.
If you would like a hot standby to minimize your failover time, you should schedule this import job. It refreshes your standby DPMS every 15 minutes.
If a cold standby is sufficient for your RTO needs, you can skip this step and also delete your standby DPMS and Dataproc cluster to further reduce your overall monthly bill. When failing over to your standby region (region B), provision the standby DPMS and the Dataproc cluster and also run an import job. Because the backup files are stored in a dual-regional bucket, they are accessible even if your primary region (region A) goes down.
Handle Failovers
Once you've failed over to region B, you must apply the following steps in order to preserve your disaster recovery requirements and protect your infrastructure against a potential failure in region B:
- Pause your existing Cloud Scheduler jobs.
- Update the primary's DPMS region to region B (
us-east1). - Update the standby's DPMS region to region A (
us-central1). - Update the DPMS primary instance to
dpms2. - Update the DPMS standby instance to
dpms1. - Redeploy the Cloud Run services based on the updated variables.
- Create new Cloud Scheduler jobs that point to your new Cloud Run services.
The steps required in the preceding list repeat many of steps from previous sections, only with minor tweaks (like swapping out the region names). Use the information in Option 1: Cloud Run and Cloud Scheduler to complete this required work.
Option 2: Cloud Composer
This section shows how to use Cloud Composer to run the export and import jobs within a single Airflow directed acyclic graph (DAG).
In Cloud Shell, enable the Cloud Composer API:
gcloud services enable composer.googleapis.comCreate a Cloud Composer environment:
export COMPOSER_ENV=comp-env gcloud beta composer environments create ${COMPOSER_ENV} \ --location ${DPMS_PRIMARY_REGION} \ --image-version composer-1.17.0-preview.1-airflow-2.0.1 \ --python-version 3- The composer image
composer-1.17.0-preview.1-airflow-2.0.1is the latest version as of publication. - Composer environments can use only one major Python version. Python 3 was selected because Python 2 has supportability issues.
- The composer image
Configure your Cloud Composer environment with these environment variables:
gcloud composer environments update ${COMPOSER_ENV} \
    --location ${DPMS_PRIMARY_REGION} \
    --update-env-variables=DPMS_PRIMARY_REGION=${DPMS_PRIMARY_REGION},DPMS_STANDBY_REGION=${DPMS_STANDBY_REGION},BACKUP_BUCKET=${BACKUP_BUCKET},DPMS_PRIMARY_INSTANCE=${DPMS_PRIMARY_INSTANCE},DPMS_STANDBY_INSTANCE=${DPMS_STANDBY_INSTANCE}
Upload the DAG file to your Composer environment:
gcloud composer environments storage dags import \
    --environment ${COMPOSER_ENV} \
    --location ${DPMS_PRIMARY_REGION} \
    --source dpms_dag.py
Retrieve the Airflow URL:
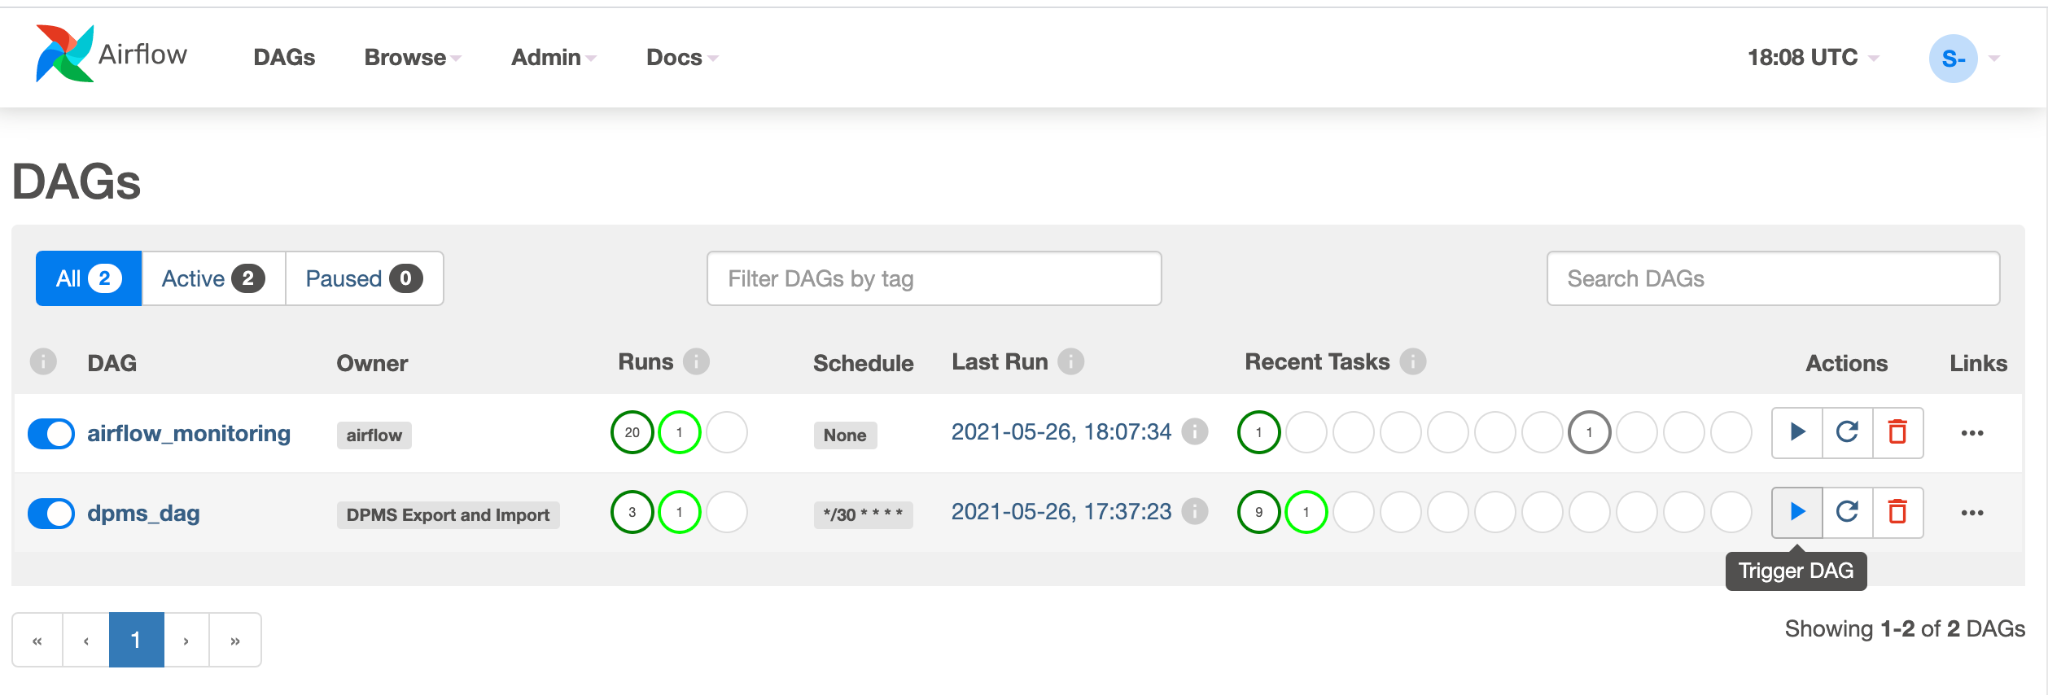
gcloud composer environments describe ${COMPOSER_ENV} \
    --location ${DPMS_PRIMARY_REGION} \
    --format "value(config.airflowUri)"
In your browser, open the URL returned by the previous command.
You should see a new DAG entry called
dpms_dag. Within a single run, the DAG executes an export, followed by an import. The DAG assumes that the standby DPMS is always up. If you don't need a hot standby and only want to run the export task, you should comment out all the import-related tasks in the code (find_backup, wait_for_ready_status, current_ts,dpms_import).Click the Arrow icon to trigger the DAG to do a test run:
Click Graph View of the running DAG to check the status of each task:
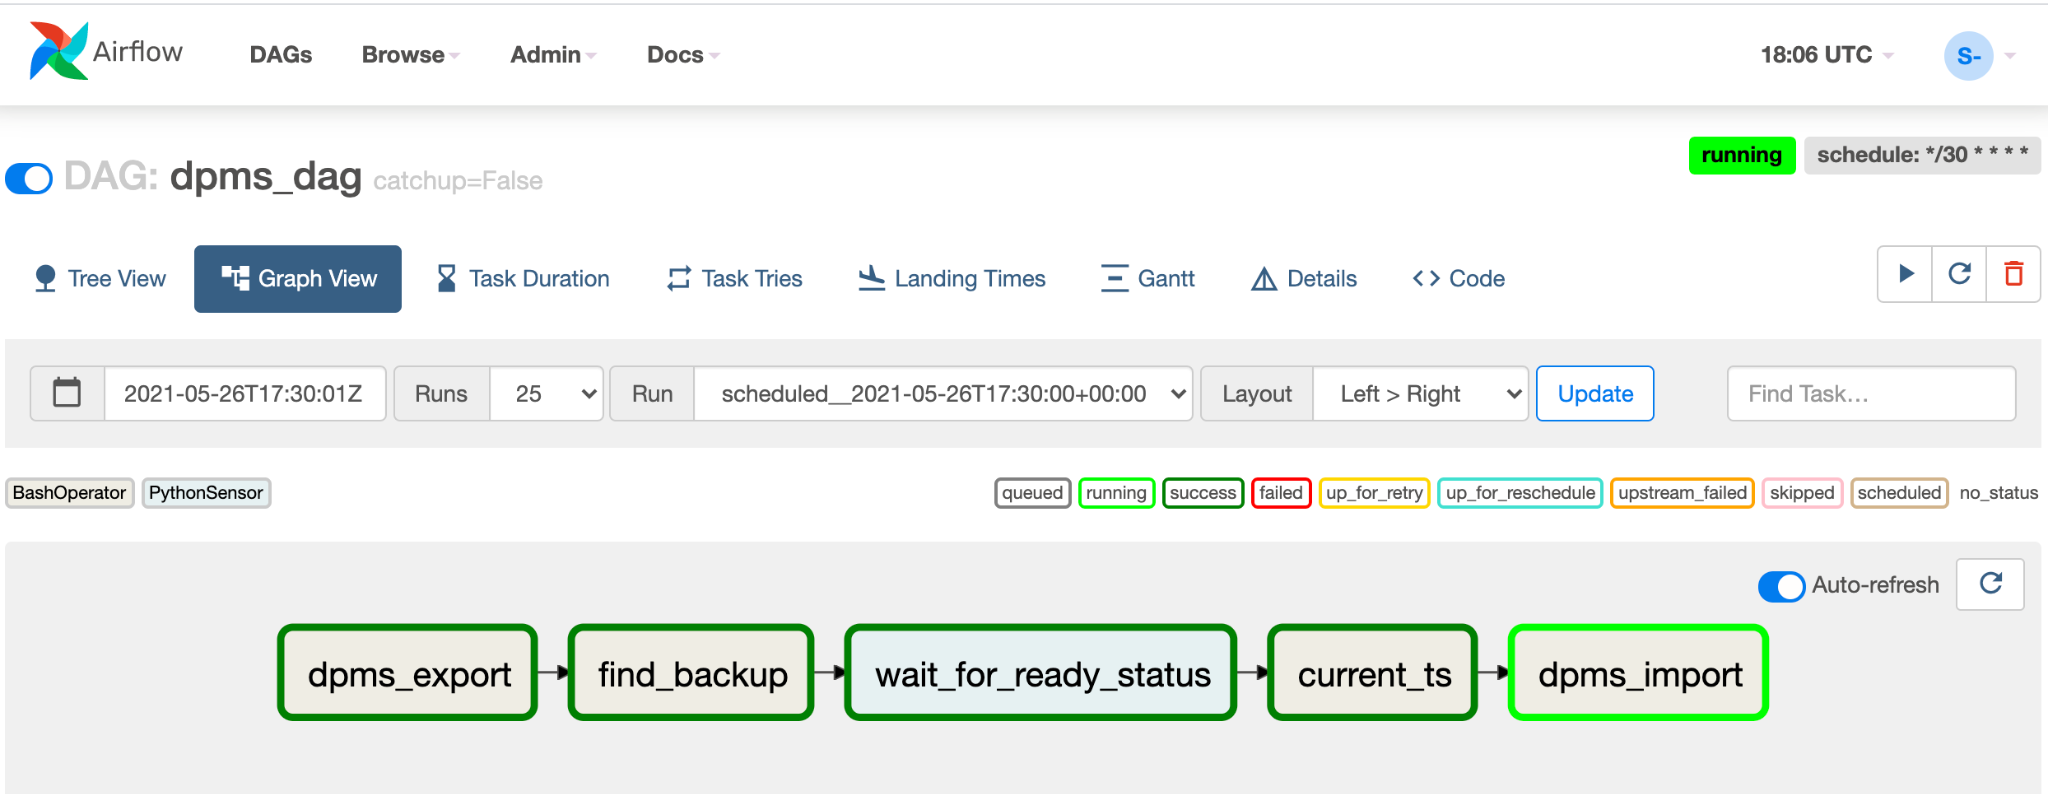
Once you have validated the DAG, let Airflow run it on a regular schedule. The schedule is set to a 30-minute interval, but can be adjusted by changing the
schedule_intervalparameter in the code to meet your timing requirements.
Handle failovers
Once you've failed over to region B, you must apply the following steps in order to preserve your disaster recovery requirements and protect your infrastructure against a potential failure in region B:
- Update the primary's DPMS region to region B (
us-east1). - Update the standby's DPMS region to region A (
us-central1). - Update the DPMS primary instance to
dpms2. - Update the DPMS standby instance to
dpms1. - Create a new Cloud Composer environment in region B (
us-east1). - Configure the Cloud Composer environment with the updated environment variables.
- Import the same
dpms_dagAirflow DAG as before to your new Cloud Composer environment.
The steps required in the preceding list repeat many of steps from previous sections, only with minor tweaks (like swapping out the region names). Use the information in Option 2: Cloud Composer to complete this required work.
Clean up
To avoid incurring charges to your Google Cloud account for the resources used in this tutorial, either delete the project that contains the resources, or keep the project and delete the individual resources.
- In the Google Cloud console, go to the Manage resources page.
- In the project list, select the project that you want to delete, and then click Delete.
- In the dialog, type the project ID, and then click Shut down to delete the project.
What's next
- Learn how to monitor your Dataproc Metastore instance
- Understand how to sync your Hive metastore with Data Catalog
- Learn more about developing Cloud Run services
- For more reference architectures, diagrams, and best practices, explore the Cloud Architecture Center.