
How to Send MongoDB Document Changes to a Slack Channel


Rate this tutorial


In this tutorial, we will explore a seamless integration of your database with Slack using Atlas Triggers and the Slack API. Discover how to effortlessly send notifications to your desired Slack channels, effectively connecting the operations happening within your collections and relaying them in real-time updates.
The overall flow will be:
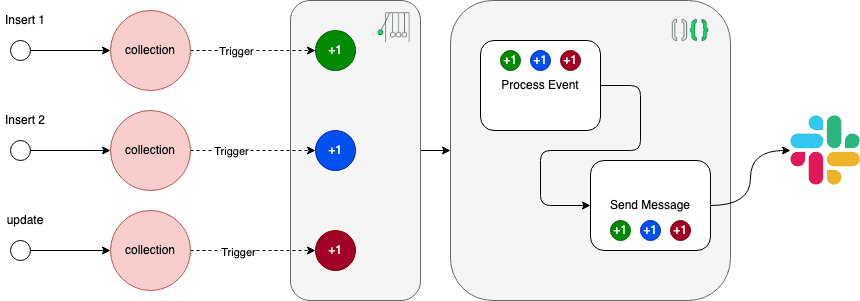
In this way, every time an operation that we need to trace is registered, the content of the transaction itself will be processed and used to send a message to a specific Slack channel.
To begin with, we will create a new application in Atlas. A step-by-step guide illustrating this process is available in our documentation.
Once this has been completed, we are ready to start creating our first database trigger that will react every time there is an operation in a certain collection.
For this tutorial, we will create a trigger that monitors all changes in a
test collection for insert, update, and delete operations.- Click the Data Services tab in the top navigation of your screen if you haven't already navigated to Atlas.
- Click Triggers in the left-hand navigation.
- On the Overview tab of the Triggers page, click Add Trigger to open the trigger configuration page.
Please note that this trigger will make use of the event ordering as we want the operations to be processed according to when they were performed.
The trigger configuration values will look like this:

Finally, this trigger will be linked to a
processEvent function which we'll see below.- Click the Data Services tab in the top navigation of your screen if you haven't already navigated to Atlas.
- Click Functions in the left navigation menu.
- Click New Function in the top right of the Functions page.
- Enter a unique, identifying name for the function in the Name field.
- Configure User Authentication. Functions in App Services always execute in the context of a specific application user or as a system user that bypasses rules. For this tutorial, we are going to use System user.
The processEvent function will process the change events every time an operation we are monitoring in the given collection is processed. In this way, we are going to create an object that we will then send to the function in charge of sending this message in Slack.
The code of the function is the following:

In this function, we will create an object that we will then send as a parameter to another function that will be in charge of sending to our Slack channel.
_idof the object that has been modified/inserted.- Operation that has been performed.
- Fields of the object that have been modified or deleted when the operation has been an
update.
With all this, we create an object and make use of the internal function calls to execute our
sendToSlack function.This function will make use of the "chat.postMessage" method of the Slack API to send a message to a specific channel.
To use the Slack library, you must add it as a dependency in your Atlas function. Therefore, in the Functions section, we must go to the Dependencies tab and install
@slack/web-api.You will need to have a Slack token that will be used for creating the
WebClient object as well as a Slack application. Therefore:- Create or use an existing Slack app: This is necessary as the subsequent token we will need will be linked to a Slack App. For this step, you can navigate to the Slack application and use your credentials to authenticate and create or use an existing app you are a member of.
- Within this app, we will need to create a bot token that will hold the authentication API key to send messages to the corresponding channel in the Slack app created. Please note that you will need to add as many authorization scopes on your token as you need, but the bare minimum is to add the
chat:writescope to allow your app to post messages.
First, we will perform the logic with the received object to create a message adapted to the event that occurred.
Once we have the library, we must use it to create a
WebClient client that we will use later to make use of the methods we need.Finally, we can send our message with:
The full function code will be as:
Note: The bot token we use must have the minimum permissions to send messages to a certain channel. We must also have the application created in Slack added to the channel where we want to receive the messages.
If everything is properly configured, every change in the collection and monitored operations will be received in the Slack channel:

Please note that this example here is a simple guide. But from this guide, it can be extended and adapted to more complex needs.
You can use $match" expressions to only detect certain changes and then adapt the change event to only receive certain fields with a "$project".
In this tutorial, we've learned how to seamlessly integrate your database with Slack using Atlas Triggers and the Slack API. This integration allows you to send real-time notifications to your Slack channels, keeping your team informed about important operations within your database collections.
We started by creating a new application in Atlas and then set up a database trigger that reacts to specific collection operations. We explored the
processEvent function, which processes change events and prepares the data for Slack notifications. Through a step-by-step process, we demonstrated how to create a message and use the Slack API to post it to a specific channel.Now that you've grasped the basics, it's time to take your integration skills to the next level. Here are some steps you can follow:
- Explore advanced use cases: Consider how you can adapt the principles you've learned to more complex scenarios within your organization. Whether it's custom notifications or handling specific database events, there are countless possibilities.
- Dive into the Slack API documentation: For a deeper understanding of what's possible with Slack's API, explore their official documentation. This will help you harness the full potential of Slack's features.
By taking these steps, you'll be well on your way to creating powerful, customized integrations that can streamline your workflow and keep your team in the loop with real-time updates. Good luck with your integration journey!