Online learning can present unique student safety challenges. We've gathered Teams for Education best practices for both administrators and educators to establish safety policies and administer meetings and channels with recommended controls. Working together, these settings help ensure a safer and more productive environment for your students while using Teams.
Notes:
-
This guide is designed to serve as a foundation for your educational institution's safety plan. We will update these recommendations regularly.
-
Other resources you might be looking for:
IT Admins play a crucial role in setting up safe policies for students and educators in Teams for Education. We've broken down the best practices in this guide with explanations for different policies and configurations.
In this article
Set up safe identities for your students and educators
We strongly recommend that you create student identities in your tenant for distance learning. Requiring students and educators to sign in to Teams before they join meetings is the safest meeting environment for remote learning. Doing so can help educators keep unauthorized users from gaining access to their online meetings.
For more information on how you can set up identities and licenses for your organization, visit our Get started with Microsoft Teams for remote learning guide.
Limiting personal usage of Teams in a school environment
The Microsoft Teams experience supports school, work, and personal accounts. If you would like to restrict the ability for students to sign in with their personal accounts, you can set up restrictions using Devices Policies.
Learn more about Microsoft Teams for your personal life.
What are Teams policies and admin settings?
Important:
-
IT Admins can run the Teams for Education Policy Wizard to easily apply the majority of the policies recommended in this article to your tenant. The wizard adjusts the Global defaults of a core set of policies with settings that we recommend for student safety and applies it to students. Running it also creates and assigns a set of custom policies to a group of educators and staff.
-
If you already used the Policy Wizard to apply policies for your students, educators, and staff, use this article as a reference for additional safety measures, or if you prefer to manually create and manage policies for your tenant.
Teams policies and admin settings allow you to control how Teams behaves in your environment and what level of access individual users have to certain features. To maintain student safety, you should use administrative policies to control who can use private chat and private calling, who can schedule meetings, and what content types can be shared. Policies must be adjusted for both students and educators to keep the environment safe.
We recommend that you use your Global (organization-wide default) policy definition for students. This will ensure that any new users get the most conservative policy set and reduces the risk that a student will receive inappropriate levels of access.
View our Teams policies and policy package for Education guide for more details about Teams policies and the best way to deploy them within your environment.
Meetings: Set up safe calls, meetings, and meeting chats
There are two roles available within Teams meetings: presenter and attendee. Presenters can manage meeting participants and share content, while the role of an attendee is more controlled. In many cases it is safest if students join meetings as attendees. This will ensure that they cannot remove other participants, mute others, or have other elevated meeting controls.
Educators can use the Who can present setting within Meeting options to control who joins their meetings as attendees, but administrators can also use the following policy to set the default value of this setting so that only the meeting organizer joins as a presenter and students join as attendees.
Apply this meeting policy to educators:
-
Who can present: Only organizers and co-organizers
Requiring participants to sign in to Teams before they join a meeting is the first step to keeping unauthorized users from gaining access to a meeting. When a meeting participant is signed in, an educator can more easily identify the participant, which makes it easier to determine if they should be allowed into the meeting.
If you have provided your students and educators with Teams licenses and do not plan to allow participants to join meetings without signing in to Teams, ensure that the following meeting setting is set:
Anonymous users can join a meeting: Off
There may be cases where you want to allow anonymous users to join a meeting within your school or district. For example, you may be using Teams meetings for parent discussions, external consultations, or other cases.
If you choose to enable anonymous meetings, make sure your meeting organizers are using the proper meeting lobby settings and following meeting lobby best practices. Configure the following settings to ensure that anonymous participants are not automatically admitted into meetings.
Apply these meeting policy settings to meeting organizers:
-
Let anonymous people and dial-in callers start a meeting: Off
-
People dialing in can bypass the lobby: Off
-
Who can bypass the lobby: Only organizers and co-organizers
Use these meeting policy settings to remove a student’s ability to schedule meetings, create live events, and participate in private calls with faculty and other students.
Apply these meeting policy settings to students:
-
Allow Meet now in channels: Off
-
Allow the Outlook add-in: Off
-
Allow channel meeting scheduling: Off
-
Allow scheduling private meetings: Off
-
Allow Meet now in private meetings: Off
Apply this live events policy to students:
-
Allow scheduling: Off
Educators can use the meeting lobby bypassoptions to control who can enter meetings directly without needing to be admitted from the meeting lobby first. Limiting who has this capability will help educators keep unauthorized users from gaining access to their meetings.
Educators should set Who can bypass the lobby to Only me to ensure that only they, as meeting organizers, can join the meeting directly. This will ensure that students and any other participants will need to wait in the lobby until they are admitted to the meeting. This setting will also prevent students from joining the meeting unattended.
In addition to enabling the meeting lobby, educators should take steps to help prevent students from joining meetings unattended by following meeting lobby best practices. Ensure that the educators in your school or district are aware of the additional measures they can take to support student safety.
Important: There are some situations where the original educator who scheduled a meeting is not present to start the meeting, such as a day when a substitute is teaching instead. If an educator has set Who can bypass the lobby to Only me for a meeting and they are unable to start the meeting to admit others, we recommend that the original teacher cancels their meeting for the class. Then, the educator who is in charge of the class for the day should create a new meeting. That way, they are the meeting organizer and will have full control of the meeting.
Use this meeting policy to set Who can bypass the lobby to Only me by default for educators.
Apply this meeting policy to educators:
-
Automatically admit people: Organizer only
Apply this meeting policy to disable all meeting chats for students:
-
Allow chat in meetings: Disabled
Ensure that the educators in your environment are aware of the additional measures they can take to control student chat within channel meetings.
Use this meeting policy if you would like to stop students from uploading custom video backgrounds but would still like to allow students to blur their video background or choose a default Team image to use as their background.
Use PowerShell to assign this meeting policy to students:
-
VideoFiltersMode: BlurandDefaultBackgrounds
Use this calling policy to disable all private calls and group calls for students.
Apply this calling policy to students:
-
Make private calls: Off
In Microsoft Teams, the Call me feature gives users a way to join the audio portion of a meeting by phone. Users get the audio portion of the meeting through their cell phone or land line and the content portion of the meeting—such as when another meeting participant shares their screen or plays a video—through their computer.
This feature is controlled at the organizer level. To prevent students from using this feature in class meetings, turn this Audio Conferencing setting off for educators organizing class meetings:
-
Dial-out from meetings: Off
Note: This is a preview or early release feature.
The Walkie Talkie app within Teams can provide educators with instant push-to-talk communication capabilities. Educators can use the app to connect quickly across campus without making voice calls or sending messages. Walkie Talkie also works anywhere with WiFi or cellular internet connectivity. While Walkie Talkie is a powerful tool for educators, it could be a distraction for students. Use this policy to disable Walkie Talkie access for students:
Apply this Teams app permission policy to students:
-
Microsoft apps: Block specific apps and allow all others.
-
Select Walkie Talkie from the application list.
Conversations: Set up safe chats and channels
Each team within Microsoft Teams is associated with a Microsoft 365 group. To prevent students from creating teams, you must remove their ability to create a Microsoft 365 group by following these instructions.
Use this messaging policy to allow educators to delete any message sent within channel meetings and channel conversation that they own.
Tip: This will allow educators to remove inappropriate content that may be posted within a channel.
Apply this messaging policy to educators:
-
Owners can delete sent messages: On
Enable supervised chat and assign educators to chat supervisor roles so they can delete messages in chats or private meetings.
Deleted messages are still available for data loss prevention and other auditing purposes after they are deleted.
Educational institutions can use third party services such as Gaggle, Senso, or LightSpeed Systems to enable content monitoring within Teams.
Schools and universities can also use communication compliance, which is a solution in Microsoft 365 that helps minimize communication risks by helping you detect, capture, and act on inappropriate messages in your organization.
Use Supervised Chat if you would like educators to be present for all student chat conversations.
Use this policy if you would like to block students from sending Giphy content.
Apply this messaging policy to students:
-
Use Giphys in conversations: Off
Use this policy to set the appropriate Giphy content rating for students. Setting this policy with the following value will mean that students can insert Giphys in chats but will be strictly restricted from adult content.
Apply this messaging policy to students:
-
Giphy content rating: Strict
Use this policy to control if students can remove other users from group chats.
Apply this messaging policy to students:
-
Remove users from group chats: Off
Giving students the ability to remove and edit their own messages provides them with useful self-moderation tools, but if you are concerned about students abusing this capability, enable these settings to prevent students from removing or editing their sent messages.
Apply these messaging policy settings to students:
-
Delete sent messages: Off
-
Edit sent messages: Off
Use this policy to disable private chat for students. If this policy is disabled, students will be unable to chat privately with educators and other students. Students can still use channels for communication, even when this is disabled.
Apply this messaging policy to students:
-
Chat: Off
Use this policy to disable private channel creation for students.
Apply this Teams policy to students:
-
Create private channels: Off
External access is a way for Teams users from an external domain to find, call, chat, and set up meetings with you in Teams. You can also use external access to communicate with external users who are still using Skype for Business (online and on-premises) and Skype (in preview).
You may want to enable external access for educators in your institution so they can collaborate with colleagues outside of your tenant. Although you have enabled external access for your tenant, you can still disable this feature for students so they cannot be contacted by participants outside of your tenant boundaries.
Apply this policy to students:
-
EnableFederationAccess: False
Note: You will need to use PowerShell to change the value of this policy setting.
Switching to distance learning can present a new set of challenges in the classroom. We’ve compiled this resource to help you create and foster a learning environment that promotes the safest experience for your students.
In this article
Ensure Teams is updated to the latest version
Having the latest version of the Teams app will give you and your students the greatest protection. Ensure that you and your students have the latest version of Teams installed. If your students use mobile devices to attend meetings, ask them to regularly check for updates in the iOS App Store or Google Play Store.
Learn more about updating Teams.
Create a safe and controlled class meeting
Before your meeting
When you schedule a meeting in Teams for online lectures and classes, we recommend that you create those meetings in channels. Channels give you more robust controls within meetings, such as disabling student-to-student chat, providing an easier meeting set up process, and giving you the ability to track class discussions in context.
Tip: These two video tutorials will help you use Microsoft Teams to schedule your online meetings and maximize student safety. Check out Online Lectures 101 - keeping your online lectures as safe as possible and Online classes and lectures with your students - scheduling meetings.
As the meeting organizer, you should manage meeting options to increase your students' online safety. Learn more about the different ways you can access meeting options before and during meetings.
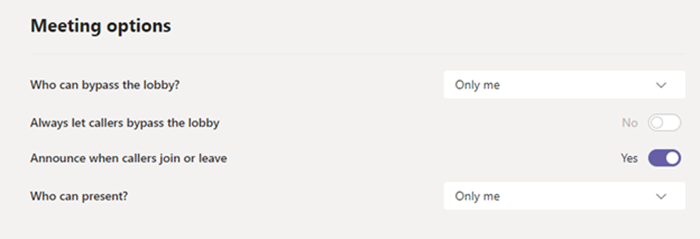
Use the meeting lobby bypass options to control who can enter your meeting directly without needing to be admitted from the meeting lobby first. Limiting who has this capability will help you keep unauthorized users from gaining access to your meetings.
Set Who can bypass the lobby to Only me to ensure that only you, as the meeting organizer, can join the meeting directly. This will ensure that your students and any other participants will need to wait in the lobby until you admit them into the meeting. This will stop students from joining the meeting unattended.
Set Always let callers bypass the lobby to No to ensure that anyone joining the meeting over the phone rather than using Teams will need to wait in the meeting lobby until you join the meeting and admit them.
There are two roles available within Teams meetings: presenter and attendee. Presenters control and manage meetings, while the role of an attendee is more controlled. In many cases it is safest if students join meetings as attendees. This will ensure that they cannot remove other participants, mute others, or have other elevated meeting controls. As attendees, students can still share video, participate in the meeting chat, and view shared files in the meeting.
Set Who can present to Only me to ensure that your students and other participants join as meeting attendees.
If you have another educator who should also join your class as a presenter, set Who can present to Specific people, then select the presenters you would like to add through the Select presenters for this meeting option.
Set Allow attendees to unmute to No to ensure that attendees join the meeting muted. This will also remove the attendees' ability to unmute themselves. You can mute and unmute students during your meeting by selecting More options 
Learn more: Manage attendee audio permissions in Teams meetings.
Set Allow meeting chat to Disabled to make meeting chat read-only. No one can send messages in the chat, including the organizer. This prevents chats from being sent before, during, and after the meeting.
Set Allow meeting chat to In-meeting only to allow participants to send messages only during the meeting and allow organizers to send messages at any time.
If you need to change the setting during your meeting, select More actions > Meeting options.
Carefully review the list of participants who are waiting in the lobby. Only admit students and invited guests if you believe that they are authorized to join your meeting.
If you have another teacher or teaching assistant in the class, you can make them a presenter and ask them to monitor and admit students who joined late. If you delegate this task, ensure that your assistant is aware of who they should admit into the meeting.
If a participant is accidentally admitted to the meeting or is being disruptive, you can remove them from the meeting:
-
Click or tap Show participants in your call controls.
-
Right-click or tap and hold on the unauthorized participant.
-
Select Remove participant.
Ensure that your meeting lobby options are set correctly so that the participant is blocked from rejoining the meeting without entering the lobby first.
During your meeting
Let students know that you're muting their audio, then from the participants list, click Mute all.
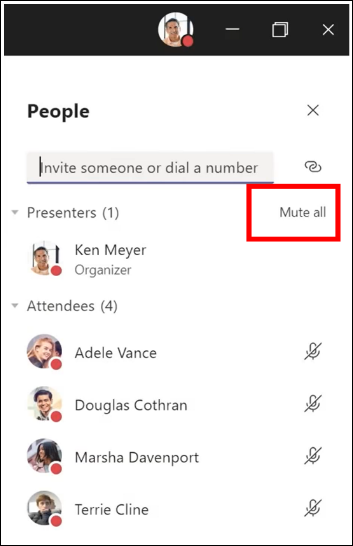
You can also prevent students from unmuting themselves by ensuring they are attendees in the meeting. Then, select More options
Learn more: Manage attendee audio permissions in Teams meetings.
If you're in a private meeting, use the instructions above to set up chatting controls before the meeting using Meeting options. During the meeting, control who can chat by selecting More actions > Meeting options.
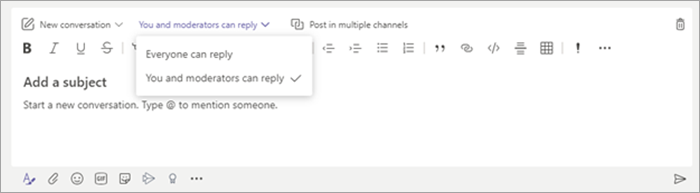
If you are using channel meetings for your class and would like to block students from sending meetings chats at any time:
-
Navigate to the channel thread for your meeting
-
Tap the Format button to expand the compose box
-
Change Everyone can reply to You and moderators can reply.
This will allow team owners to post messages in the channel and meeting, but your students will be blocked from adding new messages.
If you see inappropriate messages in a channel meeting, you can right-click and delete the message if your IT administrator has granted you the correct permissions.
If you are using a channel meeting and a students is being disruptive within the meeting chat, you can mute the student for a time through your team settings.
If others need to present content during the meeting, whether the content is from a student or colleague, you can promote an attendee to presenter during the meeting.
-
Click or tap Show participants in your call controls.
-
Right-click or tap and hold on the person’s name.
-
Select Make a presenter.
Note: This grants the person full presenter rights, which allows them to share their screen, remove participants and more. Learn more about meeting roles.
-
When the person is done presenting, right-click or tap and hold on their name again and select Make an attendee.
If you would like to quickly change the attendee or presenter roles for everyone within the meeting, you can use the Who can present? setting in your Meeting options to do so. Changes to this setting take effect as soon as you make them, even when a meeting is in progress.
After your meeting
At the end of the meeting, ensure that your students leave the meeting by clicking More options 
If you mistakenly leave a meeting without ending it, you can rejoin the meeting and end it properly to ensure that there are no lingering students.
Students will still be able to see the chat history after the meeting is ended. For example, they can see your messages and the meeting recording link if it was recorded.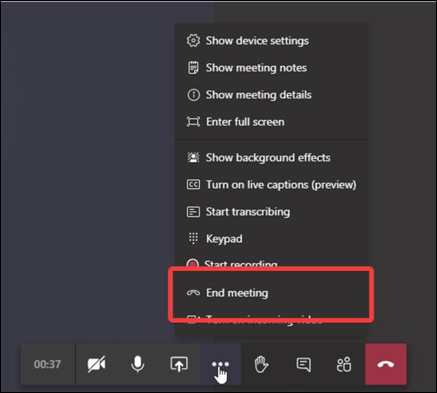
Ask your IT administrator to set general meeting policies so that students cannot rejoin meetings unattended.
Create safe teams and channels for your class
If you would like to block replies to specific announcement or channel conversation:
-
Navigate to the channel thread you would like to control.
-
Tap the Format button to expand the compose box.
-
Change Everyone can reply to You and moderators can reply.
This will allow team owners to post messages in the channel, but your students will be blocked from adding new messages.
Educators can turn on moderation for a class team channel to control who can start new posts and reply to posts in that channel.
In Teams, go to the channel, then select More options
To stop students from having the ability to post channel messages change Set channel moderation preferences to Only owners can post messages. This will control both channel and channel meeting posts.
If a students is being disruptive within a class team channel, you can mute the student for a time through your team settings.
Control who has the ability to @mention the team and whether or not students can use Giphy, stickers, or memes in channels.
-
Select More options
-
Select Settings.
-
To manage who can @mention the team or channel, select @mentions.
-
To manage Giphys, stickers, and whether students can upload memes, select Fun stuff.
Tip: You can also ask your IT Admin to create these settings ahead of time.
If your administrator has enabled supervised chat and has made you a chat supervisor, you will be able to delete inappropriate messages in chats or private meetings. To delete a message, hover over the message and select More options
Deleted messages are still available for data loss prevention and other auditing purposes after they are deleted.
This is a quick reference guide for IT Admins on the recommended policies to help ensure a safe and secure Teams environment for students. Longer descriptions and explanations behind each of these policy recommendations can be found in the IT Admin tab of this article.
Important:
-
IT Admins can run the Teams for Education Policy Wizard to easily apply the majority of the policies recommended in this article to your tenant. The wizard adjusts the Global defaults of a core set of policies with settings that we recommend for student safety and applies it to students. Running it also creates and assigns a set of custom policies to a group of educators and staff.
-
If you already used the Policy Wizard to apply policies for your students, educators, and staff, use this article as a reference for additional safety measures, or if you prefer to manually create and manage policies for your tenant.
Student policy quick guide
|
Policy area |
Sub-area |
Policy |
Global value for primary and secondary students |
Value for educators |
|---|---|---|---|---|
|
Create private channels |
Off |
On |
||
|
Off |
On |
|||
|
Off |
On |
|||
|
Off |
On |
|||
|
Off |
On |
|||
|
Off |
On |
|||
|
Off |
On |
|||
|
Everyone in the organization, but user can override |
Organizers, but users can override |
|||
|
Everyone in your organization |
Organizer only |
|||
|
BlurandDefaultBackgrounds |
AllFilters |
|||
|
Allow scheduling |
Off |
On |
||
|
Owners can delete sent messages |
Off |
On |
||
|
Delete sent messages |
Off |
On |
||
|
Edit sent messages |
Off |
On |
||
|
Chat |
Off |
On |
||
|
Use Giphys in conversations |
Off |
On |
||
|
Send urgent messages using priority notifications |
Off |
On |
||
|
Remove users from a group chat |
Off |
On |
||
|
Teams apps |
Microsoft apps |
Block specific apps and allow all others > Walkie Talkie blocked |
Allow all apps |
|
|
Voice |
Make private calls |
Off |
On |
|
|
Dial-out from meetings |
Off |
Off |
||
|
False |
No recommendation |