

In this guide
DNS records are special settings that control what people see when they visit your domain. They also allow you to connect your domain to third-party services such as an email provider. This guide will show you how to add, remove, and change your domain’s DNS records.
Reasons for Editing DNS Records
You may want to edit the DNS for your domain if you are:
- Configuring a custom email service with a third-party provider.
- Creating a subdomain.
- Verify domain ownership for services like Google.
View your DNS Records
To see the current DNS records on your domain, take the following steps:
- Visit the Domains Management page at tumblr.com/settings/domains.
- Click on your domain to get to the Domain Settings page.
- Expand the “DNS records” area.
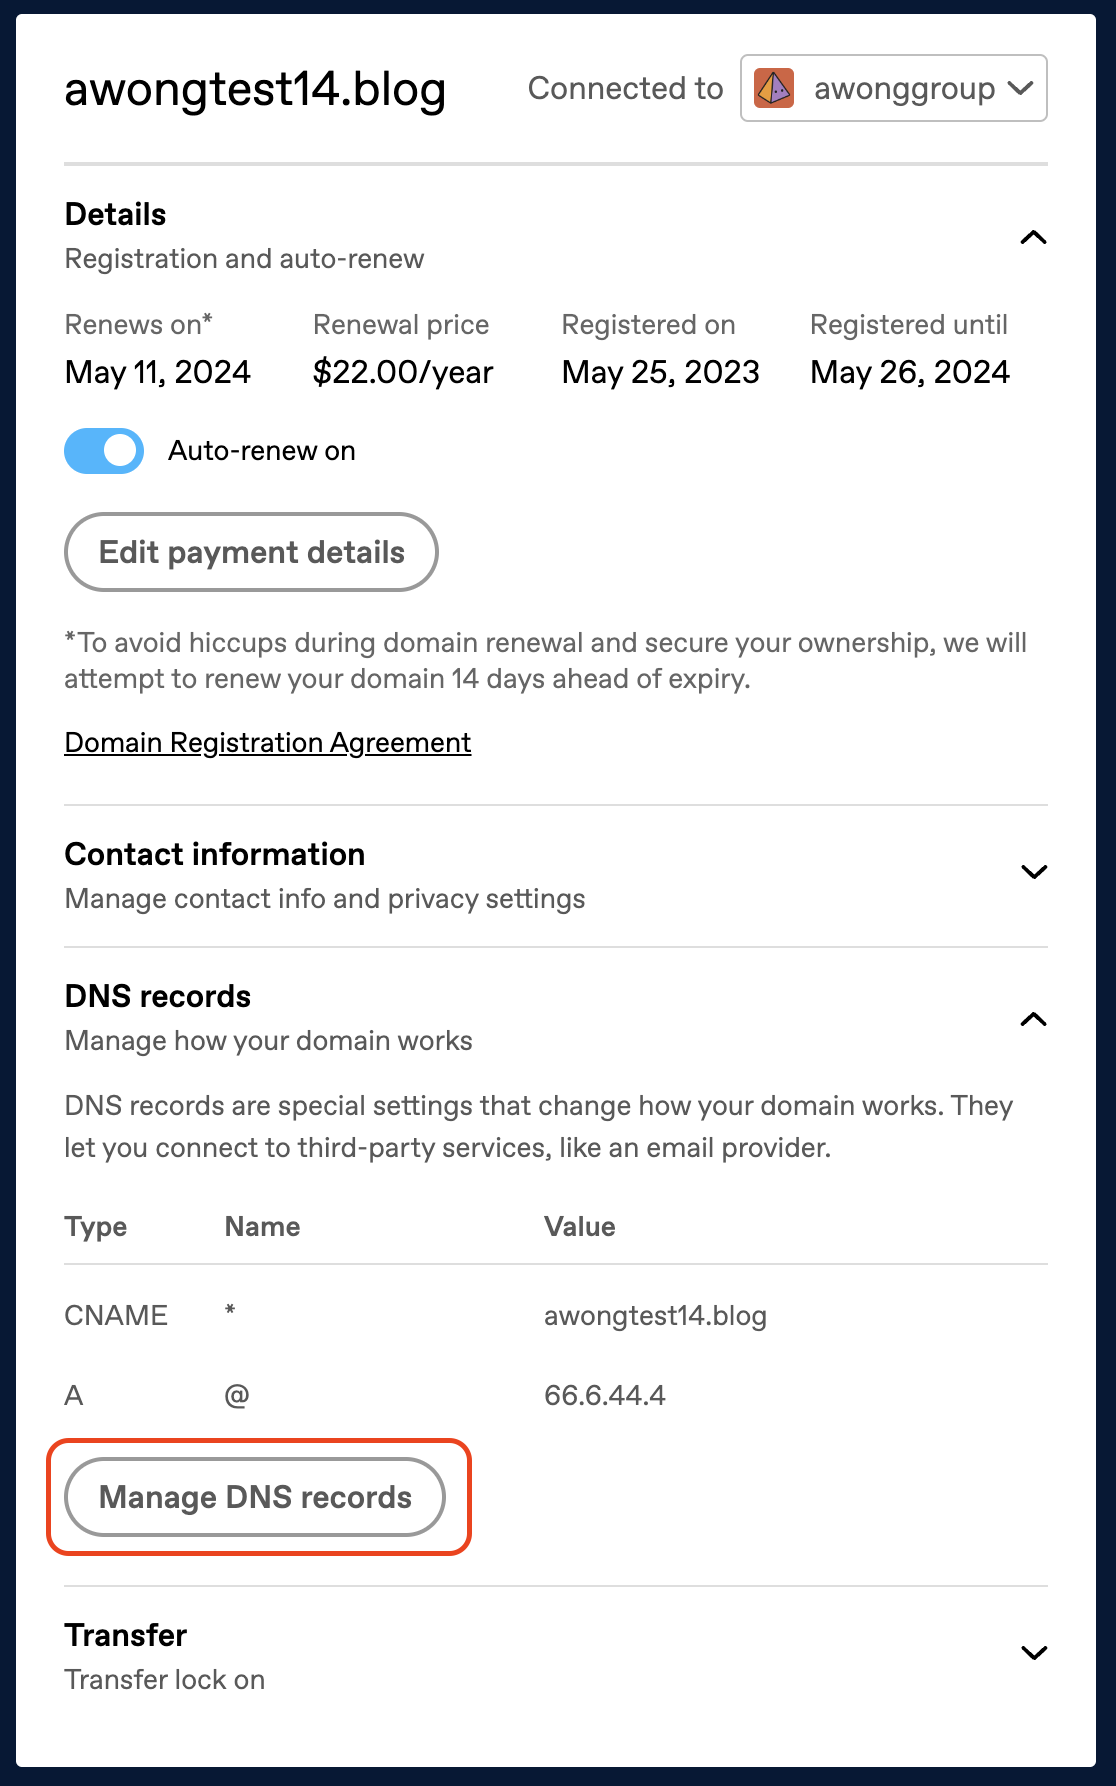
In this area, you will find a list of the current DNS records. You can then click on the “Manage DNS records” button to head to the DNS Management page to make changes.
Default Record
An A record is created by default with a value of 66.6.44.4, which enables your domain to be connected to your Tumblr blog. This record cannot be edited or deleted.
If you wish to have your domain point to an external IP address, you can do so by creating a subdomain.
Add New DNS Records
You can add the following DNS records on Tumblr:
- A
- AAAA
- CNAME (see Create a Subdomain for more info)
- MX (see Add Email Through Other Providers for more info)
- TXT
- SRV
To add a new DNS record:
- Click on “Add a record” on the DNS Management page.
- Click on the Type dropdown to select the type of DNS record you wish to add (A, AAAA, CNAME, MX, TXT, or SRV.)
- Fill in the remaining information provided to you by the service you’re adding the record for. The fields available will change depending on the record type you are adding.
- As there is no standard set of terms used for the different fields of a DNS record, different providers may use different terminology for the various DNS fields compared to what you see on tumblr.com.
TXT Record Character Limit
You can add TXT records up to 255 characters.
If you are receiving an error that your TXT record is invalid or too long (such as for a DKIM record), generate it again using a key length set to 1024 bit to be under the 255 characters limit. The provider of the record can assist you with this if needed. DKIM records split into multiple TXT records are not supported.
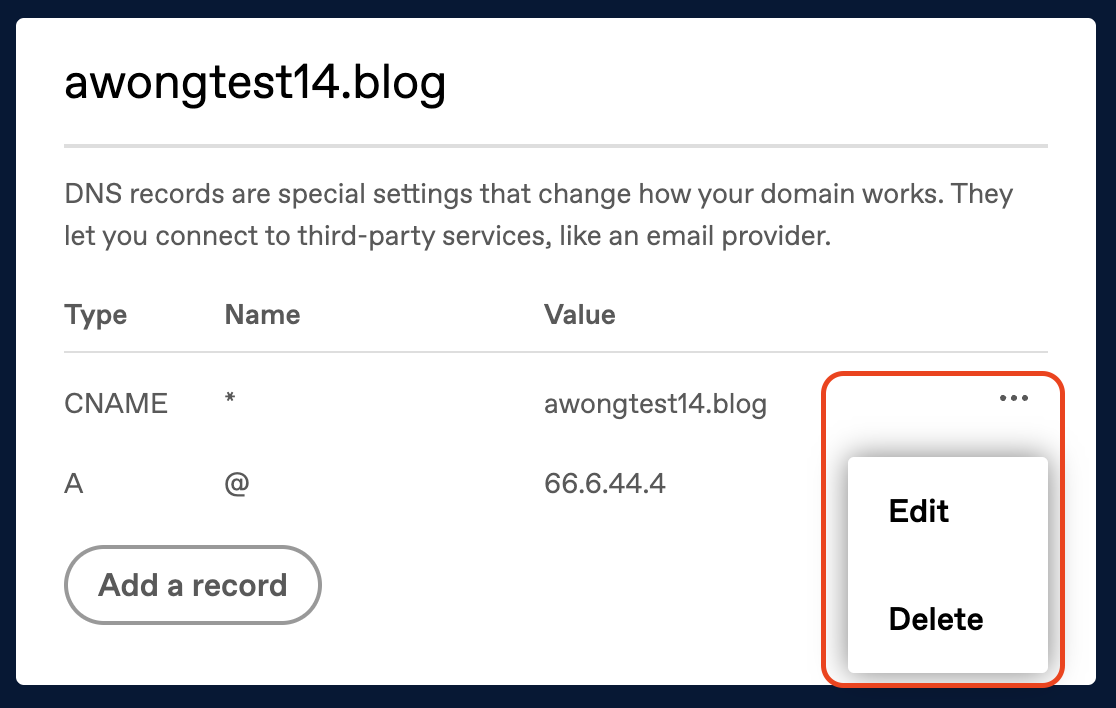
Edit or Delete DNS Records
To change or remove an existing DNS record, you can click the three dots next to an existing record on the DNS Management page, and select either Edit or Delete:
Create a Subdomain
About Subdomains
A subdomain has an extra piece of text before your main domain (called the root domain). For example, if your root domain is yourgroovydomain.com, you can create subdomains such as blog.yourgroovydomain.com and gallery.yourgroovydomain.com.
You can create a subdomain of any domain you own and connect it to an external site. Note that subdomains cannot connect to a specific page (directory) other than the homepage. For example, follows.yourgroovydomain.com could not connect to a page on your blog like yourgroovydomain.com/following.
Obtain the DNS Records
In order to connect your subdomain to an external site, you need to first obtain the required DNS record from the hosting provider or service where the subdomain will point to. Check that company’s interface, support documentation, or contact their support team to find out which DNS record(s) you need.
Once you have the DNS record(s) (typically CNAME or A records) from the hosting provider, you can add it to your root domain following these instructions:
- Click on “Add a record” on the DNS Management page for your domain.
- In the “Type” dropdown:
- Select CNAME if the record value is a host name.
- Select A if the record value is an IPv4 address, a set of numbers separated by periods (for example: 192.168.1.1).
- Select AAAA if the record value is an IPv6 address, a set of numbers and alphabets separated by colons (for example: ::ffff:c0a8:101).
- In the “Name” box, type what you want the subdomain to be.
- In the “Points to” box (for A and AAAA records) or “Alias” box (for CNAME records), enter the record value provided by the service you’re connecting to.
The subdomain will start pointing to your new host shortly, but most hosts require you to take steps to set up the subdomain on their end as well. For example, if you want to use your domain with a WordPress.com site, you can find instructions here.
Create a www Subdomain
While using our default DNS configuration, the www subdomain for domains registered at Tumblr will not resolve. If you’d like the www subdomain to redirect to your blog, you can add a CNAME record to achieve this.
- Access your domain settings here.
- Click on “DNS Records”, then click “Manage DNS Records”.
- Click “Add a Record”.
- Under “Type”, select “CNAME”
- Under “Name”, type
www - Under “Points to”, type
domains.tumblr.com
Add Email Through Other Providers
Obtain your Email DNS Records
Your domain’s email address works with the use of DNS records. The following types of DNS records are commonly used for email:
- MX (Mail Exchange)
- A (Address)
- CNAME (Canonical Name)
- TXT (Text) records
- DKIM, SPF, and DMARC records are all stored as TXT records.
Your email will require some (but not necessarily all) of these records.
To find the required or recommended records, please check with your email provider. If the information is not available on their website and you are unsure of what to ask, contact your email provider with a message like this:
Could you please provide me with the complete MX and other DNS records I will need to enter with my DNS provider (tumblr.com) so that my email on this domain will function?
Once you have obtained the DNS records from your email provider, you can add them to the domain you wish to set up email services for following these instructions.
Your email should start working within a couple of hours, but it can take up to 72 hours for everything to become fully operational.
