

1. Before you begin
In this codelab, you learn how to automate Google Workspace tasks with the function-calling and multi-modality features of the Gemini API.
Prerequisites
- Basic familiarity with Apps Script, JavaScript, or a similar programming language
What you learn
- How to leverage the Gemini API's function calling and multi-modality features.
- How to chain multiple Gemini API calls together.
- How to automate Google Workspace tasks with the Gemini API.
What you need
- A web browser.
- A Gmail account. Alternatively, a Google Workspace Account that has implemented the Gemini API's specific setup.
- A connection from a supported region for the Gemini API.
- Optional: A command-line interface with the
curlprogram to test direct API requests.
The complete code for this codelab is available in the Gemini API Cookbook on GitHub. Check it out if you need the completed code.
2. Set up the Gemini API
About Gemini
The Gemini models are Google's largest and most capable AI family of models. To take advantage of these models in your apps, you can use the Gemini API. You can also try the Gemini API in Google AI Studio, a web interface for the API where you can try prompts, tweak model settings, and tune custom models without writing any code.
Get a key
- To use the Gemini API, create an API key in Google AI Studio.
Optional: Test your key
If you have access to a command-line with curl, add your key to the first line of the following block and then run it in your terminal to test the API key.
export GOOGLE_API_KEY=Paste_your_API_key_here

curl "https://generativelanguage.googleapis.com/v1beta/models?key=${GOOGLE_API_KEY}"
You should see a list of models in JSON format, such as models/gemini-1.0-pro. This means that it worked.
3. Optional: Make a request to the Gemini API
In this optional step, you make a request to the Gemini API to better understand how content generation works before adding it to an Apps Script app.
About the models
The Gemini API provides a number of models that have different capabilities and limitations. Each of the models is listed along with their capabilities on the Gemini models page.
Making your first request
To have the Gemini API complete a text prompt, you build a JSON request and send it to the REST API endpoint.
To do so, follow these steps:
- In a new file, enter the following JSON request:
{
  contents: [
   {
     parts: [
       { text: 'The most important aspects of a persuasive presentation are:' }
     ]
   }
 ]
}
The JSON request includes the following prompt: The most important aspects of a persuasive presentation are:. The model will complete this instruction and give you the result directly.
The JSON request has three top-level fields to populate: contents, generationConfig, and safetySettings. Only contents is required. The others provide mechanisms for controlling the output.
- Save this JSON in a
presentation.txtfile and then you pass it directly tocurllike so:
curl -H 'Content-Type: application/json' -X POST -d @presentation.txt \
  'https://generativelanguage.googleapis.com/v1beta/models/gemini-1.0-pro-latest:generateContent?key='${GOOGLE_API_KEY}
In this example you set the following values in the URL:
v1betaspecifies the API version.gemini-1.0-pro-latestspecifies Gemini 1.0 Pro as the model and uses the latest snapshot.generateContentspecifies the API method that you call.
You should see results similar to the following:
{
  "candidates": [
    {
      "content": {
        "parts": [
          {
            "text": "* **Credibility:** The audience must trust that you are an expert on the subject matter and that you have their best interests at heart.\n* **Clearness:** Your message must be easy to understand and follow. Avoid using jargon or technical terms that your audience may not be familiar with.\n* **Concreteness:** Use specific examples and data to support your arguments. Avoid making vague or general claims.\n* **Emotional appeal:** In addition to appealing to the audience's logical side, you should also try to connect with them on an emotional level. Use storytelling, humor, and personal anecdotes to make your points more memorable and engaging.\n* **Strong closing:** End your presentation with a strong call to action. Tell the audience what you want them to do and why it is important for them to do it."
          }
        ],
        "role": "model"
      },
      "finishReason": "STOP",
      "index": 0,
      "safetyRatings": [...]
    }
  ],
  "promptFeedback": {
    "safetyRatings": [...]
  }
}
For the sake of readability, here's the terminal output formatted regularly:
- Credibility: The audience must trust that you are an expert on the subject matter and that you have their best interests at heart.
- Clearness: Your message must be easy to understand and follow. Avoid using jargon or technical terms that your audience may not be familiar with.
- Concreteness: Use specific examples and data to support your arguments. Avoid making vague or general claims.
- Emotional appeal: In addition to appealing to the audience's logical side, you should also try to connect with them on an emotional level. Use storytelling, humor, and personal anecdotes to make your points more memorable and engaging.
- Strong closing: End your presentation with a strong call to action. Tell the audience what you want them to do and why it is important for them to do it.
To learn more about the other settings, including generationConfig and safetySettings, see the prompt and safety guides.
4. Call the Gemini API from Apps Script
- Visit script.new and a
code.gsApps Script file is created for you automatically. - Hold your cursor over the
code.gsfile, and then click > Rename.
 - Change the filename to
utils.gs. - In the file, remove the
myFunctionfunction so that the file is empty.
Add your API key to the project
- In the navigation menu, select Project settings.
- Under Script properties, click Add script property.
- Under Property, enter
GOOGLE_API_KEY. - Under Value, enter your API key from Google AI Studio.
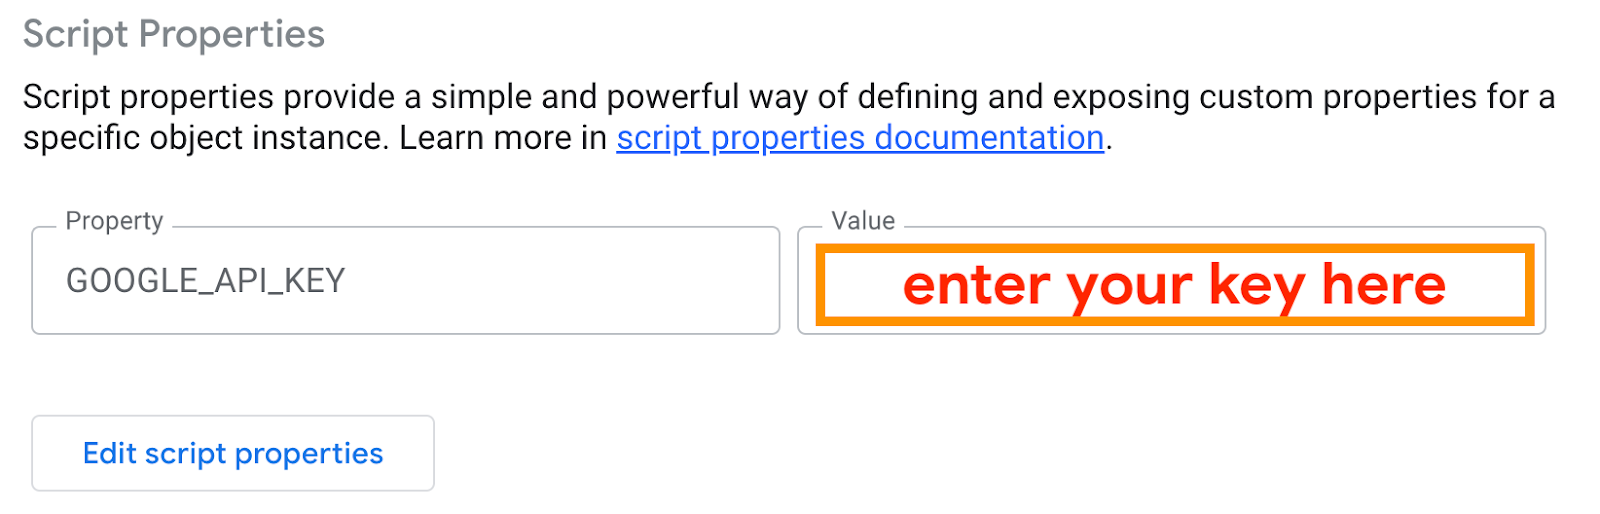
- Click Save script properties.
- Navigate back to the editor.
Add the Gemini API code
In the utils.gs file, follow these steps:
Set up the API key and endpoint:
const properties = PropertiesService.getScriptProperties().getProperties();
const geminiApiKey = properties['GOOGLE_API_KEY'];
const geminiEndpoint = `https://generativelanguage.googleapis.com/v1beta/models/gemini-1.0-pro-latest:generateContent?key=${geminiApiKey}`;
- Add the following function that calls the Gemini API with a specific prompt:
function callGemini(prompt, temperature=0) {
  const payload = {
    "contents": [
      {
        "parts": [
          {
            "text": prompt
          },
        ]
      }
    ],
    "generationConfig":  {
      "temperature": temperature,
    },
  };

  const options = {
    'method' : 'post',
    'contentType': 'application/json',
    'payload': JSON.stringify(payload)
  };

  const response = UrlFetchApp.fetch(geminiEndpoint, options);
  const data = JSON.parse(response);
  const content = data["candidates"][0]["content"]["parts"][0]["text"];
  return content;
}
- Add the following function that sets the prompt:
function testGemini() {
  const prompt = "The best thing since sliced bread is";
  const output = callGemini(prompt);
  console.log(prompt, output);
}
Test it
- Click
 Save.
Save. - Choose
testGeminiin the function dropdown list and click .
. - Accept the necessary permissions. Your code should run and you should see some console output with the results in the execution log.

It worked!
5. Call the Gemini API with images
One of the most powerful features of the Gemini family of models is the support for multi-modal input, which means that you can provide more than only text! In this section, you add a function that calls the Gemini API with an image.
- At the top of the
utils.gsfile after the existingconst geminiEndpointdeclaration, add the following line:
const geminiProVisionEndpoint = `https://generativelanguage.googleapis.com/v1beta/models/gemini-1.0-pro-vision-latest:generateContent?key=${geminiApiKey}`;
Add the Gemini Vision code
- Add a function to the
utils.gsfile to call this newly added endpoint:
function callGeminiProVision(prompt, image, temperature=0) {
  const imageData = Utilities.base64Encode(image.getAs('image/png').getBytes());

  const payload = {
    "contents": [
      {
        "parts": [
          {
            "text": prompt
          },
          {
            "inlineData": {
              "mimeType": "image/png",
              "data": imageData
            }
          }
        ]
      }
    ],
    "generationConfig":  {
      "temperature": temperature,
    },
  };

  const options = {
    'method' : 'post',
    'contentType': 'application/json',
    'payload': JSON.stringify(payload)
  };

  const response = UrlFetchApp.fetch(geminiProVisionEndpoint, options);
  const data = JSON.parse(response);
  const content = data["candidates"][0]["content"]["parts"][0]["text"];
  return content;
}
- Add the following test function:
function testGeminiVision() {
  const prompt = "Provide a fun fact about this object.";
  const image = UrlFetchApp.fetch('https://storage.googleapis.com/generativeai-downloads/images/instrument.jpg').getBlob();
  const output = callGeminiProVision(prompt, image);
  console.log(prompt, output);
}
This function loads a test image from the internet and passes it to the function that you defined. Later, you wire it to use a chart from a spreadsheet, so this is only a test.
Test it
- Save and run the
testGeminiVisionfunction, and then inspect the output.

6. Call the Gemini API with tools
In addition to text and images, you can also provide access to tools in your prompts.
Add the tool-handling code
- Add a function to the
utils.gsfile that accepts a tool specification:
function callGeminiWithTools(prompt, tools, temperature=0) {
  const payload = {
    "contents": [
      {
        "parts": [
          {
            "text": prompt
          },
        ]
      }
    ],
    "tools" : tools,
    "generationConfig":  {
      "temperature": temperature,
    },
  };

  const options = {
    'method' : 'post',
    'contentType': 'application/json',
    'payload': JSON.stringify(payload)
  };

  const response = UrlFetchApp.fetch(geminiEndpoint, options);
  const data = JSON.parse(response);
  const content = data["candidates"][0]["content"]["parts"][0]["functionCall"];
  return content;
}
For more information about this schema and the available fields, see the FunctionDeclaration API reference.
Test it
- Define a tool that the model can use to find the current date and time:
function testGeminiTools() {
  const prompt = "Tell me how many days there are left in this month.";
  const tools = {
    "function_declarations": [
      {
        "name": "datetime",
        "description": "Returns the current date and time as a formatted string.",
        "parameters": {
          "type": "string"
        }
      }
    ]
  };
  const output = callGeminiWithTools(prompt, tools);
  console.log(prompt, output);
}
The format used here is the FunctionDeclaration schema. You don't actually call the date-time function. You only receive an indication that the model requested a function call. You handle function calls in a later step.
- Save and run the
testGeminiToolsfunction to see the output.

7. Overview of demo integrations with Google Workspace
Now that you understand how function calling works, you can easily extend the Gemini model's capabilities to other services. In the next few sections, you build integrations against Google Workspace products, such as Google Drive, Google Slides, and Google Sheets. Here's a simplified diagram:

At a high level, when a user query comes in, you use the Gemini API's function calling to determine which tool to use. You build three tools that can do the following:
- Set up a meeting. The
setupMeeting()function in the diagram invokes the Gemini 1.0 Pro API to summarize a blog in Google Drive and add the summary to a newly-created meeting in Google Calendar. - Draft an email based on insights from a chart. The
draftEmail()function in the diagram invokes the Gemini 1.0 Pro Vision to analyze a chart in Google Sheets and compose an email in Gmail based on the analysis. - Create a skeleton deck. The
createDeck()function in the diagram invokes the Gemini 1.0 Pro to brainstorm bullet points for a deck in Google Slides.
For each tool, you need to do the following three things:
- Determine whether the Gemini API's function calling response asks to invoke that particular tool in an
if...elseblock. - Add the actual function to implement the tool functionality.
- Declare the tool with the Gemini API so that the Gemini model knows of the tool's existence and can return the correct function calling response.
8. Set up a meeting with Apps Script
First, you automate the setup of a meeting in Google Calendar, but you also add a description, which is a summary of a file in Google Drive.
To do so, follow these steps:
- Download this text file, which is the text copy of the Gemini 1.5 Pro launch blog.
- Upload the file to your root folder in Google Drive.
- In the editor, create a
main.gsfile and then add the following code:
function main() {
  const userQuery = "Set up a meeting at 10AM tomorrow with Helen to discuss the news in the Gemini-blog.txt file.";

  var tool_use = callGeminiWithTools(userQuery, WORKSPACE_TOOLS);
  Logger.log(tool_use);

  if(tool_use['name'] == "setupMeeting") {
    setupMeeting(tool_use['args']['time'], tool_use['args']['recipient'], tool_use['args']['filename']);
    Logger.log("Your meeting has been set up.");
 }
  else
    Logger.log("no proper tool found");
}
Here, you invoke the Gemini API's function calling capability. Next, you need to define the tool function.
- On the left of the editor, next to Services, click + Add a service > Google Calendar API > Add. This enables the advanced Google Calendar service, which you need to use for some advanced APIs later.

- In the
utils.gsfile, add the following code:
function attachFileToMeeting(event, file, fileName) {
  // Get the iCal ID for the event.
  const iCalEventId = event.getId();

  // Log the ID and title for debugging.
  console.log(`iCal event ID: ${iCalEventId}`);
  console.log(`event Title: ${event.getTitle()}`);

  // Set up the options for listing the event with the advanced Google Calendar service.
  const options = {
      iCalUID: iCalEventId,
    };

  // Use the primary calendar as the calendar ID to list events.
  const calendarId = 'primary';

  // Use the advanced Google Calendar service to list the event.
  const calEvents = Calendar.Events.list(calendarId, options);

  // Get the Calendar ID used by the advanced Google Calendar service.
  const eventId = calEvents.items[0].id;

  // Get the file URL for the attachment.
  const fileUrl = file.getUrl();

    // Set up the patch options to add the file.
    var patch = {
      attachments: [{
        'fileUrl': fileUrl,
        'title': fileName
      }]
    };

    // Patch the event to add the file as an attachment.
    Calendar.Events.patch(patch, 'primary', eventId, {"supportsAttachments": true});
}

function setupMeeting(time, recipient, filename) {
  const files = DriveApp.getFilesByName(filename);
  const file = files.next();
  const blogContent = file.getAs("text/*").getDataAsString();

  var geminiOutput = callGemini("Give me a really short title of this blog and a summary with less than three sentences. Please return the result as a JSON with two fields: title and summary. \n" +  blogContent);
  // The Gemini model likes to enclose the JSON with ```json and ```
  geminiOutput = JSON.parse(geminiOutput.replace(/```(?:json|)/g, ""));
  const title = geminiOutput['title'];
  const fileSummary = geminiOutput['summary'];

  const event = CalendarApp.getDefaultCalendar().createEventFromDescription(`meet ${recipient} at ${time} to discuss "${title}"`);
  event.setDescription(fileSummary);
  attachFileToMeeting(event, file, filename);
}
This code does the following:
- The
setupMeeting()function goes through your Google Drive and finds theGemini-blog.txtfile. This filename is automatically returned by the Gemini API's function calling in step #3. - The
setupMeeting()function calls the Gemini API to summarize the content of the file, sets up a meeting with the CalendarApp using free-form description, and adds the summary to the meeting. - The
setupMeeting()function calls theattachFileToMeeting()function to use the advanced Google Calendar service to attach the blog file to the meeting.
- At the top of the
utils.gsfile, add the following code:
const WORKSPACE_TOOLS = {
 "function_declarations": [
   {
     "name": "setupMeeting",
     "description": "Sets up a meeting in Google Calendar.",
     "parameters": {
       "type": "object",
       "properties": {
         "time": {
           "type": "string",
           "description": "The time of the meeting."
         },
         "recipient": {
           "type": "string",
           "description": "The name of the recipient."
         },
         "filename": {
           "type": "string",
           "description": "The name of the file."
         },
       },
       "required": [
         "time",
         "recipient",
         "filename"
       ]
     }
   },
   // You add tools here.
 ]
};
- In the editor, go back to the
main.gsfile and click. - If Google Workspace asks you for permission to run the script, click OK.
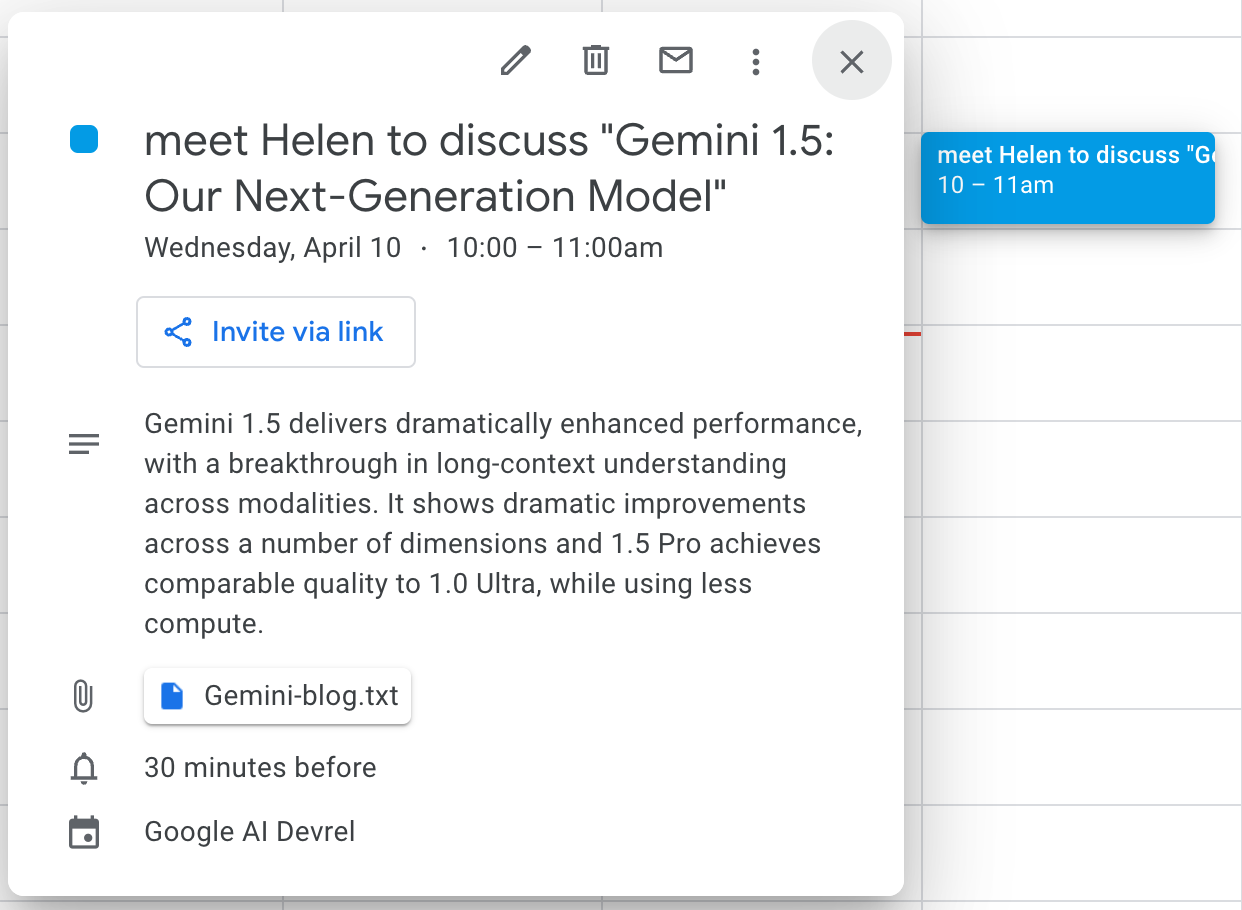
In a few seconds, the execution log displays a message that lets you know that your meeting is set up.
- In Google Calendar, look for the meeting with the summary and attachment.
9. Draft an email with Apps Script
Next, you automate the drafting of an email in Gmail. Here is the scenario: Suppose you conduct data analysis in Google Sheets. You put all the numbers in place and create a chart. You want to use the Gemini Pro Vision API to draft an email based on the chart.
To do so, follow these steps:
- Open this sheet and click File -> Make a copy.
- In the Copy document dialog's Name text box, replace the default name
Copy of CollegeExpenseswithCollegeExpenses. - In the
main.gsfile, replace the previous user query with a new one and then add the following code to theif...elsestatement:
function main() {
  // const userQuery = "Set up a meeting at 5PM with Helen to discuss the news in the Gemini-1.5-blog.txt file.";
  const userQuery = "Draft an email for Mary with insights from the chart in the CollegeExpenses sheet.";

  if(...) {...}
  // Add this code
  else if(tool_use['name'] == "draftEmail") {
    draftEmail(tool_use['args']['sheet_name'], tool_use['args']['recipient']);
    Logger.log("Check your Gmail to review the draft");
  }
  else {...}

}
- In the
utils.gsfile, add the following code:
function draftEmail(sheet_name, recipient) {

  const prompt = `Compose the email body for ${recipient} with your insights for this chart. Use information in this chart only and do not do historical comparisons. Be concise.`;

  var files = DriveApp.getFilesByName(sheet_name);
  var sheet = SpreadsheetApp.openById(files.next().getId()).getSheetByName("Sheet1");
  var expenseChart = sheet.getCharts()[0];

  var chartFile = DriveApp.createFile(expenseChart.getBlob().setName("ExpenseChart.png"));
  var emailBody = callGeminiProVision(prompt, expenseChart);
  GmailApp.createDraft(recipient+"@demo-email-provider.com", "College expenses", emailBody, {
      attachments: [chartFile.getAs(MimeType.PNG)],
      name: 'myname'
  });
}
This function retrieves the college-expense chart from the sheet and sends it to Gemini Pro Vision to draft the email. Gemini Pro Vision extracts information from the chart and drafts the email body on your behalf.
- In the
utils.gsfile, add the following code to theWORKSPACE_TOOLSobject after theYou add tools herecomment:
  WORKSPACE_TOOLS = {
    "function_declarations": [
      // You add tools here.

      {
        "name": "draftEmail",
        "description": "Write an email by analyzing data or charts in a Google Sheets file.",
        "parameters": {
          "type": "object",
          "properties": {
            "sheet_name": {
              "type": "string",
              "description": "The name of the sheet to analyze."
            },
            "recipient": {
              "type": "string",
              "description": "The name of the recipient."
            },
          },
          "required": [
            "sheet_name",
            "recipient"
          ]
        }
      },


    ]
  };
- In the editor, navigate back to the
main.gsfile and then click. - After 10-to-20 seconds, open your Gmail. You should see an email draft like this:
You can revise the email draft before you send it. The email is entirely written by Gemini Pro Vision after you give it a short prompt and the chart.
10. Create a skeleton deck with Apps Script
Next, you automate the creation of a skeleton deck in Google Slides with Apps Script.
To do so, follow these steps:
- In the
main.gsfile, replace the previous user query with a new one and add the following code to theif...elsestatement:
function main() {
  // const userQuery = "Draft an email for Mary with insights from the chart in the CollegeExpenses sheet.";
  const userQuery = "Help me put together a deck about water conservation.";

  if(...) {...}
  // Add this code
  else if(tool_use['name'] == 'createDeck') {
    deckURL = createDeck(tool_use['args']['topic']);
    Logger.log("Deck URL: " + deckURL);
  }
  else {...}

}
- In the
utils.gsfile, add the following code:
function createDeck(topic) {
  const prompt = `I'm preparing a ${NUM_SLIDES}-slide deck to discuss ${topic}. Please help me brainstorm and generate main bullet points for each slide. Keep the title of each slide short. Please produce the result as a valid JSON so that I can pass it to other APIs.`;

  var geminiOutput = callGemini(prompt, 0.4);
  // The Gemini model likes to enclose the JSON with ```json and ```
  geminiOutput = geminiOutput.replace(/```(?:json|)/g, "");
  const bulletPoints = JSON.parse(geminiOutput);

  // Create a Google Slides presentation.
  const presentation = SlidesApp.create("My New Presentation");

  // Set up the opening slide.
  var slide = presentation.getSlides()[0];
  var shapes = slide.getShapes();
  shapes[0].getText().setText(topic);

  var body;
  for (var i = 0; i < NUM_SLIDES; i++) {
      slide = presentation.appendSlide(SlidesApp.PredefinedLayout.TITLE_AND_BODY);
      shapes = slide.getShapes();
      // Set title.
      shapes[0].getText().setText(bulletPoints['slides'][i]['title']);

      // Set body.
      body = "";
      for (var j = 0; j < bulletPoints['slides'][i]['bullets'].length; j++) {
        body += '* ' + bulletPoints['slides'][i]['bullets'][j] + '\n';
      }
      shapes[1].getText().setText(body);
  }

  return presentation.getUrl();
}
This function calls the Gemini API to brainstorm a particular topic, return the bullet points in the format
of JSON, and then use Apps Script to fill a skeleton deck.
- In the
utils.gsfile, add the following code to theWORKSPACE_TOOLSobject after theYou add tools herecomment:
  WORKSPACE_TOOLS = {
    "function_declarations": [
      // You add tools here.

      {
        "name": "createDeck",
        "description": "Build a simple presentation deck with Google Slides and return the URL.",
        "parameters": {
          "type": "object",
          "properties": {
            "topic": {
              "type": "string",
              "description": "The topic that the presentation is about."
            },
          },
          "required": [
            "topic"
          ]
        }
      },


    ]
  };
- At the top of the
utils.gsfile, define the following constant:
const NUM_SLIDES = 3;
This is the number of slides that the Gemini model creates in addition to the opening slide.
- In the editor, navigate back to the
main.gsfile and then click. In a few seconds, you see a presentation URL in the execution log. - Use your browser to open the URL. You should see a skeleton deck filled with bullet points.

11. Ideas to explore
Beyond these three integrations, you can explore the following ideas:
- Build a chatbot on Google Chat. One of the most popular use cases for Large Language Models (LLMs) is building a chatbot. With the Gemini API, it's easy to build a chatbot for Google Chat. For more information, see the Google Chat API and codelab Build apps for Google Chat with Gemini.
- Retrieval-Augmented Generation (RAG) with your own data in Google Drive or Keep. In this codelab, you only use a single text file for summarization. However, you can also use the content from your personal Google Drive and Keep–like notes, PDFs, and images–with the Gemini API, a vector database, and, optionally, an orchestration tool–like LangChain–to do RAG and personalize the model's response based on your data.
- Use the Gemini API's multi-turn function-calling capability. The Gemini API's function calling isn't limited to one turn and you can multi-turn function calling for even more complex tasks.
- Go beyond Google Workspace. Now that you understand how to integrate the Gemini API with Google Workspace, you can go beyond Google Workspace and leverage other APIs in the world.
12. Congratulations
You learned about the Gemini API's multi-modal capabilities and function calling. You used them to automate some Google Workspace tasks with Apps Script!