

1. Before you begin
What are Google Chat apps with Gemini?
Google Chat apps with Gemini do the following:
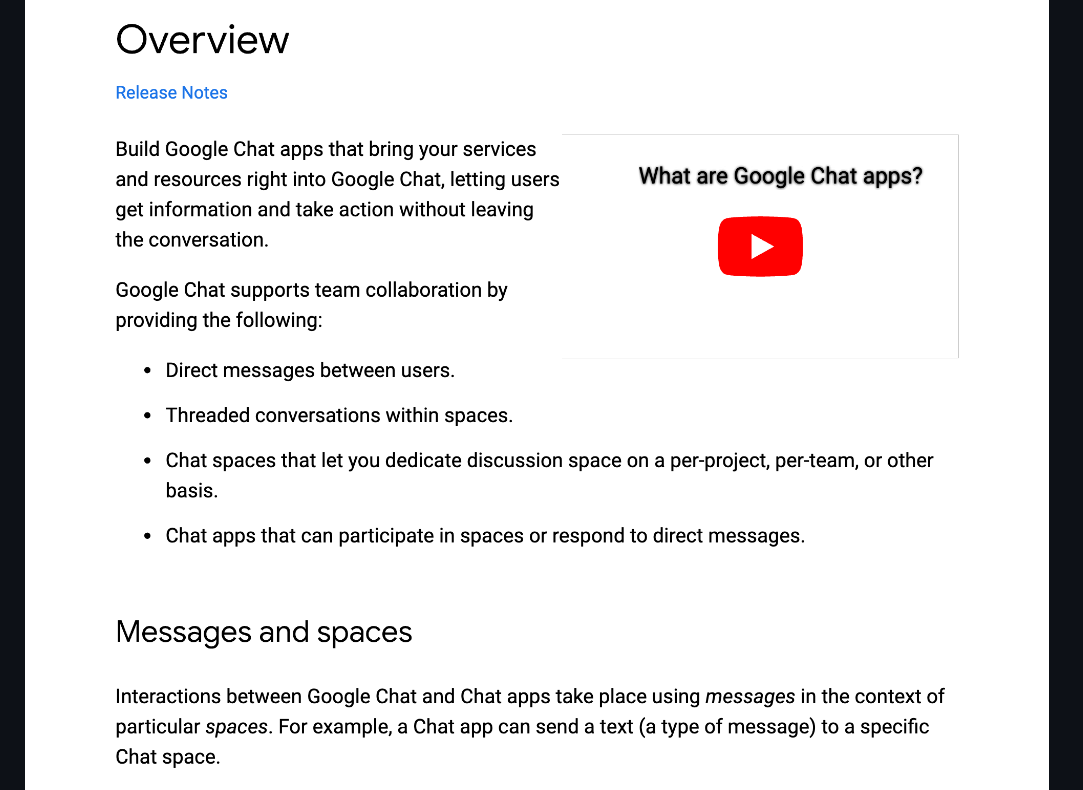
- Bring your services and resources into Google Chat, which lets users get information and take action without leaving the conversation.
- Integrate with the generative AI model Gemini, so they can create or search data like text or images at specific times to streamline your workflows.
Why integrate Google Chat apps with Gemini?
The typical use cases of Generative AI models like Gemini fall in the following categories:
- Content creation and enhancement. Generate marketing copy, craft social media posts, create realistic images, compose music, or aid in the creation of video content.
- Data search. Extract key insights from an unstructured knowledge base, summarize lengthy texts, classify contents, or translate languages with enhanced accuracy and speed.
- Conversation. Engage in natural, informative, and creative conversations.
The ability to integrate these capabilities directly within the familiar interface of Google Chat is a huge opportunity for anyone who wants to improve the experience and productivity of their users.
Prerequisites
- Basic knowledge of Apps Script, Google Cloud, and Node.js.
- Basic knowledge of Google Chat concepts, including event handlers, slash commands, dialogs, cards, messages, app authentication, and APIs.
What you build
In this codelab, you build three Google Chat apps with Gemini to cover the three use cases introduced in the previous section.
Issue management app (content creation and enhancement)
This app does the following:
- Manages issues from creation to closure with basic interactions, app home, and app authentication.
- Monitors messages and provides inclusivity help with events and accessory widgets.
You use Gemini to do the following:
- Generate issue reports based on message history and issue details.
- Classify non-inclusive words in messages with gated prompts.
The main technologies used are Vertex AI, Gemini, Apps Script, and Google Workspace APIs (Admin, Chat, Docs, Events).


Knowledge app (data search)
This app relies on Gemini to understand and answer questions in natural language and to return source references from unstructured data.
The main technologies used are Dialogflow CX data store agent, Dialogflow CX webhook, Google Cloud Functions, and Gemini.
Feedback app (conversation)
This app relies on Gemini to collect and store reviews with conversations in natural language.
The main technologies used are Dialogflow CX agent, Dialogflow CX tool, OpenAPI, Google Cloud Functions, and Gemini.

What you learn
- How to integrate Google Chat apps with Gemini through Vertex AI.
- How to integrate Google Chat apps with Dialogflow CX agents.
- How to use the latest features of Google Chat: app home, Google Chat Events, and accessory widgets.
What you need
- Completion of the Build a Google Chat app with Apps Script quickstart. This codelab builds on the resulting Apps Script and Google Cloud project.
2. Get set up
Initialize resources
In this section, you access and configure the following resources from your preferred web browser.
Apps Script project
In the Apps Script console, follow these steps:
- Click Settings and then enable the Google Apps Script API.

- Select your project.
- Click Project settings.
- Select the Show "
appsscript.json" manifest file in editor checkbox. - Rename the project to
Chat Apps Gemini.

Google Cloud project
In the Google Cloud console, follow these steps:
- Select your project.
- Click Menu ☰ > APIs & services > OAuth consent screen > Edit app, and then set App name to
Chat Apps Gemini.
- Navigate to the Google Chat API configuration, and then set the App name and Description to
Chat Apps Gemini.

Google Chat
In Google Chat, follow these steps:
- If necessary, start a chat with your Google Chat app.
- Send a message, such as
Hello, to ensure that it works.

Download source code and resources locally
- Download this GitHub repository.
- In your preferred development environment, open the
apps-script/chat-apps-geminidirectory and then navigate to the same directory in your terminal.
Install and configure clasp
We use clasp to easily edit and push versions of the source code from the local environment to the Apps Script project.
- In your local environment, install the latest versions of
node,npm, andclasp.
npm install -g @google/clasp
- Log in with your account:
clasp login

If successful, you see a basic confirmation screen in your web browser and the .clasprc.json file with your client credentials is updated. You can find where it's located in your terminal.

3. App 1: Build
Review concepts
Vertex AI
Vertex AI offers everything you need to build and use generative AI, including AI solutions, agent builder, more than 130 foundation models, and a unified AI platform.

Gemini
Gemini is a multimodal LLM from Google accessible through Vertex AI. It helps people unlock their human potential so that they can augment their imagination, expand their curiosity, and enhance their productivity.
Advanced Chat service
The Advanced Chat service lets you use the Google Chat API in Apps Script. This allows scripts to find, create, and modify Chat spaces, add or remove members to spaces, and read or post messages with text, cards, attachments, and reactions.
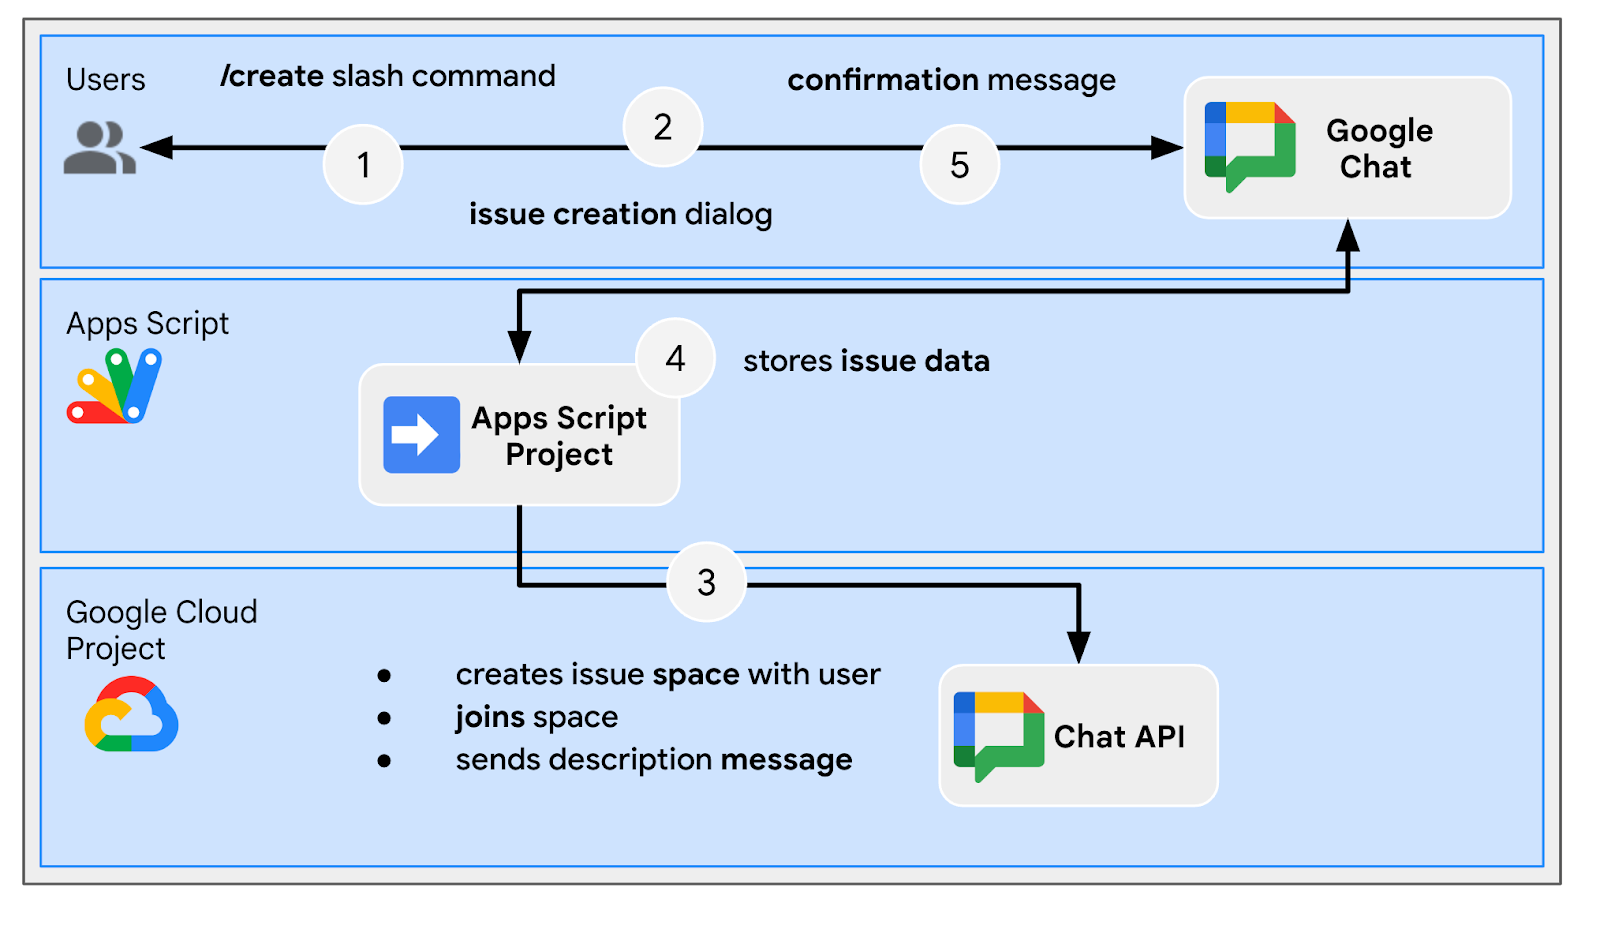
Review architecture
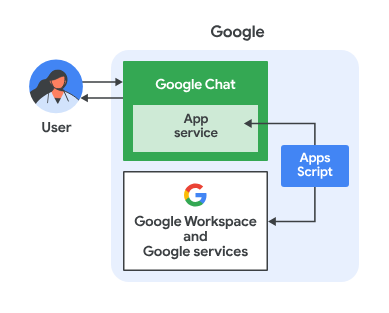
This Google Chat app is built with Apps Script. It works as follows:
- A user sends a message to the app, either in a direct message or in a space.
- The app, which is implemented in an Apps Script project and is associated with a Google Cloud project, processes the message.
- The app integrates with Google Docs and Google Chat APIs.
- The app uses the Properties Service to persist data in script properties.
- The app sends a synchronous response, either in a direct message or in the original space.
Review flows
Create issue
Troubleshoot issue from dedicated space

Close issue from dedicated space

Review source code
The Apps Script project contains the following scripts:
Configuration: Constants to edit based on the environment.ChatApp: Handles Google Chat interaction events, including messages, card clicks, slash commands, and dialogs.Storage: Utility functions that rely on Properties Services.ChatAppAuth: Utility functions that rely on Google Chat app authentication.Docs: Utility functions that rely on Google Docs.VertexAi: Utility functions that rely on Vertex AI.
And here are the parts that are actively used when generating report documents with Gemini and chat space histories:
appsscript.json
// Enables the Admin SDK Directory and Chat services, which you need to retrieve
// messages and usernames.

"enabledAdvancedServices": [
  ...
  {
    "userSymbol": "AdminDirectory",
    "version": "directory_v1",
    "serviceId": "admin"
  },
  {
    "userSymbol": "Chat",
    "version": "v1",
    "serviceId": "chat"
  }
  ...
]
// Includes the OAuth scopes to request the Admin SDK Directory, Google Chat,
// Google Docs, and Vertex AI APIs.

"oauthScopes": [
  ...
  "https://www.googleapis.com/auth/admin.directory.user.readonly",
  "https://www.googleapis.com/auth/chat.messages.readonly",
  "https://www.googleapis.com/auth/documents",
  "https://www.googleapis.com/auth/cloud-platform",
  ...
]
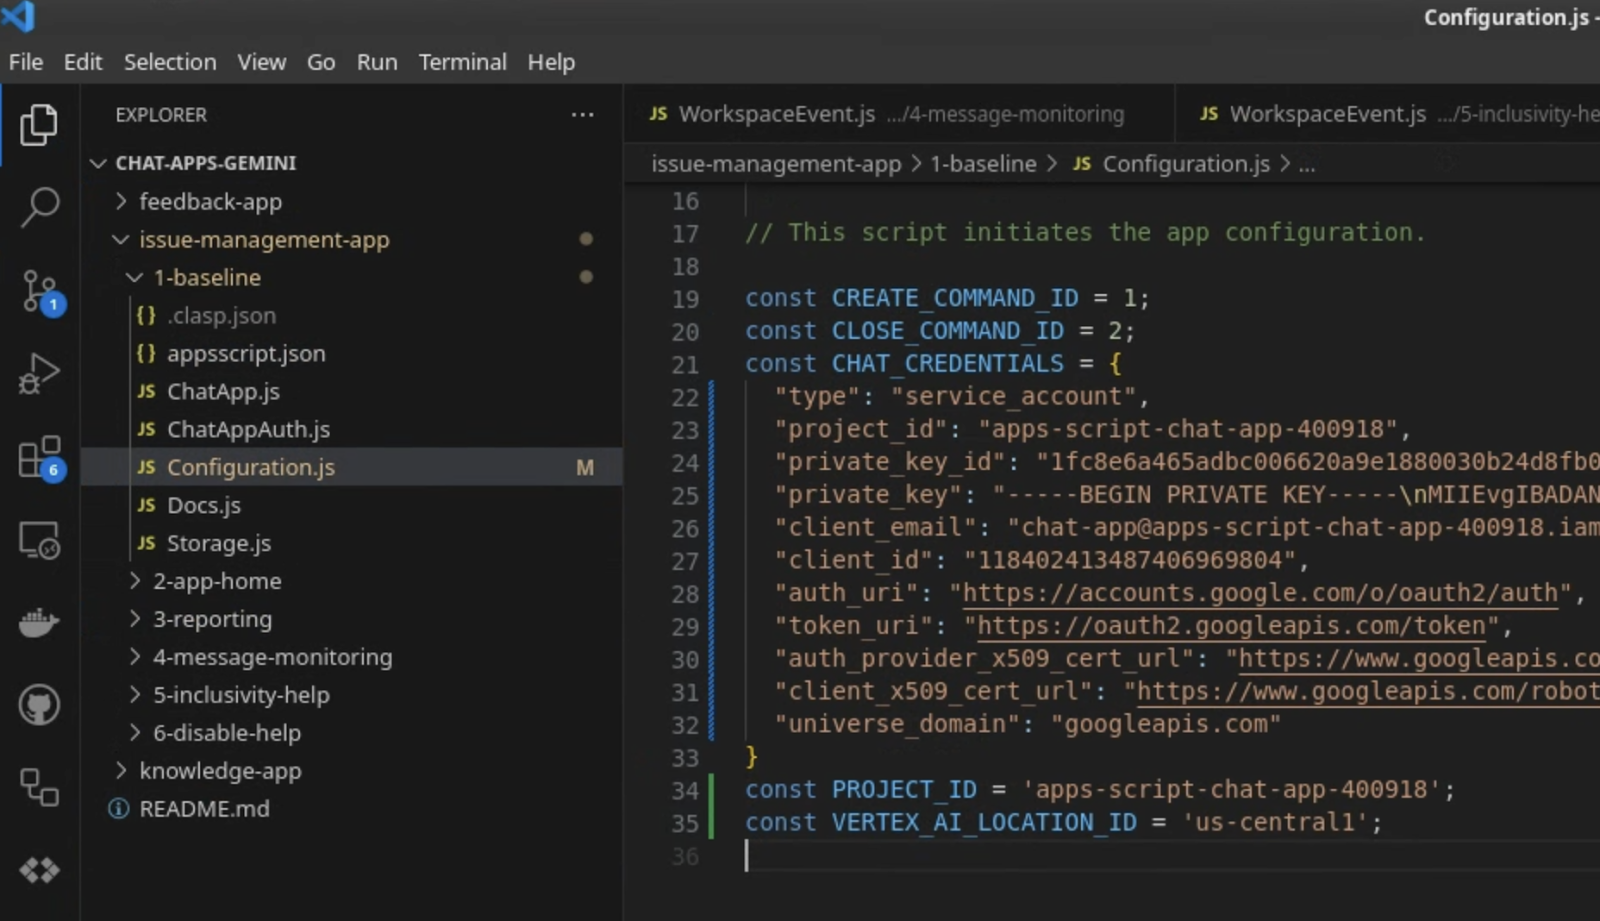
Configuration.js
// Relies on two constants: the first one is the Google Cloud project ID and the
// second one is the Vertex AI location to be used.

...
const PROJECT_ID = 'replace-with-gcp-project-id';
const VERTEX_AI_LOCATION_ID = 'us-central1';
...
ChatApp.js
// The slash command process function retrieves history, generates content, and passes
// it to the report generator.

function processSlashCommand(event) {
  ...
  if (event.message.slashCommand.commandId == CLOSE_COMMAND_ID
    && event.message.space.type !== "DM") {
    ...
    const history = exportSpaceHistory(spaceId);
    const summary = summarizeSpace(history);
    const docUrl = createReport(
      issue.title, issue.description, resolution, history, summary
    );
    ...
  }
  ...
}
/**
 * Fetches and concatenates the 100 first space messages by using the Google Chat API.
 *
 * Messages with slash commands are filtered (app command invocations).
 *
 * @return {string} concatenate space messages in the format "Sender's name: Message"
 */
function exportSpaceHistory(spaceName) {
  const messages = Chat.Spaces.Messages.list(spaceName, { 'pageSize': 100 }).messages;
  // Returns results after fetching message sender display names.
  let users = new Map();
  return messages
    .filter(message => message.slashCommand === undefined)
    .map(message =>
      `${getUserDisplayName(users, message.sender.name)}: ${message.text}`
    ).join('\n');
}
/**
 * Fetches a user's display name by using the Admin Directory API.
 *
 * A cache is used to only call the API once per user.
 *
 * @param {Map} cache the map containing users previously fetched
 * @param {string} userId the user ID to fetch
 * @return {string} the user's display name
 */
function getUserDisplayName(cache, userId) {
  if (cache.has(userId)) {
    return cache.get(userId);
  }
  let displayName = 'Unknown User';
  try {
    const user = AdminDirectory.Users.get(
      userId.replace("users/", ""),
      { projection: 'BASIC', viewType: 'domain_public' });
    displayName = user.name.displayName ? user.name.displayName : user.name.fullName;
  } catch (e) {
    // Ignores errors, uses 'Unknown User' by default.
  }
  cache.set(userId, displayName);
  return displayName;
}
VertexAi.js
/**
 * Summarizes a Google Chat space history with the Gemini Pro model using
 * Vertex AI API.
 *
 * @param {string} history the history
 * @return {string} the summary
 */
function summarizeSpace(history) {
  const url = `https://${VERTEX_AI_LOCATION_ID}-aiplatform.googleapis.com/v1`
    + `/projects/${PROJECT_ID}/locations/${VERTEX_AI_LOCATION_ID}`
    + "/publishers/google/models/gemini-1.0-pro:generateContent";
  const options = {
    method: "POST",
    headers: { Authorization: "Bearer " + ScriptApp.getOAuthToken() },
    contentType: "application/json",
    payload: JSON.stringify({
      contents: {
        role: "user",
        parts: {
          text: "Summarize the following conversation between engineers resolving"
              + " an issue in a few sentences.\n\n" + history
        }
      },
      safetySettings: {
        category: "HARM_CATEGORY_SEXUALLY_EXPLICIT",
        threshold: "BLOCK_LOW_AND_ABOVE"
      },
      generationConfig: {
        temperature: 0.2,
        topP: 0.8,
        topK: 40
      }
    })
  };

  return JSON.parse(UrlFetchApp.fetch(url, options).getContentText())
    .candidates[0].content.parts[0].text;
}
Docs.js
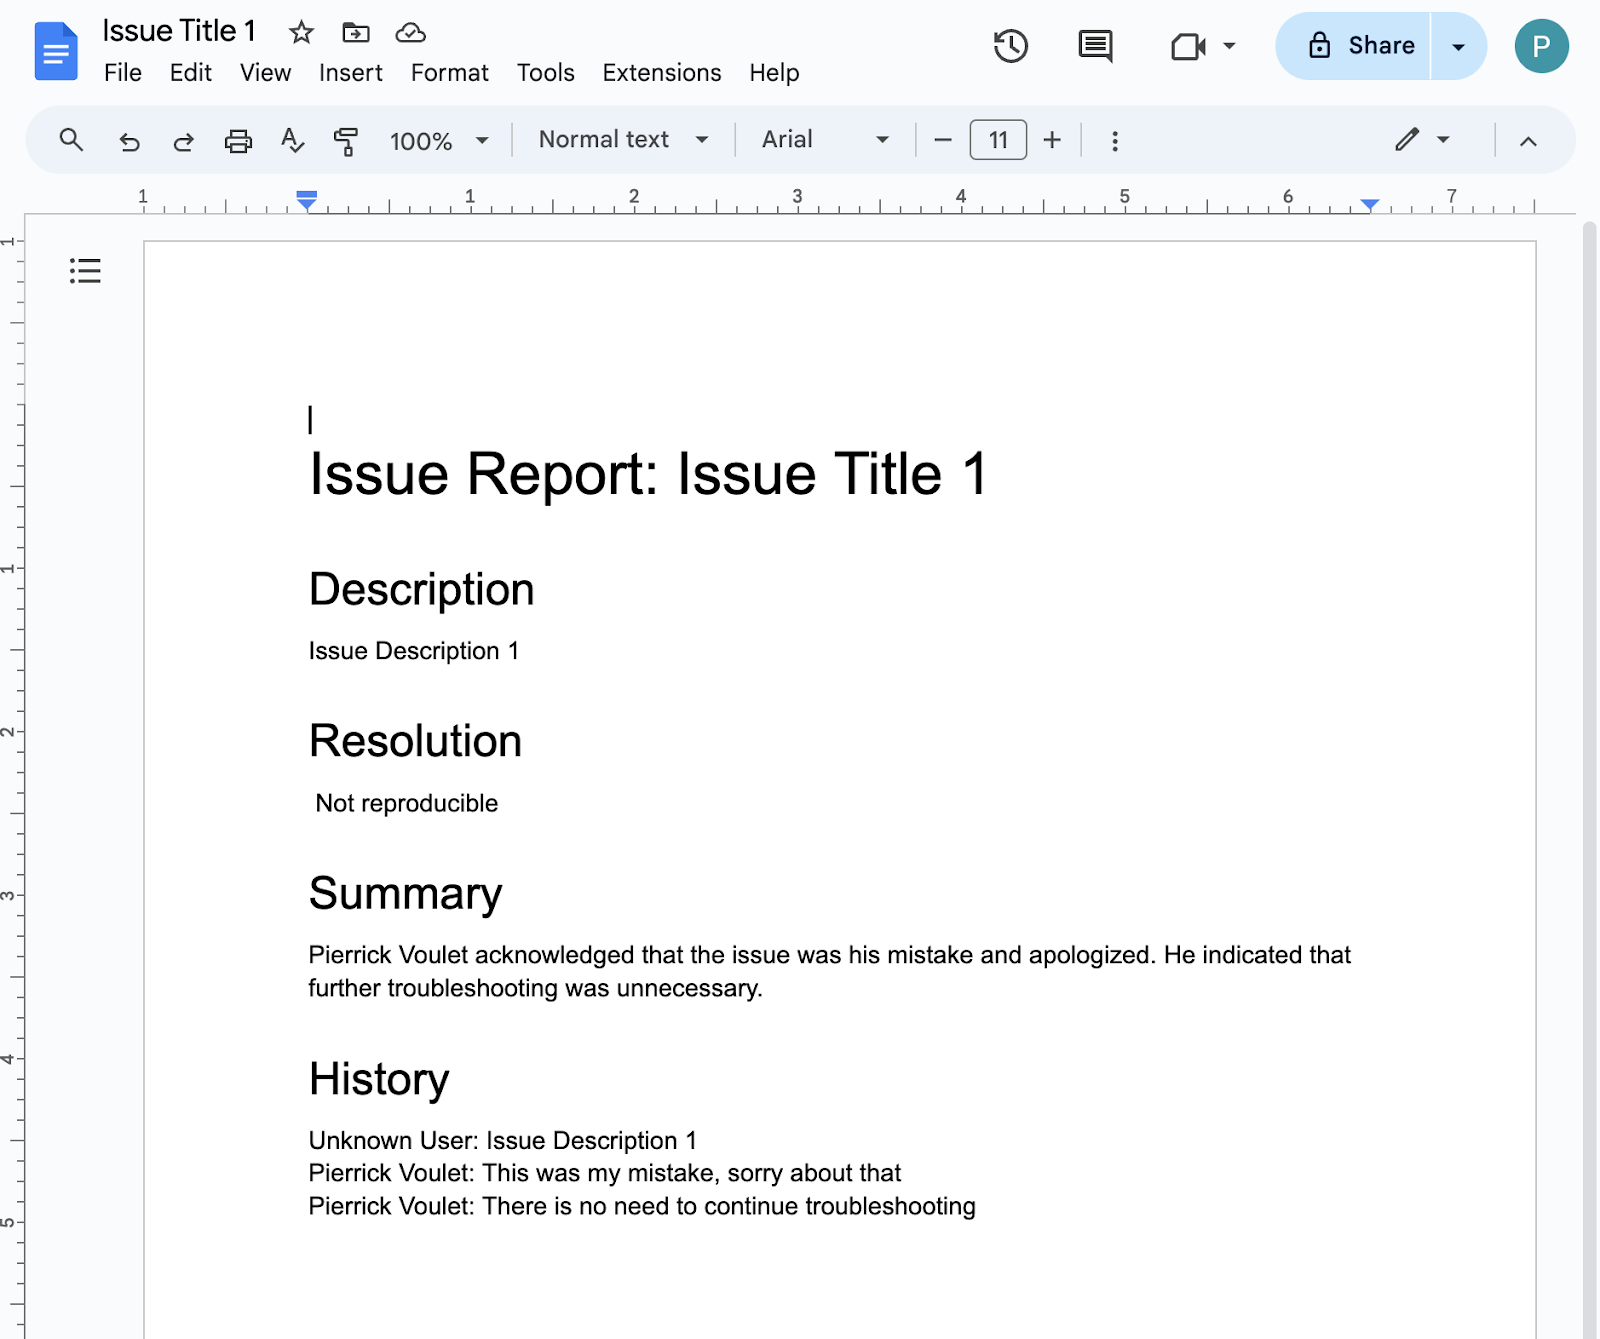
// The report generator function adds two sections: the first one is for the summary and the second one is for history.
function createReport(..., history, summary) {
  ...
  body.appendParagraph("Summary").setHeading(DocumentApp.ParagraphHeading.HEADING1);
  body.appendParagraph(summary);
  body.appendParagraph("History").setHeading(DocumentApp.ParagraphHeading.HEADING1);
  body.appendParagraph(history);
  ...
}
Update Google Cloud project
Enable APIs
- In the Google Cloud console, enable the Google Docs, Google Admin SDK, and Vertex AI APIs:
- Click Menu ☰ > APIs & Services > Enabled APIs & Services and then confirm that the APIs are enabled.
Initiate service account
In the Google Cloud console, follow these steps:
- Click Menu ☰ > IAM & Admin > Service Accounts > + Create service account.
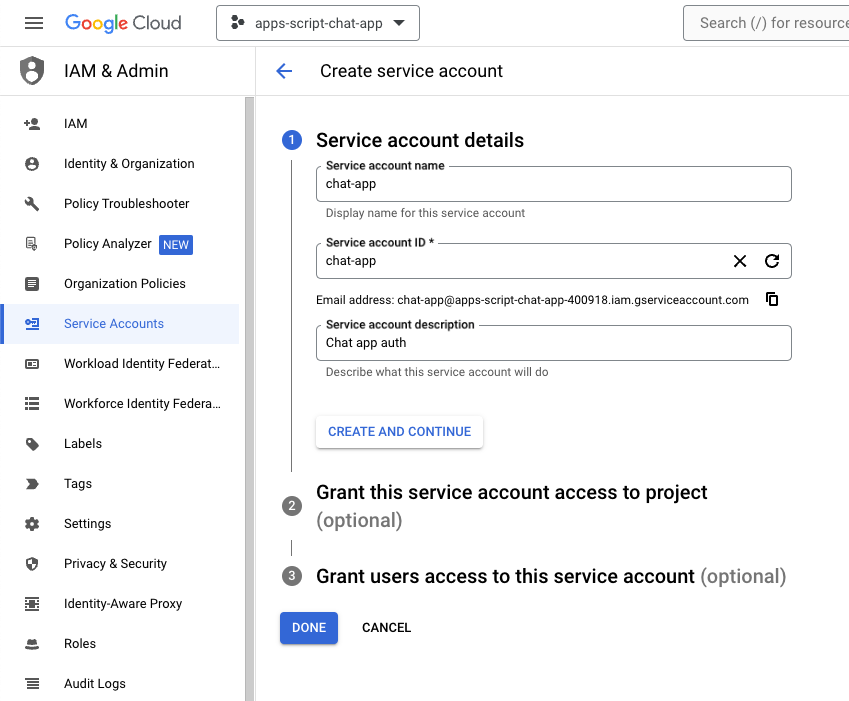
- Set Service account name to
chat-app. - Set Service account description to
Chat app auth. - Click Create and continue.
- Click Done. You're redirected to the Service accounts page and can see the service account that you created.

- Select the newly created service account.
- Select the Keys tab.
- Click Add key.
- Click Create new key.
- Select JSON.
- Click Create.

The dialog closes and your newly created public/private key pair is automatically downloaded to your local environment as a JSON file. You use its content later when you edit your Apps Script project's source code.
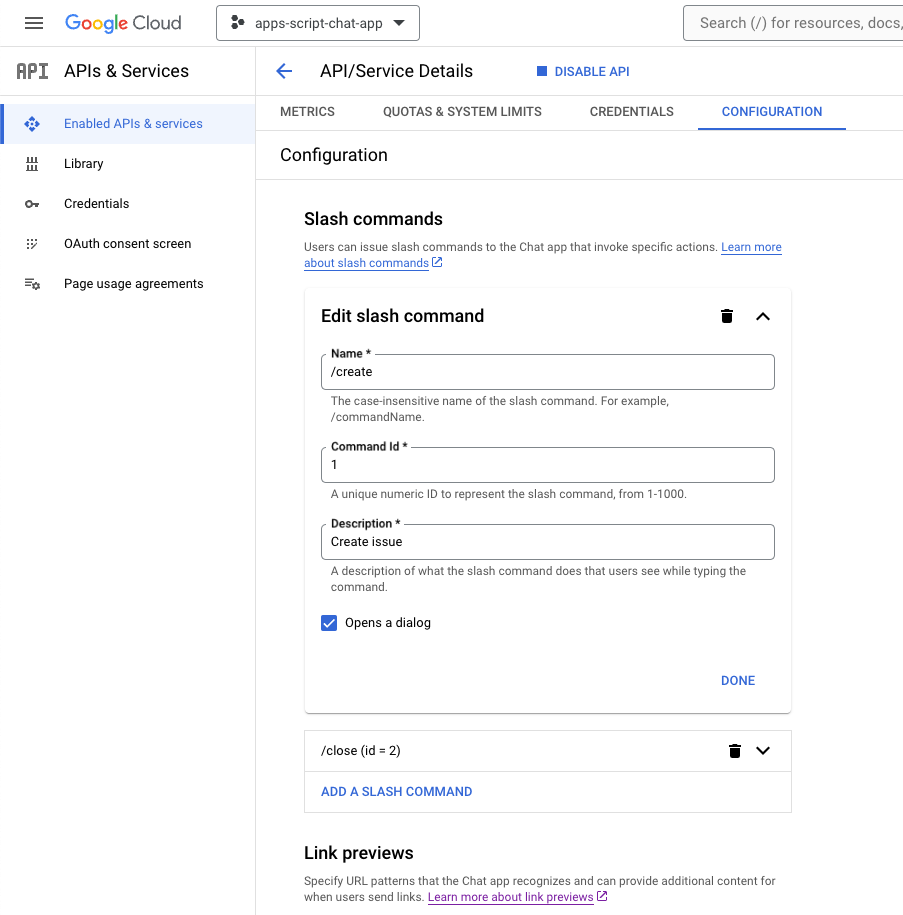
Update Google Chat API configuration
In the Google Cloud console, follow these steps:
- Add a slash command.
- Set Name to
/create. - Set Command ID to
1. - Set Description to
Create a new issue. - Select the Opens a dialog checkbox.
- Add another slash command.
- Set Name to
/close. - Set Command ID to
2. - Set Description to
Close an issue. - Click Save.
Update Apps Script project
- Change the current directory in your local terminal to
issue-management/1-baseline. It contains the source code. Before pushing the source code to your Apps Script project, you need to configure a few things.
Configure source code
- Set the JSON constant named
CHAT_CREDENTIALSin theConfiguration.jsfile to the private key file content that you downloaded previously.

- In the Google Cloud console, click Menu ☰ > IAM & Admin > Settings.
- Copy the project ID.

- Set the string constant named
PROJECT_IDin theConfiguration.jsfile to the project ID.
Configure clasp settings
To initialize clasp settings to push the source code to the right Apps Script project, follow these steps:
- In the Apps Script console, select your project.
- Select Project Settings.
- Under IDs, click Copy.

- In the current directory, create a
.clasp.jsonfile. - Replace
<your-script-id>with the copied ID. - Copy the result to the
.clasp.jsonfile. - Save the
.clasp.jsonfile.
{
  "scriptId": "<your-script-id>"
}
Push source code
- Run the following command:
$clasp push
? Manifest file has been updated. Do you want to push and overwrite? Yes
└─ appsscript.json
└─ ChatApp.js
└─ ChatAppAuth.js
└─ Configuration.js
└─ Docs.js
└─ Storage.js
└─ VertexAi.js
Pushed 7 files.
Try it
- In Google Chat, send
Hello!in a direct message to the app. The app doesn't reply, but a message appears that prompts configuration.

- Click Configure.
- Select your Google Account.
- Authenticate.
- Review and allow access to the app.
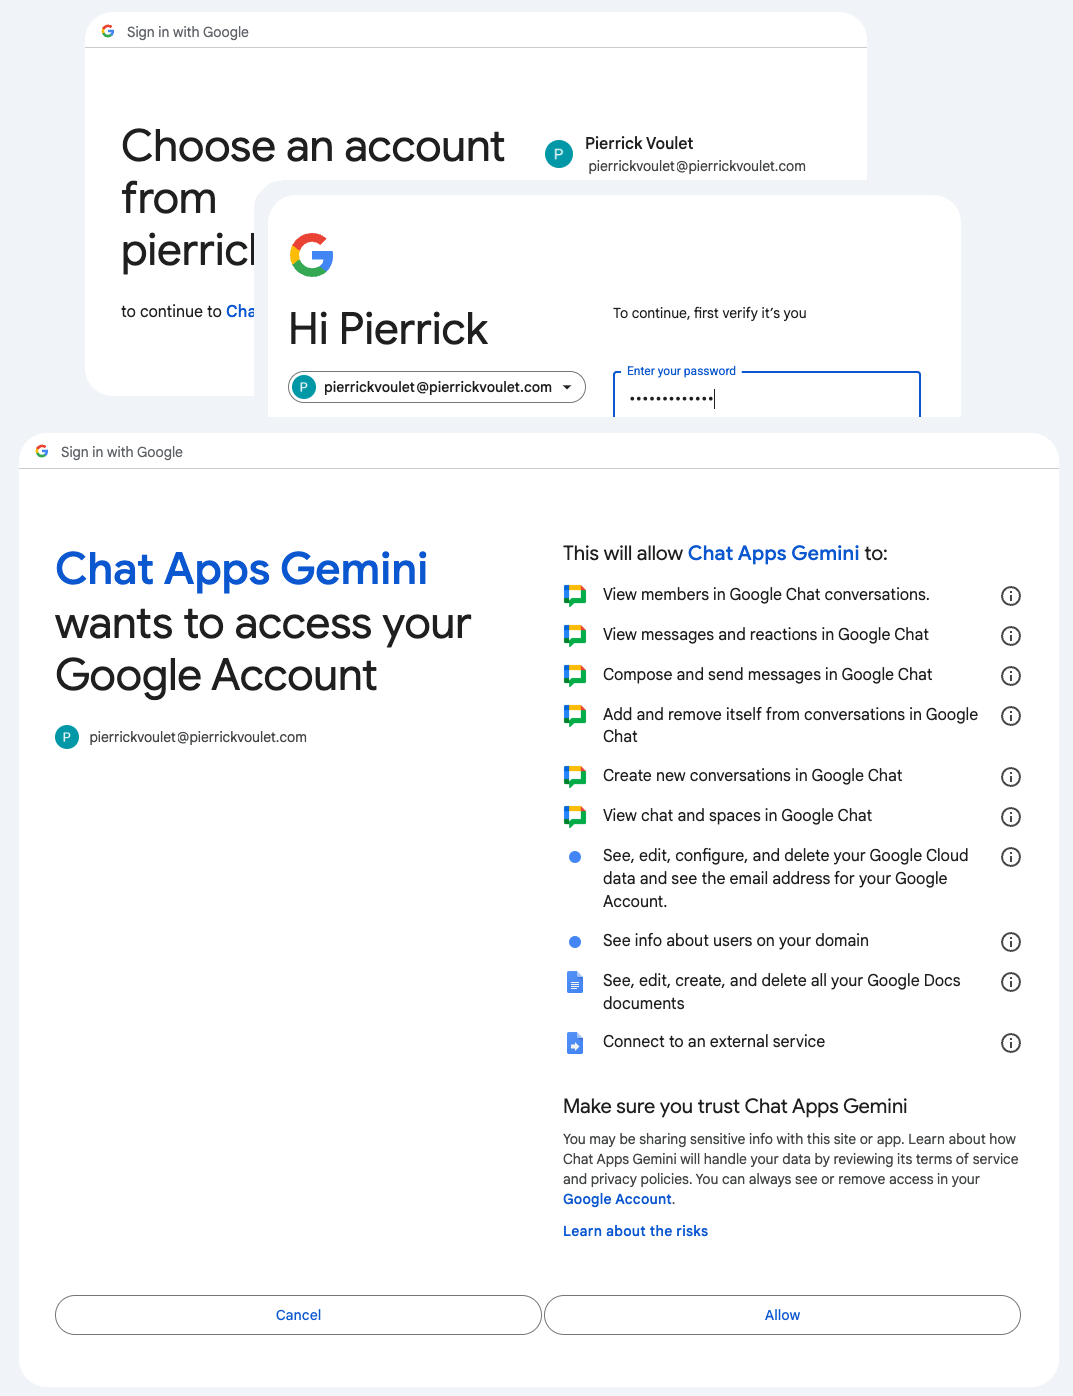
If successful, you see a basic confirmation screen on the web page and an actual response from the app to your original message.

- Send another direct message to the app, but with the slash command
/create.

- In the dialog, set Title to
Issue Title 1. - Set Description to Issue
Description 1. - Click Create.
The app does the following:
- Closes the dialog.
- Creates a space dedicated to the newly created issue with the same title.
- Joins the newly created space.
- Sends a message containing the description of the issue in the newly created space.
- Sends a direct message to you with a link to the newly created space.

- In the newly created space, send a message with the slash command
/closeand resolution such asNot reproducible.

The app does the following:
- Creates a report document in Google Docs.
- Sends a message to the space dedicated to the issue with a link to the newly created report document.
- Open the report document. It contains basic information, the history, and a summary.
4. Optional: App 1: Add app home
Review concepts
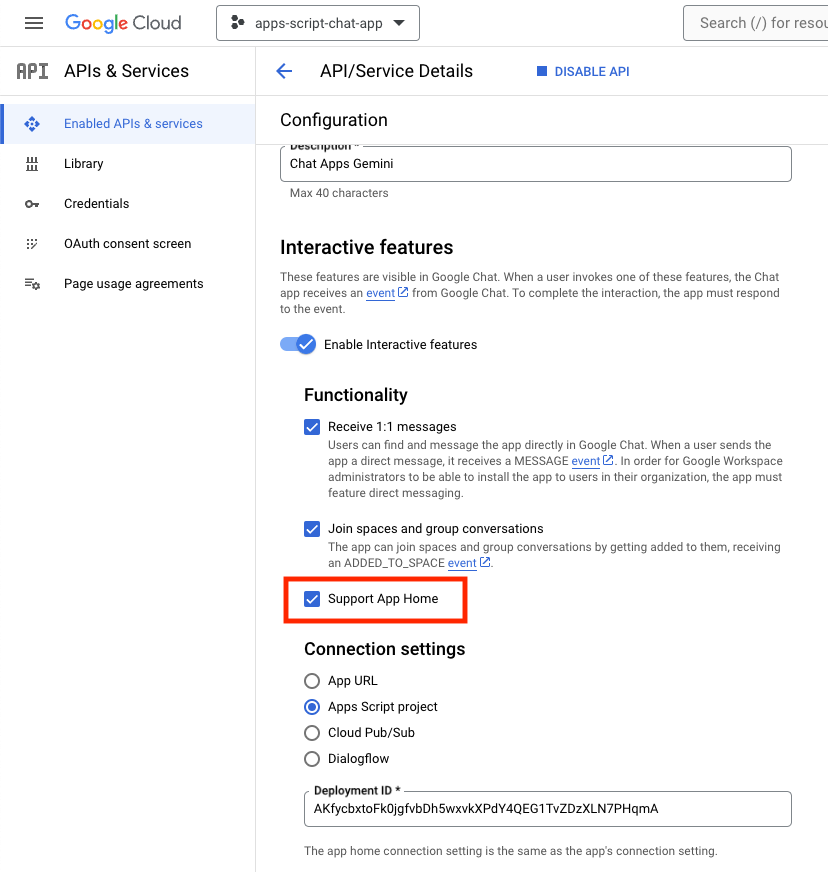
App home is a customizable card message that a Chat app sends to a user when the user accesses the Home tab from a direct message with the Chat app. This is typically used to display app documentation or an overview. Technically, there is a dedicated event to handle and it's based on the same core principles as card messages.
Review flows
Manage issues

Review source code
The Apps Script project needs to be edited.
ChatApp.js
/**
 * Handles app home requests in Google Chat.
 *
 * Displays the latest status of all issues.
 */
function onAppHome() {
  // Generates one card section per issue.
  var sections = [];
  for (var issueKey in appProperties.getProperties()) {
    const issue = JSON.parse(appProperties.getProperty(issueKey));
    if (issue.spaceId) {
      sections.push({
        header: `${issue.status} - ${issue.title}`,
        widgets: [{ textParagraph: {
            text: `Description: ${issue.description}`
          }}, { textParagraph: {
            text: `Resolution: ${issue.resolution}`
          }}, { buttonList: { buttons: [{
              text: "Open space",
              onClick: { openLink: {
                url: `https://mail.google.com/mail/u/0/#chat/space/${issue.spaceId}`
              }}
            }, {
              text: "Open report",
              onClick: { openLink: {
                url: issue.reportUrl !== "" ? issue.reportUrl : "docs.new"
              }},
              disabled: issue.reportUrl === ""
          }]}
        }]
      });
    }
  }

  return { action: { navigations: [{ push_card: {
    sections: sections
  }}]}};
}
Update Google Cloud project
In the Google Cloud console, follow these steps:
In your local environment, follow these steps:
- Change the current directory in your terminal to
issue-management/2-app-home. It contains the source code that you need to use. - Copy the
issue-management/1-baseline/.clasp.jsonfile to your current directory. - Copy the
issue-management/1-baseline/Configuration.jsfile to your current directory so that it replaces the existing one. - Run the following command:
clasp push
Try it
In Google Chat, follow these steps:
- Send a direct message with the slash command
/createto the app. The app opens a dialog. - Set Title to
Issue Title 2. - Set Description to Issue
Description 2. - Click Create.

- Select the Home tab from your space with the Google Chat app. You can see the details of the issues that you created.

5. Optional: App 1: Add space monitoring
Review concepts
Pub/Sub
Pub/Sub is an asynchronous and scalable messaging service that decouples services producing messages from services processing those messages. Pub/Sub lets you create systems of event producers and consumers, called publishers and subscribers. Publishers communicate with subscribers asynchronously by broadcasting events, rather than by synchronous remote procedure calls (RPCs).
Publishers send events to the Pub/Sub service without regard for how or when these events are to be processed. Pub/Sub then delivers events to all the services that react to them. In systems communicating through RPCs, publishers must wait for subscribers to receive the data. However, the asynchronous integration in Pub/Sub increases the flexibility and robustness of the overall system.
Topic: A named resource that represents a feed of messages. You must create a topic before you can publish or subscribe to it.
Subscription: To receive messages published to a topic, you must create a subscription to that topic. The subscriber client receives and processes the messages published to the topic. A topic can have multiple subscriptions, but a given subscription belongs to a single topic.
Google Workspace events
Google Workspace events represent changes to Google Workspace resources, such as when resources are created, updated, or deleted. Apps can subscribe to Google Workspace resources to receive and process relevant events asynchronously.

Here's how the Google Workspace Events API delivers events to an app through a subscription:
- The app subscribes to a resource in a Google Workspace app, such as a space.
- The resource to which the app subscribed changes.
- The Google Workspace app delivers an event to a topic in Pub/Sub, which serves as the notification endpoint for the app's Google Workspace subscription. The event contains data about what changed in the resource.
- The app processes the Pub/Sub message that contains the event and, if necessary, takes action.
Review flows
Create issue (update)

Troubleshoot issue from dedicated space (update)

Close issue from dedicated space (update)

Process subscriptions

Review source code
The Apps Script project needs to be edited.
appsscript.json
// Enables the Workspace Events service.

"enabledAdvancedServices": [
  ...
  {
    "userSymbol": "WorkspaceEvents",
    "version": "v1",
    "serviceId": "workspaceevents"
  }
  ...
]
Configuration.js
// Adds two constants: the first one is the Pub/Sub topic ID and the second one
// is the Pub/Sub subscription ID to be used to retrieve Google Workspace events.

...
const GWS_PUBSUB_TOPIC_ID = `projects/${PROJECT_ID}/topics/workspace-events`;
const GWS_PUBSUB_SUBSCRIPTION_ID =
  `projects/${PROJECT_ID}/subscriptions/workspace-events-sub`;
...
ChatApp.js
// Edits the function to delete the subscription at issue closure.

function processSlashCommand(event) {
  ...
  if (event.message.slashCommand.commandId == CLOSE_COMMAND_ID
    && event.message.space.type !== "DM") {
    ...
    deleteSubscription(issue.subscriptionId);
    ...
  }
  ...
}
// Edits the function to create the subscription.

function createIssue(event) {
  ...
  const subscriptionId = createSpaceSubscription(spaceUrl);
  const createdIssue = saveCreatedIssue(..., subscriptionId);
  ...
}
// Edits the function to delete the subscription.

function onRemoveFromSpace(event) {
  ...
  deleteSubscription(issue.subscriptionId);
  ...
}
Storage.js
// Edits the function to keep track of the subscription ID.

function saveCreatedIssue(..., spaceId, subscriptionId) {
  ...
  appProperties.setProperty(spaceId, JSON.stringify({
    ...
    subscriptionId: subscriptionId,
    ...
  }));
  ...
}
WorkspaceEvent.js
/**
 * Creates a new subscription to Google Workspace Events associated to a
 * Google Chat space.
 *
 * The subscription scope includes message creation events and resources.
 *
 * @param {string} spaceId the space ID to create a subscription for
 * @return the ID of the newly created subscription
 */
function createSpaceSubscription(spaceId) {
  const operation = WorkspaceEvents.Subscriptions.create({
    targetResource: `//chat.googleapis.com/${spaceId}`,
    eventTypes: ["google.workspace.chat.message.v1.created"],
    notificationEndpoint: { pubsubTopic: GWS_PUBSUB_TOPIC_ID },
    payloadOptions: { includeResource: true },
  });

  return operation.response.name;
}
/**
 * Processes events from subscription by using the Google Cloud PubSub API.
 *
 * It pulls and acknowledges each event.
 */
function processSubscription() {
  const response = UrlFetchApp.fetch(
    `https://pubsub.googleapis.com/v1/${GWS_PUBSUB_SUBSCRIPTION_ID}:pull`,
    {
      method: "POST",
      contentType: "application/json",
      headers: { "Authorization": "Bearer " + ScriptApp.getOAuthToken() },
      payload: JSON.stringify({ maxMessages: 10 })
    }
  );

  const messages = JSON.parse(response.getContentText()).receivedMessages;
  for (var messageIndex in messages) {
    const message = messages[messageIndex];
    const ceType = message.message.attributes["ce-type"];
    const dataStr = Utilities.newBlob(Utilities.base64Decode(message.message.data))
      .getDataAsString();
    if (ceType === "google.workspace.events.subscription.v1.expirationReminder") {
      // Renews subscription.
      renewSubscription(JSON.parse(dataStr).subscription.name);
    } else if (ceType === "google.workspace.chat.message.v1.created") {
      // Processes the message text when it's sent in a space.
      const chatMessage = JSON.parse(dataStr).message;
      if (chatMessage.sender.type !== "BOT") {
        console.log("Message was processed.");
      }
    }
    // Acknowledges successful processing to avoid getting it again next time.
    ackSubscription(message.ackId);
  }
}
/**
 * Acknowledges a subscription event by using the Google Cloud PubSub API.
 *
 * @param {string} ackId the ID of the event acknowledgment to send
 */
function ackSubscription(ackId) {
  UrlFetchApp.fetch(
    `https://pubsub.googleapis.com/v1/${GWS_PUBSUB_SUBSCRIPTION_ID}:acknowledge`,
    {
      method: "POST",
      contentType: "application/json",
      headers: { "Authorization": "Bearer " + ScriptApp.getOAuthToken() },
      payload: JSON.stringify({
        ackIds: [ackId]
      })
    }
  );
}
/**
 * Renews a subscription to Google Workspace Events.
 *
 * The default time to live option is used.
 *
 * @param {string} subscriptionId the ID of the subscription to renew
 */
function renewSubscription(subscriptionId) {
  WorkspaceEvents.Subscriptions.patch({ttl: '0s'}, subscriptionId);
}
/**
 * Deletes a subscription to Google Workspace Events.
 *
 * @param {string} subscriptionId the ID of the subscription to delete
 */
function deleteSubscription(subscriptionId) {
  WorkspaceEvents.Subscriptions.remove(subscriptionId);
}
Update Google Cloud project
Enable APIs
- In the Google Cloud console, enable Google Workspace Events and PubSub.
- Click Menu ☰ > APIs & services > Enabled APIs & services and then confirm that both are enabled.
Initiate subscription
You need to create and subscribe to a Pub/Sub topic for all workspace events to be posted.
In the Google Cloud console, follow these steps:
- Go to Menu ☰ > Pub/Sub > Topics.
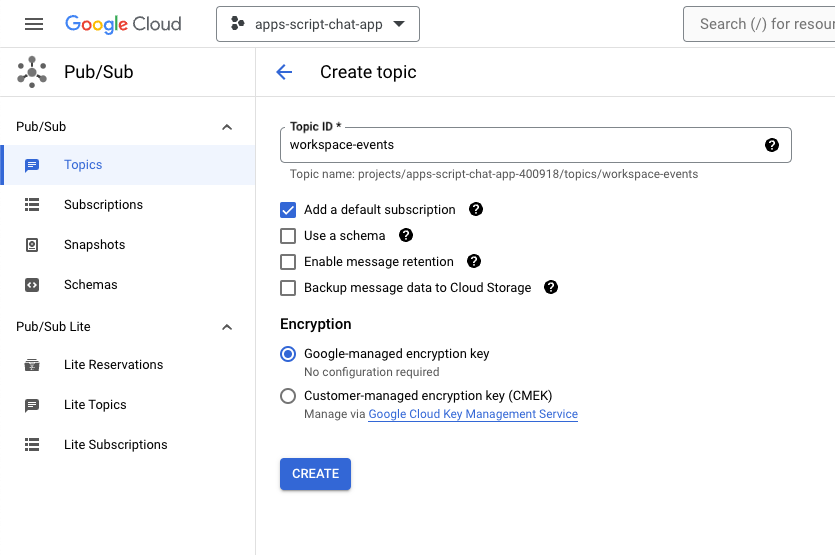
- Click Create topic.
- Set Topic ID to
workspace-events. - Select the Add a default subscription checkbox.
- Click Create.
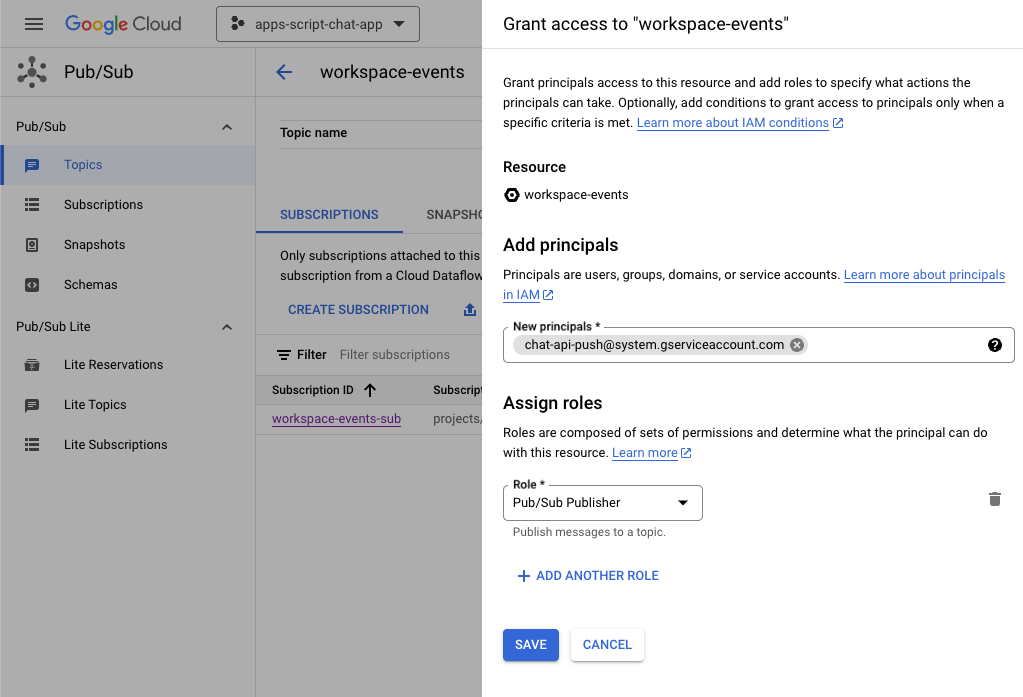
To grant access to publish Pub/Sub messages to your newly created topic from Google Chat, follow these steps:
- Select the topic from the list.
- Select the Permissions tab.
- Add
[email protected]to New principals. - Select Pub/Sub Publisher for Role.
- Click Save.
Update Apps Script project
In the Google Cloud console, follow these steps:
- Go to Menu ☰ > IAM & Admin > Settings.
- Copy the project ID.
In your local environment, follow these steps:
- Change the current directory in your terminal to
issue-management/3-message-monitoring. It contains the source code that you need. - Set the string constant named
PROJECT_IDin theConfiguration.jsfile to the copied project ID. - Set the JSON constant named
CHAT_CREDENTIALSin theConfiguration.jsfile to the private key file content that you downloaded earlier. - Copy the
issue-management/2-app-home/.clasp.jsonfile to your current directory. - Run the following command:
clasp push
Try it
In Google Chat, follow these steps:
- Send a direct message with the slash command
/createto the app. The app opens a dialog. - Set Title to
Issue Title 3. - Set Description to Issue
Description 3. - Click Create.
- In the newly created space, send a few messages that discuss the issue.
- Send a message with the slash command
/closeand resolution such asFixed.
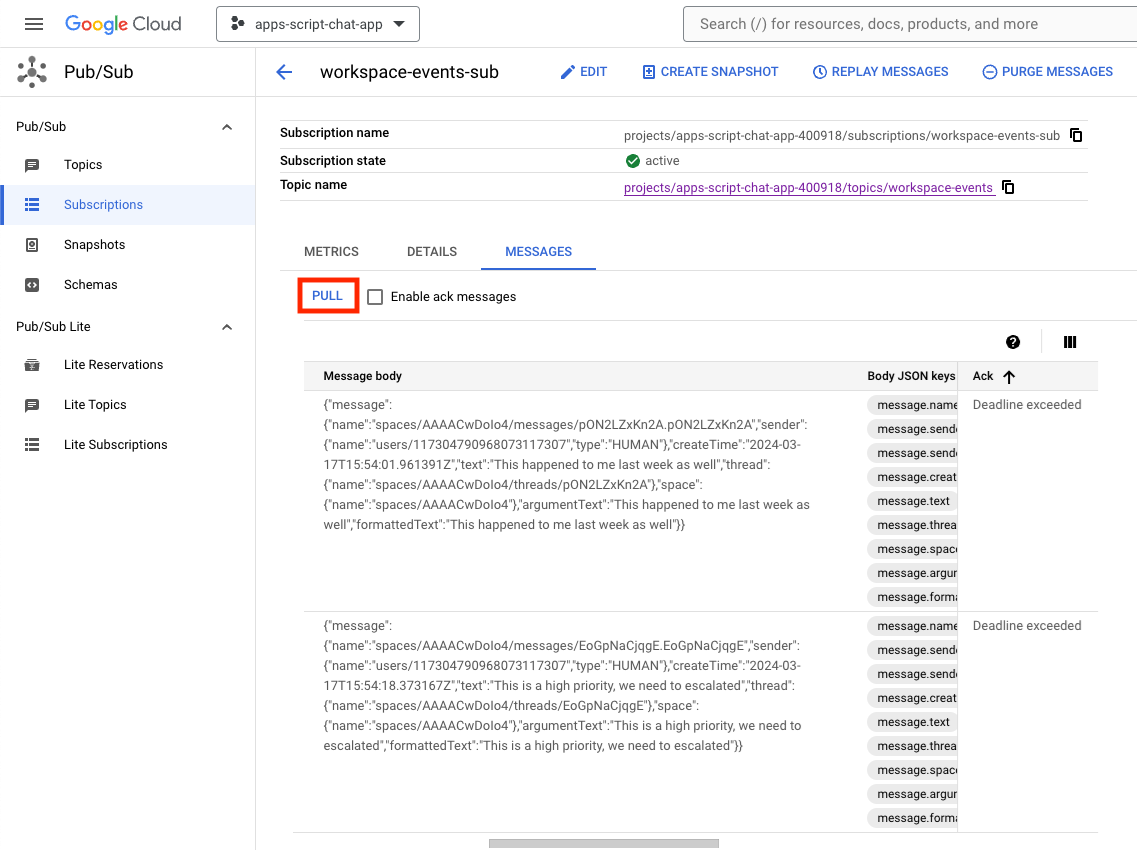
In the Google Cloud console, follow these steps:
- Go to Menu ☰ > Pub/Sub > Subscriptions.
- Select the subscription workspace-events-sub.
- Select the Messages tab.
- Click Pull. The table displays the messages related to what you sent to the newly created space.
In the Apps Script console, follow these steps:
- Select your project.
- Select Editor.
- Select the
WorkspaceEvent.gsfile. - Select
processSubscriptionin the Run section. - Click
Run.You can see from the execution log that messages were processed.

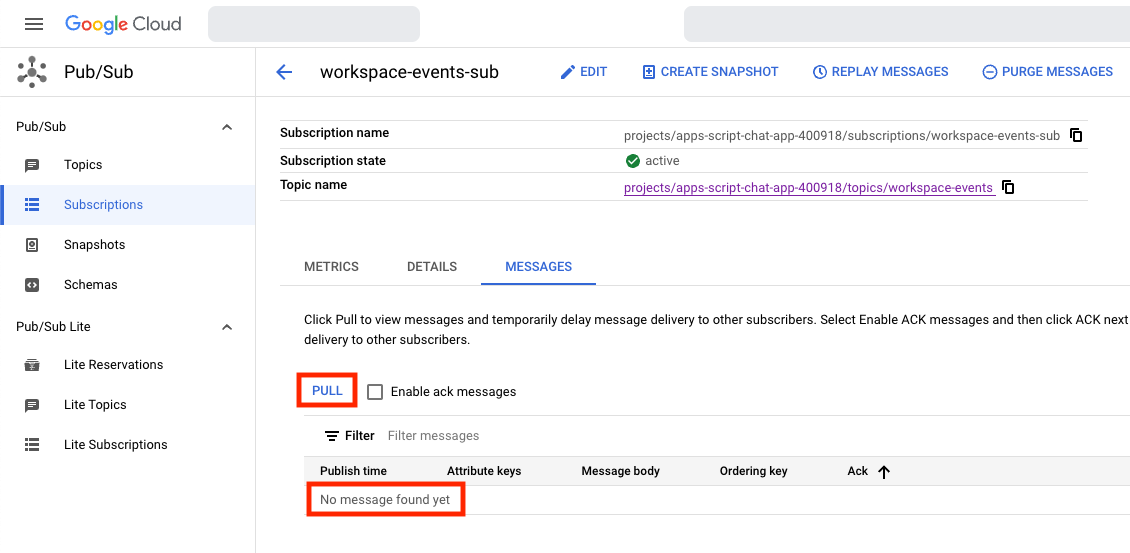
In the Google Cloud console, follow these steps:
- Go to Menu ☰ > Pub/Sub > Subscriptions.
- Select the subscription workspace-events-sub.
- Select the Messages tab.
- Click Pull. The table no longer displays the messages related to what you sent to the newly created space.
- In Google Chat, in the space dedicated to the third issue that you created with the slash command
/create, send a few more messages that discuss the issue.
In the Google Cloud console, follow these steps:
- Go to Menu ☰ > Pub/Sub > Subscriptions.
- Select the subscription workspace-events-sub.
- Select the Messages tab.
- Click Pull. The table doesn't display the messages related to what you sent to the newly created space.
6. Optional: App 1: Add inclusivity help
Review concepts
Gen AI prompting is the art of crafting instructions or questions to guide a generative AI model toward the specific type of desired output. A common practice is to gate answers by adding rules and conditions in the prompts. This can help make the output safe, relevant, consistent, and aligned with expectations.
Review flows
Process subscriptions (update)

Review source code
The Apps Script project needs to be edited.
WorkspaceEvent.js
// Edits the function to replace logging by an actual card message.
function processSubscription() {
...
for (var messageIndex in messages) {
...
} else if (ceType === "google.workspace.chat.message.v1.created") {
...
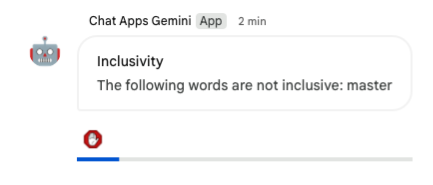
const inclusivityCheck = getInclusivityFeedback(chatMessage.text);
if (inclusivityCheck !== "It's inclusive!") {
createAppMessageUsingChatService({
cardsV2: [{ cardId: "1", card: { header: {
title: "Inclusivity",
subtitle: `The following words are not inclusive: ${inclusivityCheck}`
}}}]
},
chatMessage.space.name);
}
...
}
...
}
...
}
VertexAi.js
/**
 * Gets feedback on inclusivity for a text with the Gemini Pro model using
 * Vertex AI API.
 *
 * Returns "It's inclusive!" when it is otherwise a list of word(s) that might not
 * be optimal.
 *
 * @param {string} text the text
 * @return {string} the feedback
 */
function getInclusivityFeedback(text) {
  const url = `https://${VERTEX_AI_LOCATION_ID}-aiplatform.googleapis.com/v1`
    + `/projects/${PROJECT_ID}/locations/${VERTEX_AI_LOCATION_ID}`
    + "/publishers/google/models/gemini-1.0-pro:generateContent";
  const options =  {
    method: "POST",
    headers: { Authorization: "Bearer " + ScriptApp.getOAuthToken() },
    contentType: "application/json",
    payload: JSON.stringify({
      contents: {
        role: "user",
        parts: {
          text: "Are there any words that obviously go against inclusivity "
            + "in this text:"
            + `\n\n----------\n${text}\n----------\n\n`
            + "If there are not, answer \"It's inclusive!\" "
            + "otherwise answer by listing them separated by commas. "
            + "Do not answer with any explanation."
        }
      },
      safetySettings: {
        category: "HARM_CATEGORY_SEXUALLY_EXPLICIT",
        threshold: "BLOCK_LOW_AND_ABOVE"
      },
      generationConfig: {
        temperature: 0.2,
        topP: 0.8,
        topK: 40
      }
    })
  };

  return JSON.parse(UrlFetchApp.fetch(url, options).getContentText())
    .candidates[0].content.parts[0].text;
}
Update Apps Script project
In your local environment, follow these steps:
- Change the current directory in your terminal to
issue-management/4-inclusivity-help. It contains the source code you that you need. - Copy the
issue-management/3-message-monitoring/.clasp.jsonfile to your current directory. - Copy the
issue-management/3-message-monitoring/Configuration.jsfile to your current directory so that it replaces the existing one. - Run the following command:
clasp push
Try it
In Google Chat, follow these steps:
- Send a direct message with the slash command
/createto the app. The app opens a dialog. - Set Title to
Issue Title 4. - Set Description to Issue
Description 4. - Click Create.
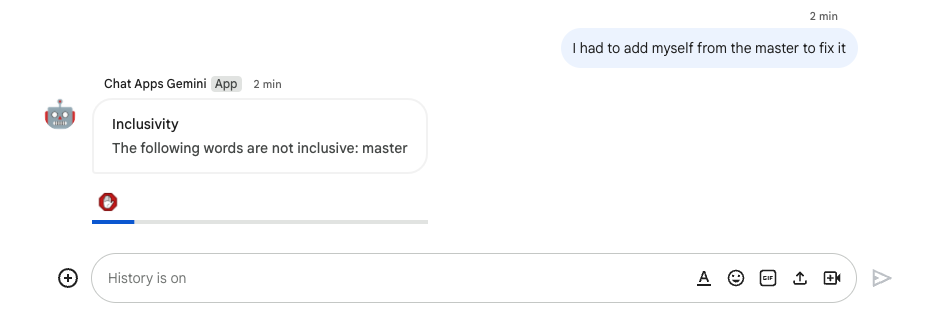
- In the newly created space, send
It happened to me last week as well.
In the Apps Script console, follow these steps:
- Select your project.
- Select Editor.
- Select the
WorkspaceEvent.gsfile. - Select
processSubscriptionin the Run section. - Click Run. You can see from the execution log that messages were processed.
In Google Chat, follow these steps:
- Notice that the app didn't send any inclusivity help in the newly created space.
- In the newly created space, send the message
I had to add myself from the master to fix it.
In the Apps Script console, follow these steps:
- Select your project.
- Select Editor.
- Select the
WorkspaceEvent.gsfile. - Select
processSubscriptionin the Run section. - Click Run. You can see from the execution log that messages were processed. In Google Chat, the app sent an inclusivity help message in the newly created space.

7. Optional: App 1: Add preferences
.
Review concepts
An accessory widget is a borderless widget attached to the bottom of a message sent by an app. This is typically used to enable quick reactions from the user in the specific context of messages. Technically, it's based on the same core principles as card buttons.
Review flows
Disable inclusivity help

Review source code
The Apps Script project needs to be edited.
ChatApp.js
// Edits the function to handle the inclusivity help disablement action for a
// given space.

function onCardClick(event) {
  ...
  if (event.action.actionMethodName === "disableInclusivityHelp") {
    disableInclusivityHelp(event.common.parameters.spaceId);
  }
}
Storage.js
// Edits the function to keep track of the inclusivity help setting.

function saveCreatedIssue(title, description, spaceId, subscriptionId) {
  appProperties.setProperty(spaceId, JSON.stringify({
    ...
    inclusivityHelp: true,
    ...
  }));
  ...
}
/**
 * Disables inclusivity help in a space.
 *
 * @param {string} spaceId the ID of dedicated space of the issue
 */
function disableInclusivityHelp(spaceId) {
  var issue = JSON.parse(appProperties.getProperty(spaceId));
  issue.inclusivityHelp = false;
  appProperties.setProperty(spaceId, JSON.stringify(issue));
}
/**
 * Checks whether the app should help with inclusivity in a given space.
 *
 * @param {string} spaceId the ID of dedicated space of the issue
 * @return whether the app should help with inclusivity
 */
function shouldHelpWithInclusivity(spaceId) {
  return JSON.parse(appProperties.getProperty(spaceId)).inclusivityHelp;
}
WorkspaceEvent.js
// Edits the function to display the accessory widget to the existing card message.

function processSubscription() {
  ...
  for (var messageIndex in messages) {
    ...
    } else if (ceType === "google.workspace.chat.message.v1.created") {
      ...
      if (... && shouldHelpWithInclusivity(chatMessage.space.name)) {
        createAppMessageUsingChatService({
          ...
          accessoryWidgets: [{ buttonList: { buttons: [{
            altText: "Disable inclusivity help",
            icon: {
              iconUrl: "https://upload.wikimedia.org/.../Stop_hand_rugen.png"
            },
            onClick: { action: {
              function: "disableInclusivityHelp",
              parameters: [{
                key: "spaceId",
                value: chatMessage.space.name
              }]
            }}
          }]}}]
        }, ...);
        ...
      }
      ...
    }
    ...
  }
  ...
}
Update Apps Script project
In your local environment, follow these steps:
- Change the current directory in your terminal to
issue-management/5-disable-help. It contains the source code that you need. - Copy the
issue-management/4-inclusivity-help/.clasp.jsonfile to your current directory. - Copy the
issue-management/4-inclusivity-help/Configuration.jsfile to your current directory so that it replaces the existing one. - Run the following command:
clasp push
Try it
Disable help
- In Google Chat, in the space dedicated to the fourth issue that you created with the slash command
/create, send the messageI had to add myself from the master to fix.
In the Apps Script console, follow these steps:
- Select your project.
- Select Editor.
- Select the
WorkspaceEvent.gsfile. - Select
processSubscriptionin the Run section. - Click Run. You can see from the execution log that messages were processed.
In Google Chat, follow these steps:
- Notice that the app sent a message with inclusivity help to the space dedicated to the issue with an accessory widget.
- Click the accessory widget to disable inclusivity help.
Check disablement
- In Google Chat, in the space dedicated to the fourth issue that you created with the slash command
/create, send the messageI had to add myself from the master to fix.
In the Apps Script console, follow these steps:
- Select your project.
- Select Editor.
- Select the
WorkspaceEvent.gsfile. - Select
processSubscriptionin the Run section. - Click Run. You can see from the execution log that messages were processed. In Google Chat, the app didn't send a message with inclusivity help to the space dedicated to the issue because it was disabled.

8. App 2: Build
Review concepts
Gen AI grounding
It's about making AI models more factual and reliable by connecting them to verifiable sources of knowledge. This technique helps prevent AI from inventing information and can help make responses contextually relevant and less biased.
Natural language
Any language spoken or written by humans for everyday communication, in contrast to artificial or computer-based languages.
Cloud Storage
Cloud Storage allows worldwide storage and retrieval of any amount of data at any time. It can be used for a range of scenarios, including serving website content, storing data for archival and disaster recovery, or distributing large data objects to users through direct download.
Dialogflow CX data store
Dialogflow CX integrates with data stores that are collections of websites and documents used by data store agents to find answers for end user's questions from specific data. For a given question, the data store agent searches for an answer from the given source content and summarizes the findings into a coherent response. It also provides supporting links to the sources of the response for the end user to learn more.
Review architecture

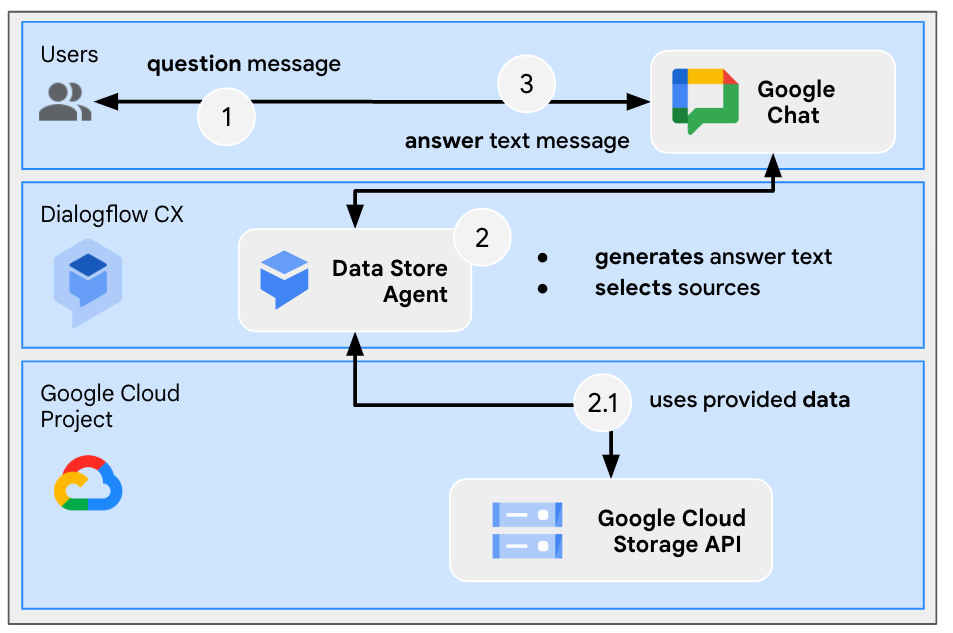
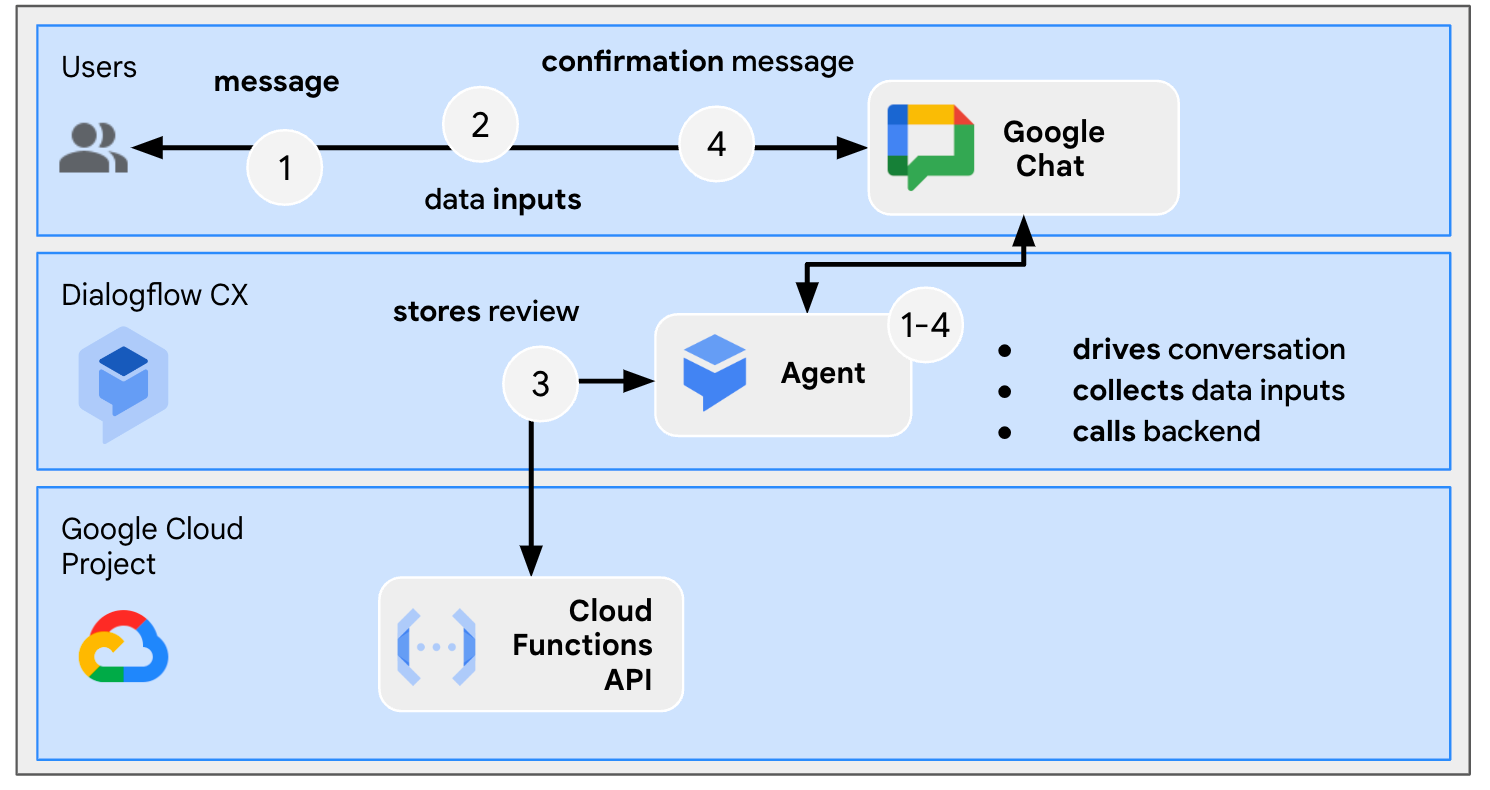
This Google Chat app is built with Dialogflow CX and works as follows:
- A user sends a message to the app, either in a direct message or in a space.
- The app, which is a Dialogflow CX agent and is associated with a Google Cloud project, processes the message.
- The app integrates with a data store located in Cloud Storage.
- The app sends a synchronous response, either in a direct message or in the original space.
Review flows
Answer question
Review source code
The only source that you need isn't code, but rather data that you use for grounding.
google-chat-overview.pdf
Contains the unstructured information of Google Chat apps, a printed version of a page from the Google Workspace developers website.
Update Google Cloud project
In the Google Cloud console, follow these steps:
- Enable the Dialogflow and Cloud Storage APIs.
- Enable the Vertex AI Agent Builder API.
- Click Menu ☰ > APIs & services > Enabled APIs & services and then confirm that all APIS are enabled.
.
Create Dialogflow CX data store agent
Initiate knowledge data
In the Google Cloud console, follow these steps:
- Click to Menu ☰ > Cloud Storage > Buckets.
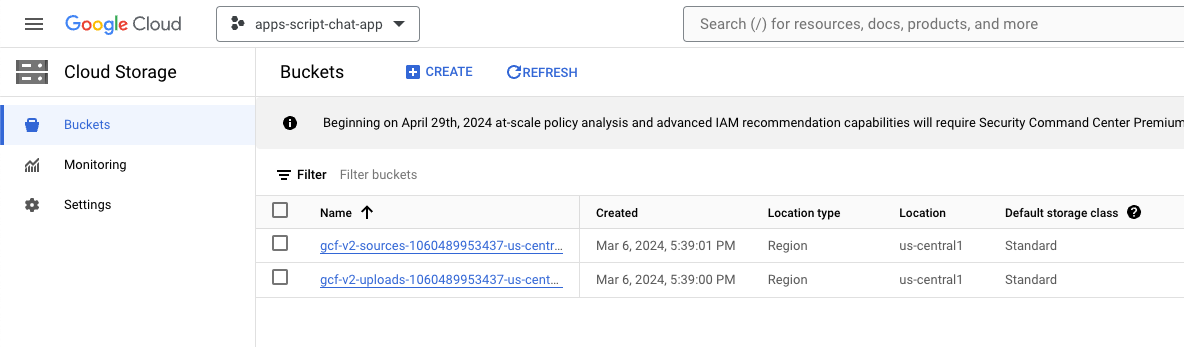
- Click Create.
- Set name to
gchat-knowledge. - Click Create.

- Select the gchat-knowledge bucket.
- Click Upload files.
- Select the
knowledge-app/grounding/google-chat-overview.pdffile from your local environment.

Create app
In the Google Cloud console, follow these steps:
- Click Menu ☰ > Agent builder > Apps.
- Click New app.
- Select the Chat type.

- Set
Company nameto your company name. - Set
Agent nametoknowledge. - Click Continue.

- Click Create new data store.
- Select Cloud Storage as the data source.
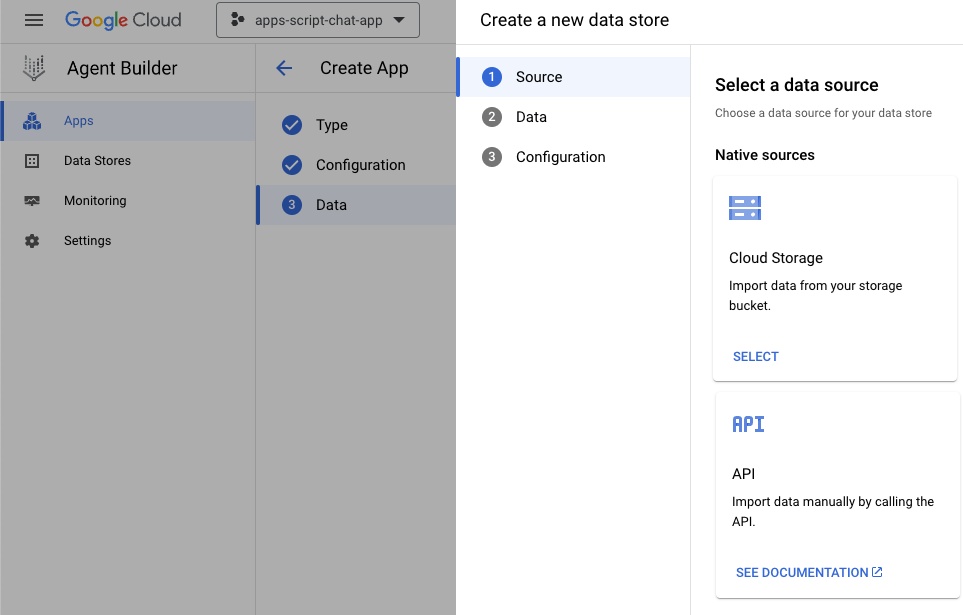
- Select File.
- Click Browse.
- Select the
google-chat-overview.pdffile. - Click Continue.
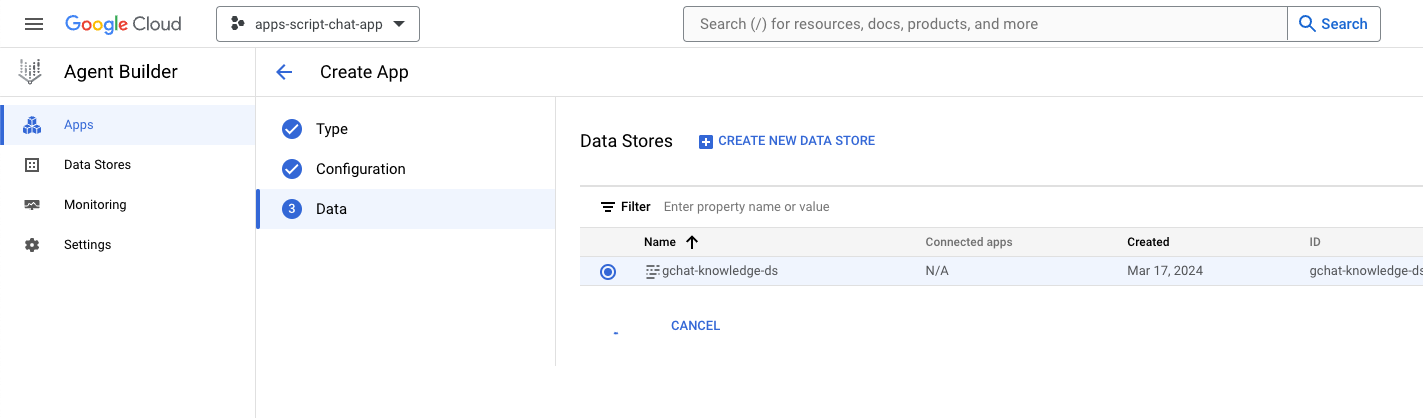
- Set the data store name to
gchat-knowledge-ds. - Click Create.

- Select the gchat-knowledge-ds data store in the table.
- Click Create.
- After a couple of minutes, click Menu ☰ > Agent builder > Apps and notice that you can see the app.

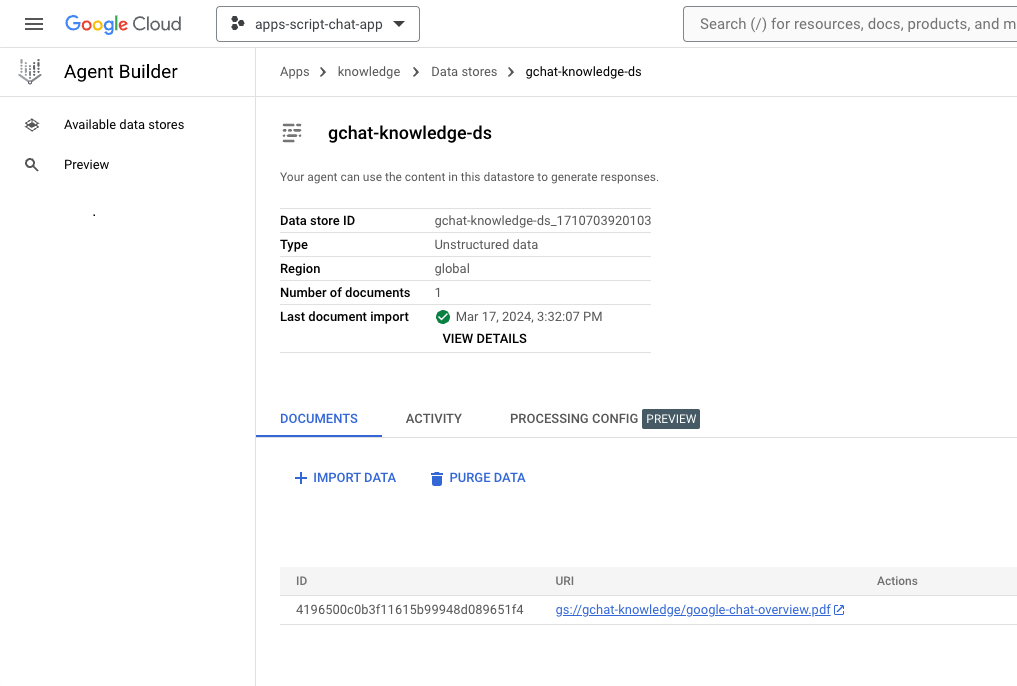
- Click Menu ☰ > Agent builder > Data stores.
- Click the gchat-knowledge-ds data store. The number of documents is
1, which indicates that it's ready.
Complete and test app
In the Dialogflow CX console, follow these steps:
- Select your Google Cloud project.
- Select the knowledge agent.

- Select Agent settings > Generative AI > Generative agent.
- Switch the model from Text Bison to Gemini Pro.
- Click Save.
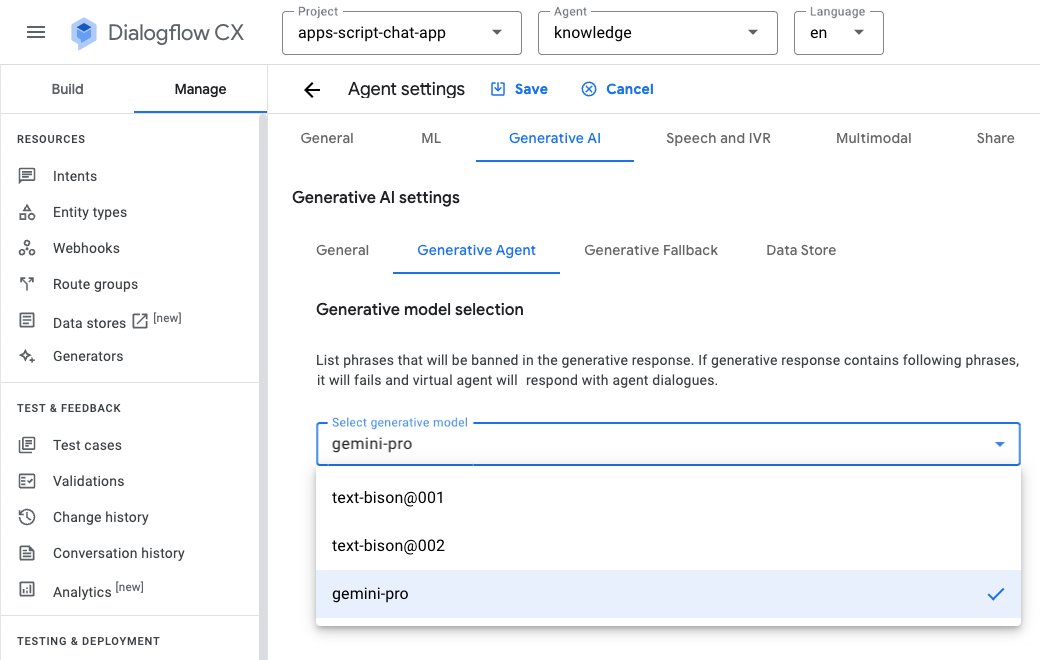
- Click Test agent.
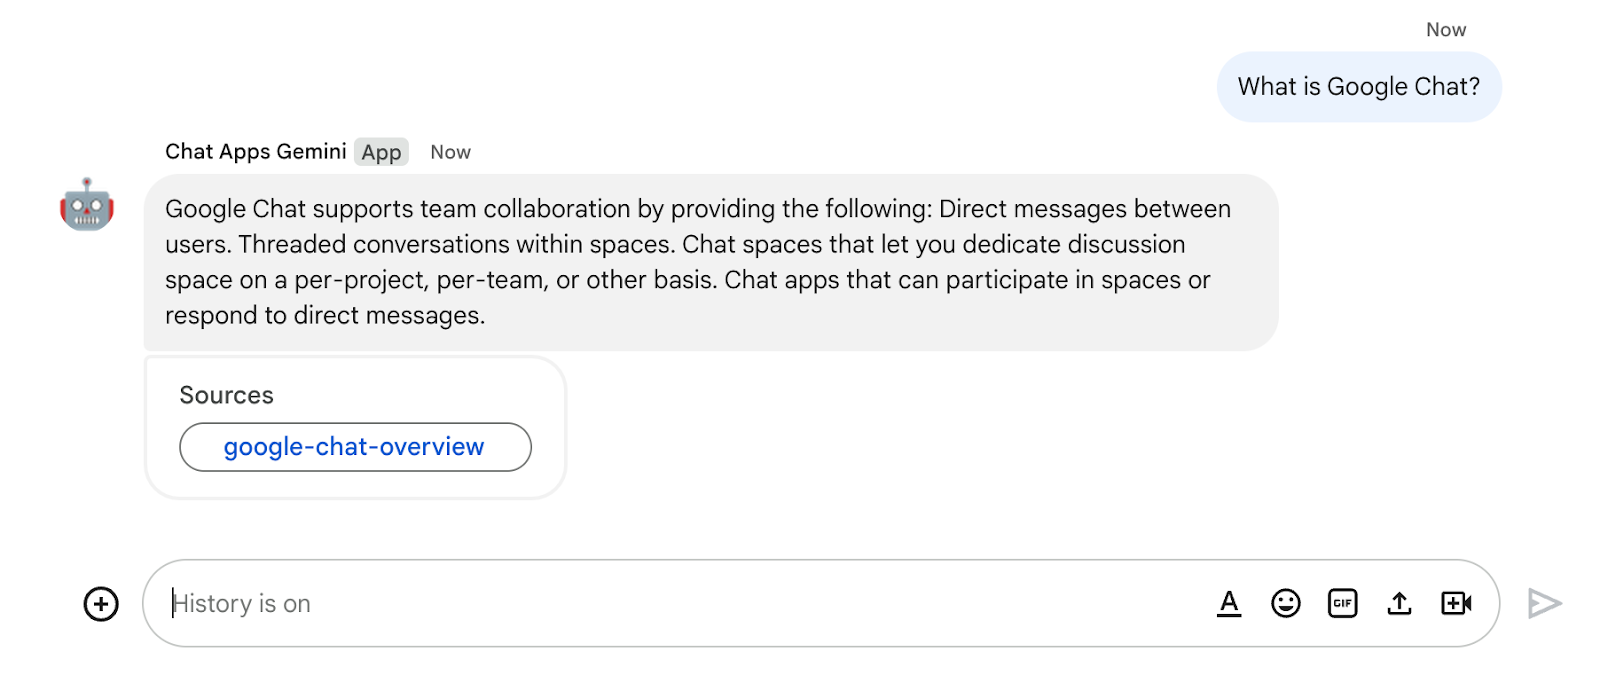
- Send
What is Google Chat?. The agent responds with something meaningful.

Integrate Google Chat app
In the Dialogflow CX console, follow these steps:
- Select your Google Cloud project.
- In the row of the knowledge agent, click
 > Copy name.

In the Google Cloud console, follow these steps:
- Go to Google Chat API configuration.
- Under Connection settings, select Dialogflow.
- Under Dialogflow settings, select Dialogflow CX.
- Set Agent or Environment resource name to the agent name that you copied.
- Remove the two slash commands.

- In Google Chat, send
What is Google Chat?in a direct message to the Google Chat app. The agent responds with something meaningful.

9. Optional: App 2: Add sources
Review concepts
Dialogflow CX webhook
A service that hosts business logic or calls other services. During a Dialogflow CX session, webhooks can rely on the data extracted by natural language processing to generate dynamic responses, validate collected data, or trigger actions on the backend.
Cloud Functions
Cloud Functions are great for building serverless backends, doing real-time data processing, and creating intelligent apps. There are no servers to provision, manage, patch, or update. They automatically scale, and are highly available and fault-tolerant.
Review flows
Answer question (update)

Review source code
The only source code that you need is the function to adapt agent responses to Google Chat messages. It's used as a webhook.
package.json
// The function relies on the Cloud Functions framework to run.

{
  "name": "agent-response-adapter",
  "version": "0.0.1",
  "dependencies": {
    "@google-cloud/functions-framework": "^3.0.0"
  },
  ...
}
index.js
/**
 * Handles all incoming requests.
 *
 * It takes a Dialogflow CX agent response as input and returns a
 * valid Google Chat card message with both the text and source links
 */
functions.http('agent-response-adapter', (request, response) => {
  // Creates Google Chat buttons based on the data store agent response
  // grounding details.
  var linkTitles = [];
  var linkButtons = [];
  const grounding = request.body.messages[1].payload.richContent[0][0];
  if (grounding.type === "match_citations") {
    // Supports citation match type.
    grounding.citations.forEach((citation) => {
      // Avoid duplications.
      if (linkTitles.indexOf(citation.title) < 0) {
        linkButtons.push({
          text: citation.title,
          onClick: { openLink: {
            url: citation.actionLink
          }}
        });
        linkTitles.push(citation.title);
      }
    });
  } else if (grounding.type === "info") {
    // Supports info type.
    if (linkTitles.indexOf(grounding.title) < 0) {
      linkButtons.push({
        text: grounding.title,
        onClick: { openLink: {
          url: grounding.actionLink
        }}
      });
      linkTitles.push(grounding.title);
    }
  }

  // Sends the Dialogflow CX fulfillment response to replace the agent response
  // with the Chat message with text and source buttons.
  response.send({ fulfillment_response: {
    merge_behavior: "REPLACE",
    messages: [{ payload: {
      // Reuses the original data store agent response text.
      text: request.body.messages[0].text.text[0],
      cardsV2: [{
        cardId: "sourcesCard",
        card: { sections: [{
          header: "Sources",
          widgets: [{ buttonList: {
            buttons: linkButtons
          }}]
        }]}
      }]
    }}]
  }});
});
Update Google Cloud project
In the Google Cloud console, follow these steps:
- Enable the Cloud Build, Cloud Functions, Cloud Logging, Artifact Registry, and Cloud Run APIs.
- Click Menu ☰ > APIs & services > Enabled APIs & services and then confirm that the APIs are enabled.
Update Dialogflow CX data store agent
You need to deploy a Cloud Function and update the Dialogflow CX webhook to trigger it with multiple sources when possible.
Return multiple sources
By default, a new data store agent only returns one source at maximum, but you can change for more.
In the Dialogflow CX console, follow these steps:
- Select your Google Cloud project.
- Select the knowledge agent.
- Select Start page.
- Select Edit data stores.
- Under the Agent responses section, set Data store response options to
5. - Click Save.
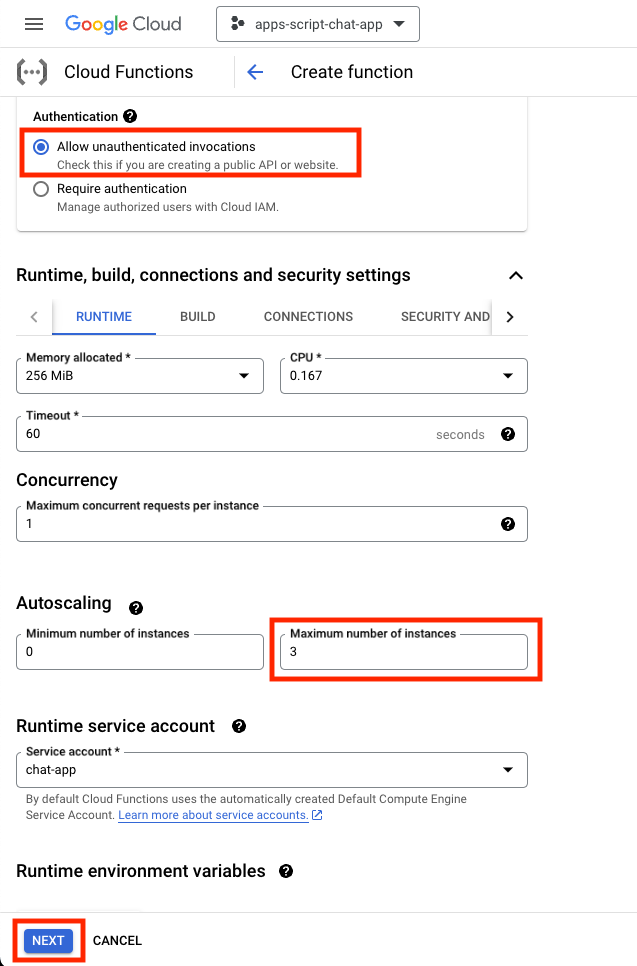
Initiate Cloud Function
In the Google Cloud console, follow these steps:
- Click Menu ☰ > Cloud Functions.
- Click on Create function.
- Under Basics, set name to
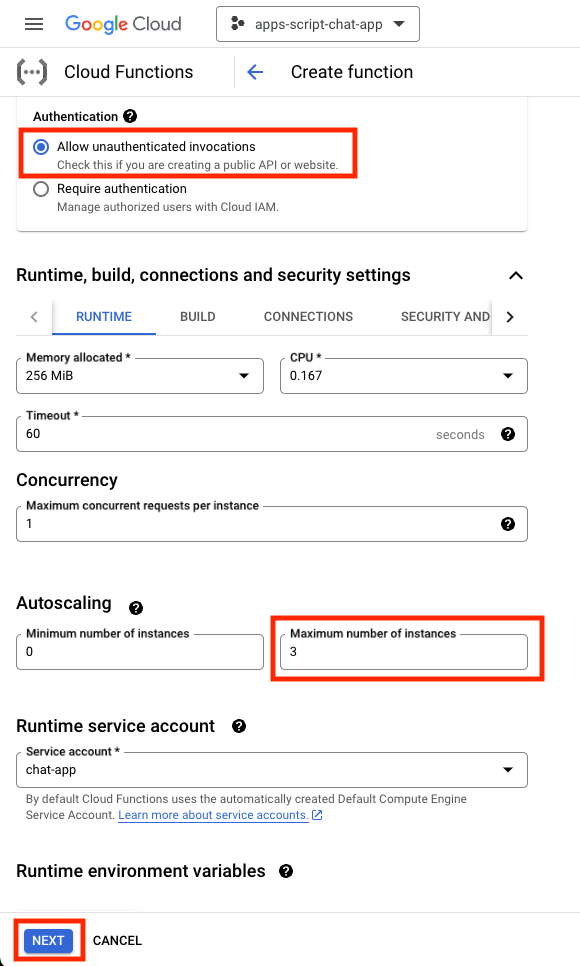
function-1. - Under Authentication, select the Allow unauthenticated invocations radio button.
- Under Runtime, build, connections and security settings, set Maximum number of instances to
3. - Click Next.
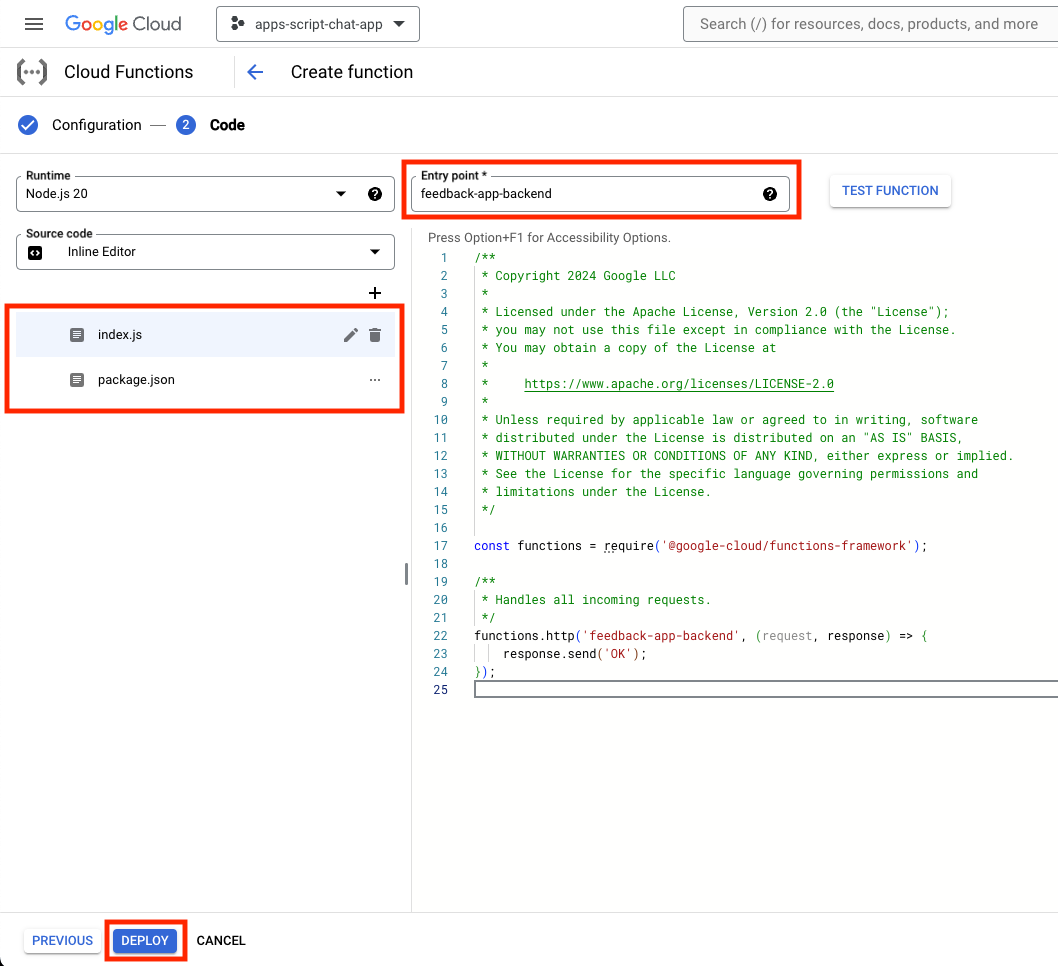
- Set Entry point to
agent-response-adapter. - Replace the default content with the files located in the
knowledge-app/agent-response-adapterdirectory. - Click Deploy.
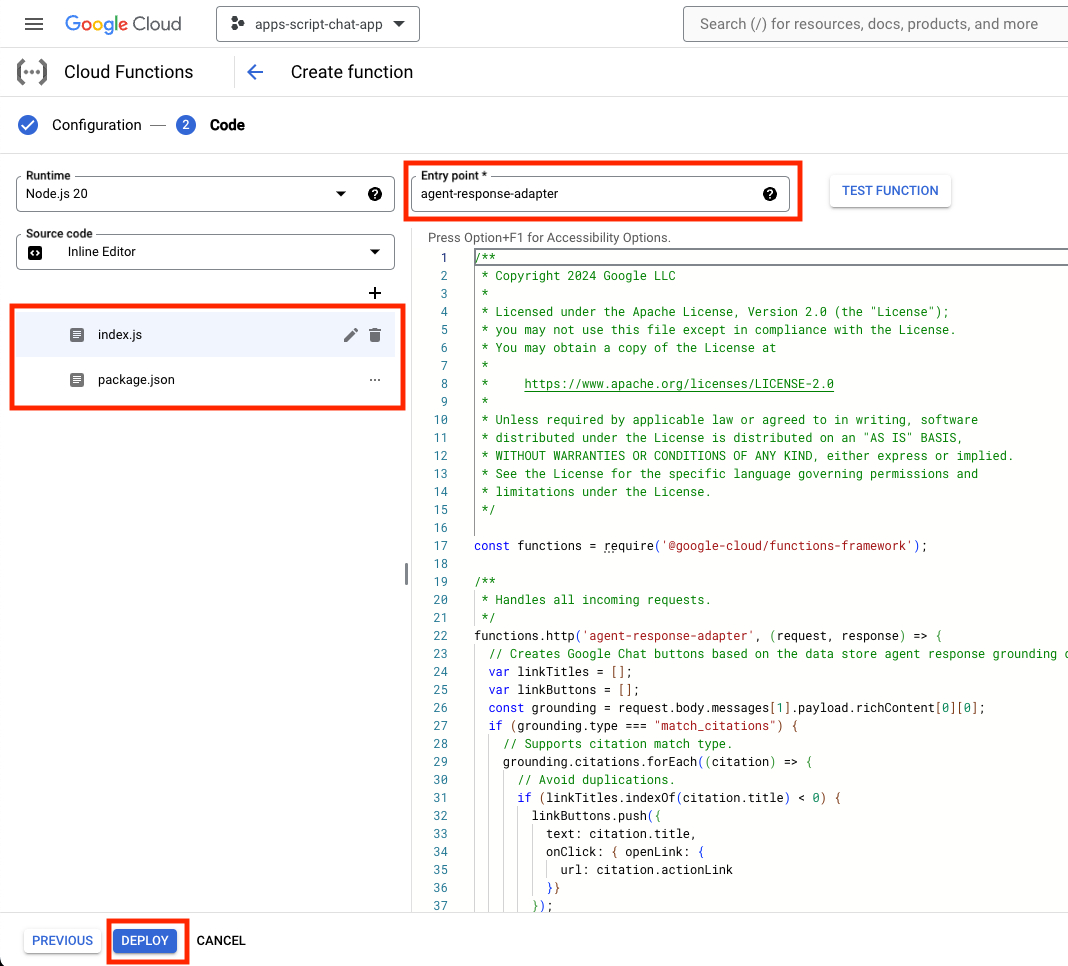
- Copy the URL while you wait a couple minutes for the function to deploy.

Initiate webhook
You need to configure the Dialogflow CX agent to use a webhook that triggers the newly deployed function.
In the Dialogflow CX console, follow these steps:
- Select your Google Cloud project.
- Select the knowledge agent.
- Select Manage > Webhooks > Create.
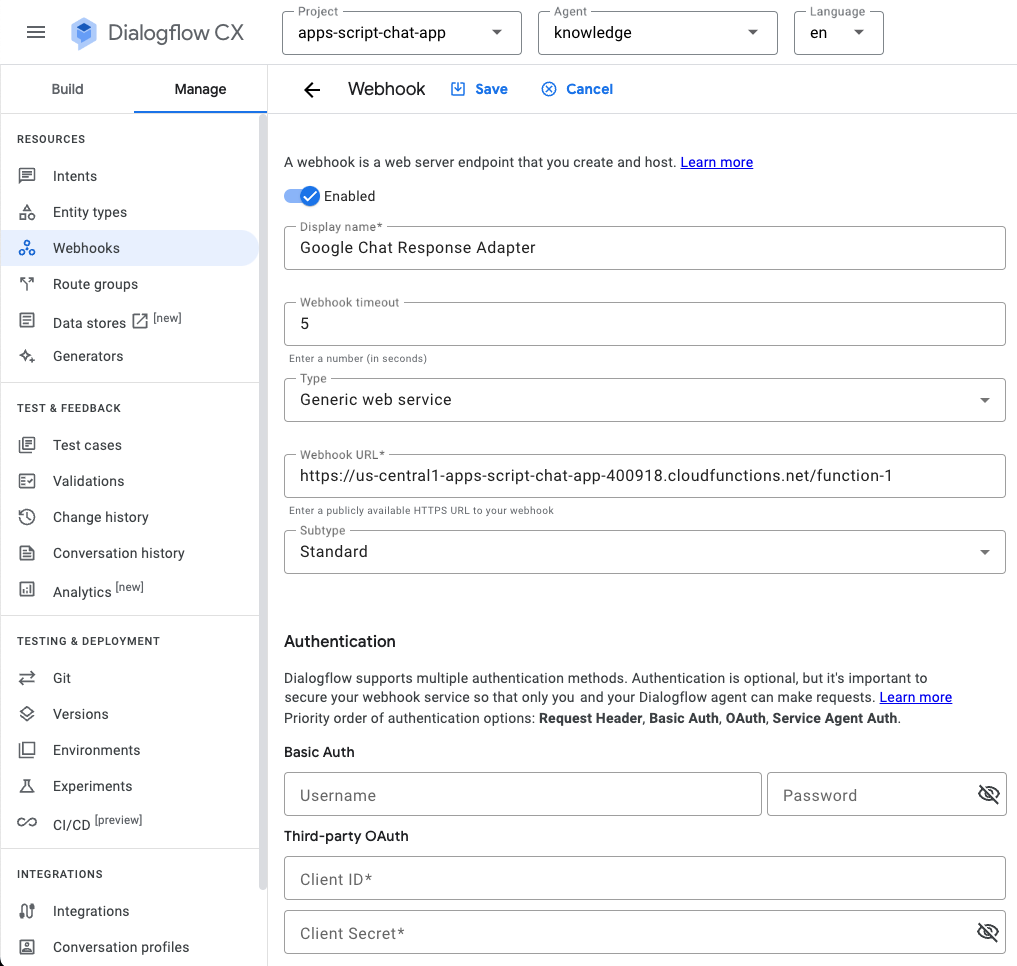
- Set Display name to
Google Chat Response Adapter. - Set Webhook URL to the URL that you copied previously.
- Click Save.
- Click Build.
- Select Start page.
- Select Edit data stores.
- Under Webhook settings, click the Enable webhook toggle.
- Select Google Chat Response Adapter for Webhook.
- Set tag to
arbitrary_tag. - Click Save.

Test app
- In Google Chat, send
What is Google Chat?in a direct message to the Google Chat app. The agent responds with something meaningful and a card with sources, if any.
10. App 3: Build
Review concepts
Conversational interactions
They are the back-and-forth exchanges of information or ideas between two or more people through natural language. This contrasts to technical interfaces that often rely on stateless, highly structured, and intolerant exchanges.
OpenAPI Specification
It provides a consistent means to carry information through each stage of the API lifecycle. It is a specification language for HTTP APIs that defines structure and syntax in a way that is not wedded to the programming language the API is created in. API specifications are typically written in YAML or JSON, allowing for easy sharing and consumption of the specification.
Dialogflow CX agent
The basic building block of agent apps. An agent app typically has many agents, where each agent is defined to handle specific tasks. The agent data is provided to the LLM, so it has the information it needs to answer questions and execute tasks. Each agent can provide information, send queries to external services, or defer conversation handling to a Dialogflow CX flow or another agent to handle sub-tasks.
Dialogflow CX tool
Tools are used to connect agent apps to external systems. These systems can augment the knowledge of agent apps and empower them to execute complex tasks efficiently.
Review architecture
This Google Chat app is built with Dialogflow CX and works as follows:
- A user sends a message to the app, either in a direct message or in a space.
- The app, which is a Dialogflow CX agent and is associated with a Google Cloud project, processes the message.
- The app integrates with an agent.
- The app sends a synchronous response, either in a direct message or in the original space.
Review flows
Collect review
Review source code
The only source code that you need is the function to mock the backend service that the agent uses as a tool.
package.json
// The function relies on the Cloud Functions framework to run.

{
  "name": "feedback-app-backend",
  "version": "0.0.1",
  "dependencies": {
    "@google-cloud/functions-framework": "^3.0.0"
  },
  ...
}
index.js
/**
 * Handles all incoming requests.
 *
 * It always returns OK in plain text.
 */
functions.http('feedback-app-backend', (request, response) => {
    response.send('OK');
});
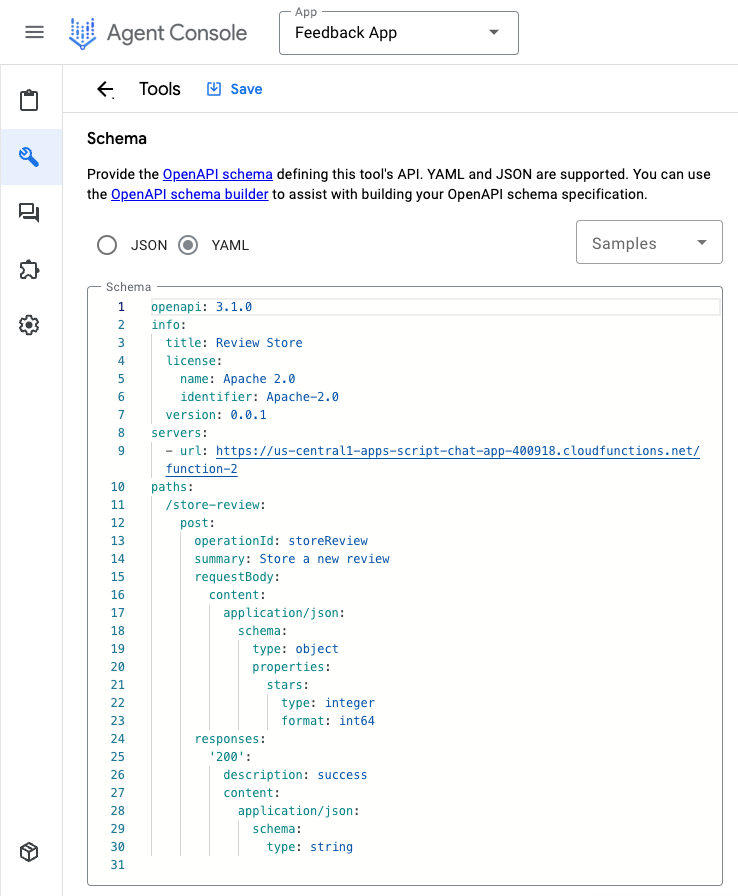
service-openapi.yaml
// Defines the backend service structure and how to request it.

openapi: 3.1.0
info:
  title: Review Store
  license:
    name: Apache 2.0
    identifier: Apache-2.0
  version: 0.0.1
servers:
  - url: https://us-central1-project-0.cloudfunctions.net
paths:
  /store-review:
    post:
      operationId: storeReview
      summary: Store a new review
      requestBody:
        content:
          application/json:
            schema:
              type: object
              properties:
                stars:
                  type: integer
                  format: int64
      responses:
        '200':
          description: success
          content:
            application/json:
              schema:
                type: string
Initiate backend service mock
You deploy a Cloud Function to simulate a backend service that the Dialogflow CX agent app needs to integrate and call as a tool.
In the Google Cloud console, follow these steps:
- Click Menu ☰ > Cloud Functions.
- Click Create function.
- Under Basics, set name to
function-2. - Under Authentication, select the Allow unauthenticated invocations radio button.
- Under Runtime, build, connections and security settings, set Maximum number of instances to
3. - Click Next.
- Set Entry point to
feedback-app-backend. - Replace the default content with the files located in the
feedback-appdirectory. - Click Deploy.
- Copy the URL while you wait a couple minutes for the function to deploy.
Create Dialogflow CX agent app
Create app
In the Google Cloud console, follow these steps:
- Click Menu ☰ > Agent builder > Apps.
- Click New app.
- Select Agent.
- Set Display name to
Feedback App. - Click Create.

Initiate tool
In the Google Cloud console, follow these steps:
- Click Menu ☰ > Agent builder > Apps.
- Select the Feedback App agent.
- Click Tools > + Create.
- Set Name to
review. - Select OpenAPI.
- Set description to the following value:
The tool takes the number of stars as a parameter of the store review method and saves it in a database for later use.
- Replace
$URLin thefeedback-app/service-openapi.yamlfile with the URL that you copied previously. - Set
YAML Schemato the edited content of thefeedback-app/service-openapi.yamlfile. - Click Save.
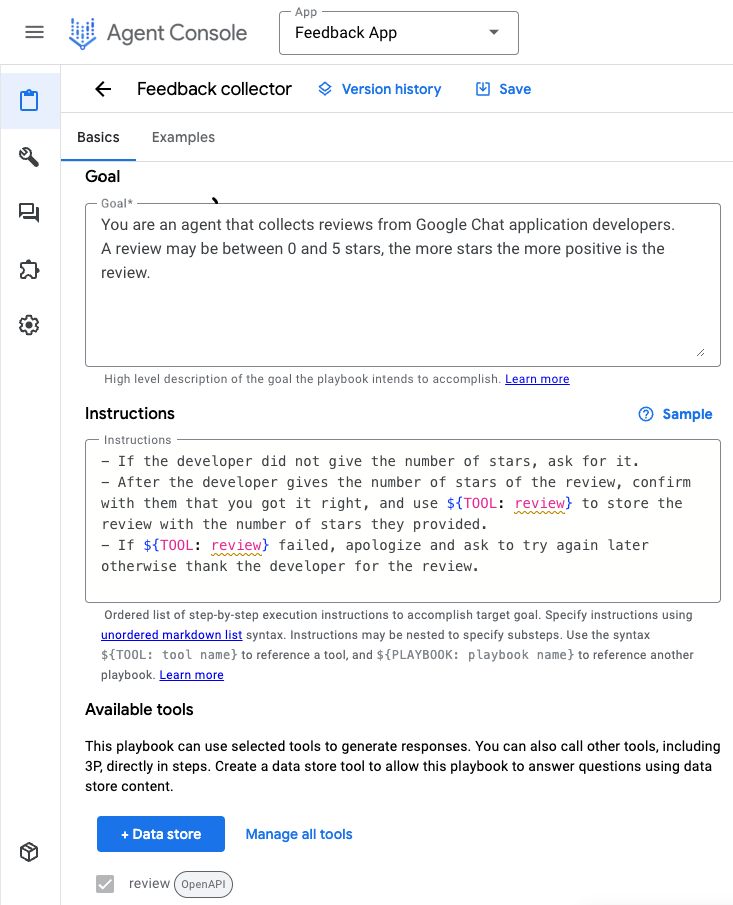
Initiate agent
In the Google Cloud console, follow these steps:
- Click Menu ☰ > Agent builder > Apps.
- Select the Feedback App agent.
- Select Agents > Default Generative Agent.
- Set Agent name to
Feedback collector. - Set
goalto the following value:
You are an agent that collects reviews from Google Chat app developers.
A review may be between 0 and 5 stars. The more stars, the more positive the review.
- Set instructions to the following value:
If the developer didn't provide the number of stars, ask for the number of stars.
After the developer provides the number of stars of the review, confirm the number with the developer and use ${TOOL: review} to store the review with the number of stars.
If ${TOOL: review} fails, apologize and ask to try again later. Otherwise, thank the developer for the review.
- Click Save.
Test app
In the Google Cloud console, follow these steps:
- Click Menu ☰ > Agent builder > Apps.
- Select the Feedback App agent.
- Go to Preview agent.
- Under Agent, select Feedback collector.
- Under Select generative model, select gemini-pro.
- Send the message
Hello!to start.

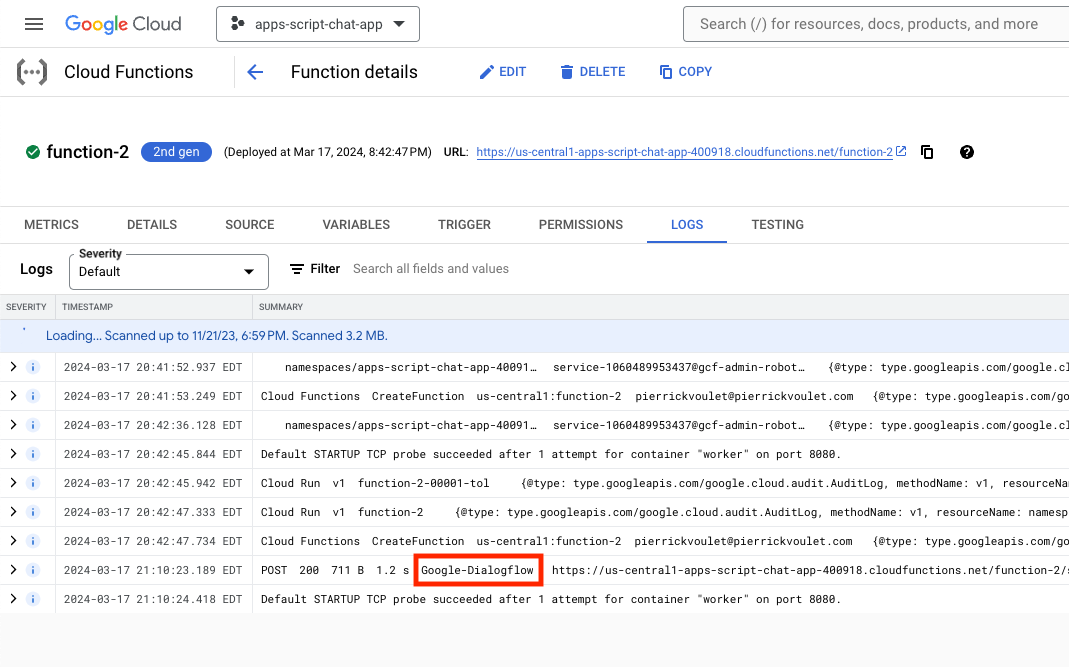
In the Google Cloud console, follow these steps:
- Click Menu ☰ > Cloud Functions.
- Select function-2 > Logs. Some logs show Google-Dialogflow as caller.
Integrate Google Chat app
In the Dialogflow CX console, follow these steps:
- Select your Google Cloud project.
- Click the action menu of the
Feedback Appagent. - Click Copy name.
In the Google Cloud console, follow these steps:
- Go to the Google Chat API configuration.
- Set Agent or Environment resource name to the agent name that you copied previously.
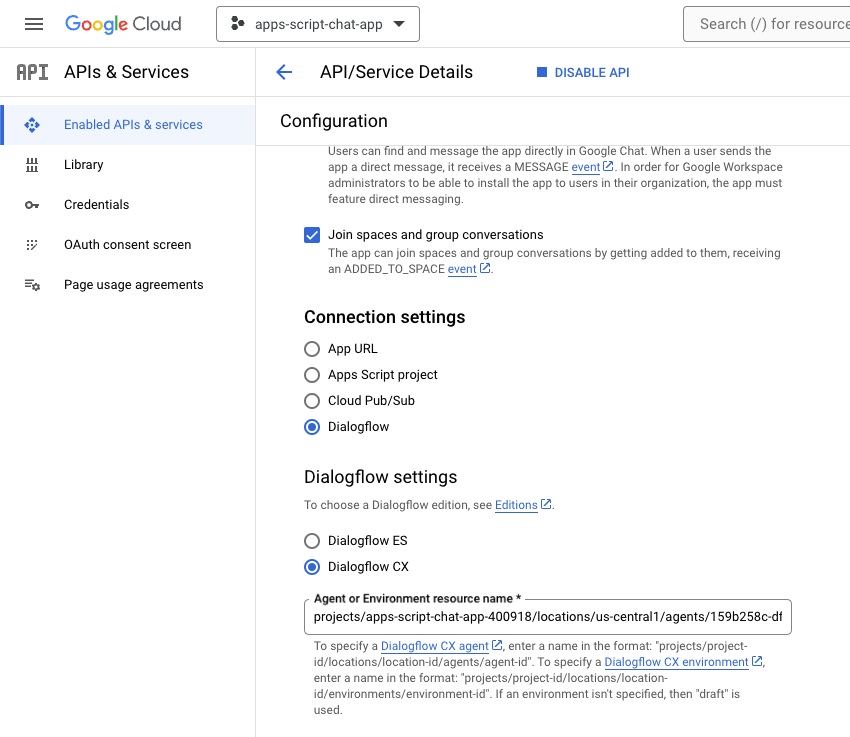
- In Google Chat, send
Hello!in a direct message to the Google Chat app to start. The agent responds similarly to your test from the Dialogflow CX console.
11. Clean up
Delete Google Cloud project
To avoid incurring charges to your Google Cloud Account for the resources used in this codelab, we recommend that you delete the Google Cloud project.
In the Google Cloud console, follow these steps:
- Click Menu ☰ > IAM & Admin > Settings.
- Click Shut down.
- Enter the project ID.
- Click Shut down anyway.

Delete Apps Script project
We recommend that you delete your Apps Script project, too.
In the Apps Script console, follow these steps:
- Select your project.
- Click the action menu.
- Click Remove.
12. Congratulations
Congratulations! You built Google Chat apps with Gemini!
What's next?
We only showcased simple use cases in this codelab, but there are plenty of expansion areas that you might want to consider in your Google Chat apps, such as the following:
- Integrate with other Generative AI models, including customs.
- Support other types of media, such as audio, image, and video.
- Use multimodality.
- Rely on longer context windows and feedback loops.
- Publish production-ready Google Chat apps on the marketplace. There are plenty of resources available for developers such as YouTube videos, documentation websites, code samples, and tutorials.
- Enable Google Chat for your organization. The import mode feature makes it easier to get started.
Learn more
- Developers documentation website for Google Chat
- Google Chat and Dialogflow CX integration
- GitHub repository for all Google Chat samples
- Google Chat import mode
- Developers documentation website for Apps Script
- Google Workspace Developers YouTube channel
- Google Cloud Developer Center
- Generative AI on Vertex AI
- Generative AI Models
- Generative AI Custom Models
- Generative AI multimodality
- Generative AI long context windows
- Generative AI feedback loop